When buyers begin searching for a home, location is often one of the first things they consider.
For some buyers, that may include proximity to work, parks, shopping, recreation or family.
For others, school district boundaries are an important part of the search.
If you’re a homeowner in Cerritos, you may have wondered:
“Does being within ABC Unified School District attract more buyers to my home?”
Potentially—but no single factor determines how much buyer demand a property will receive.
School district location can influence the way certain buyers search for homes, but price, property condition, neighborhood, inventory, interest rates and current market conditions all play important roles as well.
Here’s what Cerritos homeowners should know about school districts and buyer demand.
•••••••••••••••••••••
Homebuyers don’t all search for homes the same way.
Some start with a city.
Others begin with:
A buyer who has identified a particular school district as one of their priorities may focus their search on properties within that district’s boundaries.
That means a home verified as being within ABC Unified School District (ABCUSD) may be relevant to buyers specifically searching within ABCUSD.
However, school district location is only one part of what ultimately determines whether buyers are interested in a particular property.
•••••••••••••••••••••
ABC Unified School District serves communities in southeast Los Angeles County, including Artesia, Cerritos and Hawaiian Gardens, as well as portions of Lakewood, Long Beach and Norwalk.
Buyers researching Cerritos and surrounding communities may encounter ABCUSD during the home-search process and decide that district boundaries are one of the criteria they want to consider.
A buyer might therefore search for:
Homes in ABC Unified School District
instead of searching only for:
Homes in Cerritos
For homeowners, that means accurately identifying your property’s school district can help provide useful location information to buyers conducting those searches.
It does not mean every buyer prioritizes schools or that ABCUSD guarantees greater demand.
•••••••••••••••••••••
No.
Being within ABC Unified School District does not automatically mean that your home will receive more offers, sell faster or command a higher price.
Buyer demand depends on many factors.
These may include:
School district information may influence the search for some buyers, but it doesn’t replace the fundamentals of pricing, preparation and marketing.
•••••••••••••••••••••
It’s helpful to separate two related questions:
Does the school district affect buyer interest?
and
Does the school district increase the home’s value?
Those aren’t necessarily the same thing.
A verified ABCUSD location may make a property relevant to certain buyers searching specifically within the district.
But the home’s market value should still be evaluated using factors such as recent comparable sales, property size, lot size, condition, upgrades, location and current competition.
There is no automatic dollar amount that can be added to a Cerritos home simply because it is within ABC Unified School District.
•••••••••••••••••••••
If you’re going to include ABC Unified School District in your property’s marketing, accuracy matters.
One of the questions buyers may ask is:
“Which schools are assigned to this address?”
Don’t guess.
ABCUSD attendance information is based on the property’s specific address.
The district provides an official School Search that allows homeowners and buyers to research the schools associated with a property.
ABC Unified School District School Search:
https://www.abcusd.us/apps/pages/index.jsp?uREC_ID=1185677&type=d&pREC_ID=1444428
Enter the complete property address rather than relying solely on the city name, ZIP code or nearby schools.
•••••••••••••••••••••
Another reason to verify school information before selling is that attendance boundaries can change.
ABC Unified School District’s current School Search has been updated to reflect attendance-boundary changes approved by the Board of Education on November 4, 2025.
That means information from:
may not necessarily reflect the property’s current assignment.
When school information will be used in your marketing, verify it directly through ABCUSD.
•••••••••••••••••••••
If the property has been verified as being within ABC Unified School District, you can include that as factual information.
For example:
“Located within ABC Unified School District. Buyers are encouraged to verify current school assignments directly with ABCUSD.”
This tells buyers something useful about the location without making promises about enrollment, school quality or a particular student’s eligibility.
The goal is to provide accurate information that buyers can research further based on their own priorities.
•••••••••••••••••••••
Even when ABCUSD is relevant to certain buyers, it should be only one part of the property’s story.
A strong listing may also highlight:
Different buyers will respond to different features.
The more accurately and completely your marketing presents the property, the easier it becomes for buyers to determine whether it matches what they’re looking for.
•••••••••••••••••••••
School district information can’t overcome an unrealistic asking price.
Even a desirable home in a location buyers are actively searching can struggle if it enters the market significantly above what buyers believe comparable properties support.
Pricing strategy should consider:
What have similar properties actually sold for?
What other homes are buyers comparing with yours right now?
How does your home compare with competing listings?
How quickly are comparable homes selling?
Are similar properties receiving multiple offers, price reductions or extended market time?
School district location may help put your home on a buyer’s radar.
Pricing helps determine whether they take the next step.
•••••••••••••••••••••
Once buyers find the property, presentation matters.
A home that photographs well and shows well can make it easier for buyers to recognize its strongest features.
Depending on the property, preparation might include:
Professional photography and video can then help present those features online.
The goal is to make a strong first impression when buyers encounter the listing.
•••••••••••••••••••••
A home’s location may be desirable, but buyers still need to discover the property.
A comprehensive real estate marketing strategy may include:
More exposure doesn’t guarantee a sale.
But effective marketing gives the property more opportunities to reach buyers who may consider it a match.
•••••••••••••••••••••
For buyers considering Cerritos, the property isn’t the only thing they’re evaluating.
They may also research:
Providing factual information about these features can help buyers better understand the property’s location.
Rather than simply saying the neighborhood is “great” or “perfect for families,” good marketing shows buyers what is actually nearby and lets them decide whether those features are important to them.
•••••••••••••••••••••
There isn’t a single statistic that automatically tells a homeowner, “ABCUSD added this many buyers to your listing.”
Instead, your real estate professional can look at the local market for signs of demand.
That may include:
How many buyers are touring comparable homes?
How quickly are similar properties selling?
Are comparable homes receiving multiple offers?
Are homes closing near, below or above their asking prices?
How many competing homes are currently available?
What have similar properties actually sold for?
This local data provides a much better picture of current demand than relying on assumptions about the school district alone.
•••••••••••••••••••••
If you’re preparing to sell a home in Cerritos, keep the role of ABC Unified School District in perspective.
School district information may matter to some buyers.
But it is not the only thing that matters.
A successful selling strategy combines:
Accurate information.
Market-supported pricing.
Strong property preparation.
Professional presentation.
Broad marketing exposure.
Knowledge of current local buyer activity.
Your goal shouldn’t be to market your home only as an “ABC Unified home.”
It should be to present the complete value and characteristics of the property while making verified school district information available to buyers who consider it important.
•••••••••••••••••••••
They can. Some buyers include school district boundaries among their home-search criteria. However, buyer demand also depends on price, property condition, location, inventory, interest rates and overall market conditions.
ABC Unified School District may be relevant to buyers who specifically include ABCUSD among their property-search criteria. However, being within the district does not guarantee greater buyer demand, multiple offers or a higher sales price.
No. A home’s value is determined by many factors, including comparable sales, location, property size, lot size, condition, upgrades and current market conditions. School district location may be one factor some buyers consider.
Use ABC Unified School District’s official School Search and enter your complete property address:
https://www.abcusd.us/apps/pages/index.jsp?uREC_ID=1185677&type=d&pREC_ID=1444428
Buyers and homeowners should verify current school information directly through ABCUSD when it is important to a real estate decision.
Yes. ABCUSD attendance boundaries can change. The district’s current School Search reflects boundary changes approved by the Board of Education on November 4, 2025.
If your property is verified as being within ABC Unified School District, it can be included as factual information in your marketing. Buyers should be encouraged to verify current school assignments directly with ABCUSD.
No. Buyer demand is influenced by many factors, including price, location, home size, floor plan, lot size, property condition, current competition, mortgage rates and broader housing market conditions.
A local market analysis can review recent comparable sales, active competition, days on market, sale-to-list-price ratios and current buyer activity to help evaluate demand for a property like yours.
A thoughtful strategy may include market-supported pricing, home preparation, professional photography and video, broad online exposure, community-focused marketing and accurate property information. The best strategy depends on the individual property and current market.
•••••••••••••••••••••
If you’re thinking about selling a home in Cerritos, understanding what drives buyer demand is an important part of preparing for the market.
ABC Unified School District may be one factor certain buyers consider, but it works alongside many others.
Your home’s price, location, condition, floor plan, lot, upgrades, neighborhood, competition and current market conditions all influence how buyers respond.
That’s why the strongest selling strategy isn’t based on one feature.
It’s based on understanding the complete property and the current market.
As a local real estate professional familiar with Cerritos and the surrounding ABC Unified communities, I can help you analyze recent comparable sales, current competition and buyer activity to determine how your home may be positioned in today’s market.
From there, we can build a customized pricing and marketing strategy around the features that make your particular property worth considering.
Every home is different.
And understanding what today’s buyers are responding to is one of the first steps toward presenting yours effectively.
••••••••••••••••••••

CHRISTINE ALMARINES
Real Estate Agent | CA Real Estate Group | Caliber Real Estate
📱 714-476-4637
📧 christine@carealestategroup.com
DRE #01412944
Christine Almarines is a top real estate agent in Buena Park and Cerritos helping homeowners sell in Orange County and Los Angeles County.
When buyers begin searching for a home, they’re often looking for much more than the right number of bedrooms, a larger backyard or a particular floor plan.
Location matters, too.
For some households, that includes proximity to parks, recreation, shopping, community resources, convenient transportation routes and a school district that aligns with their educational priorities.
That’s one reason Cerritos, California, and ABC Unified School District (ABCUSD) frequently appear in homebuyers’ searches.
While every buyer has different priorities, Cerritos offers a combination of residential neighborhoods, community amenities, recreation, convenient access throughout Southern California and educational options through ABC Unified School District.
Here’s a closer look at why buyers considering ABCUSD often include Cerritos in their home search.
•••••••••••••••••••••
There isn’t one single reason people choose Cerritos.
For some buyers, ABC Unified School District is an important consideration.
Others may be drawn to Cerritos because of its parks, location, library, shopping, restaurants, community facilities or access to nearby employment centers throughout Los Angeles and Orange counties.
For many buyers, it’s the combination of these features that puts Cerritos on their list.
That distinction is important.
Choosing a home isn’t simply about buying into a school district. It’s about finding a property and community that fit your household’s overall priorities.
•••••••••••••••••••••
One reason many buyers research Cerritos is its connection to ABC Unified School District.
ABCUSD operates elementary, middle and high schools serving communities in southeast Los Angeles County, and buyers who prioritize the district may begin their home search by researching properties within its boundaries.
In 2026, both Cerritos High School and Whitney High School were recognized as California Distinguished Schools, adding to the reasons some buyers research educational options within ABCUSD.
However, buyers should remember an important point:
Living in Cerritos does not mean you should assume a particular school assignment.
School attendance is determined by the property’s address and current attendance boundaries.
•••••••••••••••••••••
Before purchasing a home based on school preferences, verify the individual property address.
ABC Unified School District provides an official School Search that allows buyers to enter a home address and research the schools associated with that property.
ABC Unified School District School Search:
https://www.abcusd.us/apps/pages/index.jsp?uREC_ID=1185677&type=d&pREC_ID=1444428
This is a much better approach than relying solely on:
Attendance boundaries can change, so buyers should verify current information directly with ABCUSD when schools are an important part of their homebuying decision.
•••••••••••••••••••••
While ABC Unified School District may be the reason some buyers initially discover Cerritos, it isn’t the only feature worth considering.
Cerritos also offers a variety of city amenities, recreation facilities, parks, shopping, dining and community resources.
For buyers comparing communities across southeast Los Angeles County and northern Orange County, these everyday features can become just as important as the house itself.
•••••••••••••••••••••
Outdoor recreation is an important part of the Cerritos community.
The city maintains multiple parks and recreational facilities with amenities that vary by location.
For example, Heritage Park includes picnic areas, playground equipment, basketball courts and a softball diamond.
Cerritos Park East includes a community center along with indoor activity spaces and outdoor recreational facilities.
Depending on where you live in Cerritos, residents may have convenient access to parks, playgrounds, athletic facilities and community recreation programs.
For buyers who enjoy spending time outdoors or participating in recreational activities, these amenities can become an important part of evaluating the community.
•••••••••••••••••••••
One of Cerritos’s most recognizable civic amenities is the Cerritos Library, located in the Cerritos Civic Center.
The library offers much more than books.
Available services and spaces include resources for children and teens, study rooms, technology, Wi-Fi, educational materials and community programming.
For households that value learning resources and access to public community spaces, having a city library like this nearby can be another reason to consider Cerritos.
•••••••••••••••••••••
Cerritos also offers convenient access to shopping, dining and everyday services.
Residents can find grocery stores, restaurants, retail centers and other businesses throughout the area, while larger commercial destinations are also nearby.
For many buyers, having everyday conveniences close to home can make a significant difference in how a community fits their lifestyle.
Instead of focusing only on the property itself, it can be helpful to consider:
How far is the grocery store?
Where will I shop?
What restaurants are nearby?
How convenient are daily errands?
These practical questions often become increasingly important once buyers start comparing neighborhoods.
•••••••••••••••••••••
Location is another reason buyers consider Cerritos.
The city is located in southeast Los Angeles County near the Orange County border, making it convenient for people whose daily activities take them into both counties.
Major transportation routes in and around the area provide access to destinations throughout Southern California.
For commuters, the best location depends on where they need to travel regularly, so buyers should evaluate actual drive times and transportation routes based on their own schedules.
But geographically, Cerritos can provide a useful central location for households whose work, relatives or activities are spread across both Los Angeles and Orange counties.
•••••••••••••••••••••
Cerritos includes many established residential neighborhoods with a variety of housing styles.
Depending on the area, buyers may find:
That’s another reason it’s useful to search Cerritos by neighborhood and property characteristics, not simply by city name.
Two Cerritos homes at similar price points can offer very different layouts, lots, locations and renovation histories.
•••••••••••••••••••••
Cerritos also provides residents with a range of public facilities and community resources.
Depending on your interests and location, buyers may consider proximity to:
When comparing communities, these amenities can help buyers understand what daily life may actually look like after they move.
•••••••••••••••••••••
No.
ABCUSD may be one of the reasons some buyers begin researching Cerritos, but the city offers many other features.
Buyers may also be interested in:
Every buyer values these features differently.
That’s why the best home search starts with your specific priorities rather than someone else’s definition of the “perfect” neighborhood.
•••••••••••••••••••••
No.
This is an especially important point for buyers whose primary goal is living within ABC Unified School District.
ABCUSD extends beyond Cerritos.
The district serves Artesia, Cerritos and Hawaiian Gardens, as well as portions of Lakewood, Long Beach and Norwalk.
That means buyers who don’t find the right property in Cerritos may have additional communities to consider while continuing to research homes within ABCUSD boundaries.
Individual addresses should always be verified.
•••••••••••••••••••••
If you’re deciding whether Cerritos is right for you, look at the entire community and property—not just the school district.
Consider factors such as:
How does the home compare with other properties available within your price range?
How long will your actual commute be during the times you typically travel?
Does the layout, lot size, bedroom count and condition work for you?
Visit at different times of day and evaluate the area based on your own preferences.
Are the facilities you expect to use conveniently located?
How close are your everyday destinations?
When schools matter to your decision, verify the specific property address directly through ABCUSD.
Looking at all these factors together can help you make a more informed decision.
•••••••••••••••••••••
Cerritos isn’t one single neighborhood.
Different parts of the city offer different housing styles, lot sizes, street locations, nearby amenities and assigned schools.
A local real estate professional can help you compare homes based on factors such as:
The goal isn’t to tell you which neighborhood or school is “best.”
It’s to give you accurate information about the homes and communities you’re considering so you can decide which property best fits your priorities.
•••••••••••••••••••••
Buyers choose Cerritos for many different reasons. Some consider ABC Unified School District, while others prioritize parks, recreation, Cerritos Library, shopping, dining, transportation access, residential neighborhoods or proximity to both Los Angeles and Orange counties.
Cerritos is one of the communities served by ABC Unified School District. Buyers should still verify the current schools associated with an individual property address through ABCUSD.
Use ABC Unified School District’s official School Search and enter the complete property address:
https://www.abcusd.us/apps/pages/index.jsp?uREC_ID=1185677&type=d&pREC_ID=1444428
Buyers should verify current school information directly with ABCUSD when school assignment is important to the purchase decision.
No. ABC Unified School District also serves Artesia, Hawaiian Gardens and portions of Lakewood, Long Beach and Norwalk.
Cerritos provides parks, recreational facilities, Cerritos Library, community facilities, shopping, dining and access to transportation routes connecting the city with surrounding areas.
Yes. The City of Cerritos operates multiple parks and recreational facilities. Amenities vary by location and include features such as playgrounds, athletic facilities, picnic areas and community-center spaces.
Cerritos Library provides books and media along with study rooms, children’s and teen resources, technology, Wi-Fi and various programs and services.
Whether Cerritos is the right community depends on each household’s priorities. Buyers may want to evaluate housing costs, home styles, commute, parks, recreation, community resources, school options and other factors that matter to them personally before deciding where to buy.
No. A home purchase should take into account the property itself, budget, location, commute, neighborhood, amenities and other priorities in addition to school information. If a particular school matters to you, verify the current assignment directly with ABCUSD before buying.
•••••••••••••••••••••
Choosing where to live involves much more than finding a house with the right number of bedrooms.
It’s about finding a combination of home, location and community that works for you.
For some buyers, ABC Unified School District is an important part of that decision.
Others may be drawn to Cerritos for its parks, library, recreation, shopping, dining, location or established residential neighborhoods.
And for many buyers, it’s a combination of several of these factors.
As a local real estate professional with extensive knowledge of Cerritos and the surrounding communities, I can help you compare available homes, neighborhoods, property features and locations based on the things that actually matter to your household.
If ABC Unified School District is one of your priorities, we can also narrow your search to properties that appear to meet that criterion while making sure you know where to verify current school assignments directly with ABCUSD.
The right home search isn’t about finding someone else’s ideal community.
It’s about finding the home and location that make sense for you.
••••••••••••••••••••
CHRISTINE ALMARINES
Real Estate Agent | CA Real Estate Group | Caliber Real Estate
📱 714-476-4637
📧 christine@carealestategroup.com
DRE #01412944
Christine Almarines is a top real estate agent in Buena Park and Cerritos helping homeowners sell in Orange County and Los Angeles County.
If you’re thinking about selling your home in Cerritos or another community served by ABC Unified School District (ABCUSD), understanding what today’s buyers want can help you prepare a stronger listing and marketing strategy.
For many buyers, finding the right home involves much more than square footage, bedroom count or price.
They may also consider the property’s location, neighborhood, commute, nearby amenities, school district and other factors that affect their day-to-day lifestyle.
If your home is located within ABC Unified School District, buyers may have questions such as:
Which schools are assigned to this home?
Is this property actually within ABCUSD boundaries?
What parks, shopping, dining and community amenities are nearby?
What makes this particular home and location worth considering?
Providing accurate information—and presenting your property well—can make it easier for buyers to understand everything your home has to offer.
•••••••••••••••••••••
Homebuyers don’t all search for properties the same way.
Some begin with a city.
Others begin with a price range, commute or property type.
And some buyers specifically include a school district among their home-search criteria.
That means a buyer may search for:
Homes for sale in ABC Unified School District
rather than simply:
Homes for sale in Cerritos
For sellers whose properties are verified as being within ABCUSD, accurately identifying the district can help provide buyers with useful information about the property’s location.
However, school district information should always be verified before it is included in your home’s marketing.
•••••••••••••••••••••
One of the questions you may hear when selling a home is:
“Which schools are assigned to this address?”
It’s important not to guess.
School attendance boundaries do not necessarily follow city limits, neighborhood names or ZIP codes.
Even when you’ve lived in the home for many years, don’t assume that the schools associated with the property today are necessarily the same schools that served the address in the past.
ABC Unified School District provides an official School Search that allows homeowners and buyers to enter a property address and research the schools associated with that location.
ABC Unified School District School Search:
https://www.abcusd.us/apps/pages/index.jsp?uREC_ID=1185677&type=d&pREC_ID=1444428
Before marketing your home with specific school information, verify the current address through the district.
•••••••••••••••••••••
School information can appear in several places during a real estate transaction.
It may be included in:
Incorrect information can create confusion later.
That’s why I recommend verifying the property address before your marketing launches rather than waiting for a buyer to ask.
ABCUSD’s School Search currently reflects attendance-boundary changes approved by the district’s Board of Education on November 4, 2025.
That is also a good reminder that school boundaries can change over time.
•••••••••••••••••••••
If the property is verified as being within ABC Unified School District, that information can be included factually in your marketing.
For example:
“Located within ABC Unified School District. Buyers are encouraged to verify current school assignments directly with ABCUSD.”
This provides useful information without making promises about enrollment or telling buyers how they should evaluate the schools.
The goal is accuracy.
Buyers can then research school programs, enrollment, boundaries and other educational information based on their own priorities.
•••••••••••••••••••••
Third-party real estate websites often display nearby schools alongside a property listing.
That information can be useful for general research, but it shouldn’t be your only source for confirming assigned schools.
A website may display:
A school being geographically close to the property doesn’t necessarily mean it is assigned to that address.
For current ABCUSD attendance information, use the district’s official School Search.
•••••••••••••••••••••
The house itself is obviously important.
But buyers are also evaluating what it may be like to live in the area.
Depending on the property and location, buyers may consider:
Strong marketing helps buyers understand both the home and its location.
•••••••••••••••••••••
There is a difference between highlighting objective community features and making assumptions about who should live there.
Good property marketing can say:
“Conveniently located near Cerritos Towne Center.”
“Minutes from local parks and recreation.”
“Convenient access to the 91 and 605 freeways.”
“Located within ABC Unified School District; buyers should verify current school assignments.”
These are factual characteristics buyers can evaluate for themselves.
The strongest marketing gives people useful information and lets them decide whether the property fits their needs.
•••••••••••••••••••••
Before buyers read the description, research the neighborhood or ask about schools, they’ll usually see your home.
First impressions matter.
Depending on the property’s condition, preparing your home for sale might include:
Trim landscaping, clean walkways, remove clutter and make the entrance feel inviting.
Reducing unnecessary items can help rooms feel more spacious and allow buyers to focus on the home itself.
Small deferred-maintenance issues may distract buyers from otherwise desirable features.
Clean floors, windows, kitchens, bathrooms and frequently overlooked areas.
Open blinds or curtains where appropriate and replace burned-out light bulbs.
Patios, yards and entertaining areas can become important selling features when they’re presented well.
The goal isn’t necessarily to remodel your entire house.
It’s to present the home in a way that helps buyers see its strengths.
•••••••••••••••••••••
Many buyers will see your home online before they ever step inside.
That means your property’s digital presentation is often its first showing.
Professional photography can help showcase:
The photographs should help buyers quickly understand the home’s strongest features and encourage them to learn more.
•••••••••••••••••••••
Putting a home into the MLS is important, but today’s real estate marketing can extend well beyond a single listing platform.
Depending on the property, a comprehensive marketing plan might include:
The objective is to create multiple opportunities for qualified buyers to discover your home.
•••••••••••••••••••••
Real estate marketing increasingly happens through search.
A buyer may search Google for:
homes for sale in Cerritos
homes in ABC Unified School District
Cerritos homes near parks
or another location-specific question.
That’s why good real estate marketing can extend beyond the MLS description itself.
Neighborhood guides, community pages, educational blog posts and optimized property pages can help buyers learn more about the area while creating additional ways for them to discover your listing and your real estate website.
•••••••••••••••••••••
Photography shows individual spaces.
Video can help buyers understand how those spaces connect.
A well-produced property video can highlight:
Short-form video can also introduce the property to buyers who discover homes through Instagram, Facebook, YouTube or other platforms.
For many listings, photography and video work best together.
•••••••••••••••••••••
A buyer isn’t only purchasing a structure.
They’re choosing a location.
That means your marketing strategy should help buyers understand what’s around the home.
For a Cerritos-area property, that might include factual information about:
The specific features highlighted should depend on the home itself and what is genuinely nearby.
Generic marketing isn’t nearly as powerful as marketing tailored to the individual property.
•••••••••••••••••••••
When selling a home, it’s tempting to highlight every possible benefit.
But school information is an area where accuracy matters more than hype.
Avoid making promises such as:
“Your child will attend this school.”
“Buy here and your child can attend Whitney High School.”
“You’ll definitely be able to transfer to another ABCUSD school.”
Enrollment, attendance boundaries, admissions and school-choice decisions belong to ABC Unified School District.
A property’s marketing can accurately identify its verified district and current school assignment while directing buyers to ABCUSD for confirmation.
•••••••••••••••••••••
Before your home goes on the market, it can help to gather important information about the property.
Depending on your home, that might include:
The more accurately your real estate professional understands the home, the better the marketing can communicate its features.
•••••••••••••••••••••
If your property is verified as being within ABC Unified School District, it can be included as factual information in your property marketing. Buyers should be encouraged to confirm current school assignments directly with ABCUSD.
Use ABC Unified School District’s official School Search and enter your complete property address:
https://www.abcusd.us/apps/pages/index.jsp?uREC_ID=1185677&type=d&pREC_ID=1444428
The district’s search tool provides current school attendance information associated with the address.
Yes. Attendance boundaries can change over time. ABCUSD’s current School Search reflects boundary changes approved by the Board of Education on November 4, 2025, so sellers should verify current information rather than relying on older property listings.
Some buyers may include school district location among their property-search criteria, while others may prioritize factors such as commute, price, lot size, neighborhood, property condition or nearby amenities. Every buyer’s priorities are different.
Third-party websites can be useful research tools, but sellers should verify school attendance information through the school district when it will be included in property marketing.
Preparation may include decluttering, cleaning, completing minor repairs, improving curb appeal and discussing staging or presentation with your real estate professional. The right preparation depends on the home’s condition, market and expected return on the improvements.
Because many buyers first encounter listings online, high-quality photography is an important part of presenting a home digitally. Professional images can help buyers understand the home’s features and decide whether they want to schedule a showing.
A marketing plan may include professional photography, video, MLS exposure, property websites, social media, email marketing, open houses, agent outreach, search-optimized content and neighborhood information. The right combination depends on the property and target market.
A property-specific comparative market analysis can evaluate recent comparable sales, location, square footage, lot size, condition, upgrades and current competition to estimate how your home may be positioned in today’s market.
•••••••••••••••••••••
Selling a home involves much more than putting a sign in the yard and uploading it to the MLS.
Today’s buyers often begin their search online, compare properties across multiple platforms and research the community before they ever schedule a showing.
If your home is located within ABC Unified School District, accurate school information can be one part of a much larger marketing strategy.
The strongest plan brings together:
Professional presentation.
Accurate property information.
Professional photography and video.
Local community knowledge.
Digital and social media marketing.
Search-friendly online content.
A pricing strategy based on current comparable sales.
And most importantly, a strategy designed specifically for your home rather than a one-size-fits-all approach.
As a local real estate professional familiar with Cerritos and the surrounding ABC Unified communities, I can help you evaluate your property’s current market position, identify the features buyers are likely to notice and create a customized plan for presenting your home to the market.
Whether you’re thinking about selling soon or simply trying to understand what your options look like, the first step is knowing where your home stands in today’s market.
Every home has a story.
The goal is to tell yours accurately, professionally and in a way that gives buyers every opportunity to see what makes it worth considering.
••••••••••••••••••••
CHRISTINE ALMARINES
Real Estate Agent | CA Real Estate Group | Caliber Real Estate
📱 714-476-4637
📧 christine@carealestategroup.com
DRE #01412944
Christine Almarines is a top real estate agent in Buena Park and Cerritos helping homeowners sell in Orange County and Los Angeles County.
If you own a home in Cerritos or another community served by ABC Unified School District (ABCUSD), you may have wondered:
“Does being in the ABC Unified School District increase my home’s value?”
It’s a good question—and one that comes up when both homeowners and buyers are evaluating real estate in Cerritos and the surrounding communities.
The answer isn’t as simple as yes or no.
Being located within ABC Unified School District may influence buyer interest and demand, but it does not automatically add a specific dollar amount to your home’s value.
Real estate values are determined by many factors, including location, recent comparable sales, property size, condition, lot size, upgrades and current market conditions.
Your home’s verified school district and assigned schools are additional pieces of information that some buyers may consider when deciding which properties to pursue.
Here’s what Cerritos-area homeowners should know.
•••••••••••••••••••••
School districts can influence the way some buyers search for homes.
A buyer who has identified a particular school district as one of their priorities may begin their search by looking only at properties within that district’s boundaries.
When multiple buyers are competing for a limited number of homes in a particular location, increased demand can affect market activity.
However, that doesn’t mean the school district alone determines what a property is worth.
Think of it as one piece of a much larger real estate puzzle.
•••••••••••••••••••••
No—not automatically.
There isn’t a standard “ABC Unified premium” that can simply be added to the price of a house.
Your home’s market value is influenced by a combination of factors, including:
The property’s school district and assigned schools may also matter to certain buyers, but they should be evaluated alongside all of these other factors.
Two homes within the same school district can have very different market values depending on the properties themselves.
•••••••••••••••••••••
Some homebuyers begin their property search with specific geographic priorities, and school district boundaries may be one of them.
Instead of searching only for “homes in Cerritos,” for example, a buyer may search for:
Homes in ABC Unified School District
That distinction matters because ABC Unified extends beyond Cerritos.
ABCUSD serves Artesia, Cerritos and Hawaiian Gardens, along with portions of Lakewood, Long Beach and Norwalk.
For a seller whose property is verified as being within ABCUSD, accurately identifying the district can help the home appear in front of buyers who specifically include that criterion in their search.
It doesn’t guarantee a higher sales price, but it can be an important part of accurately marketing the property’s location.
•••••••••••••••••••••
Potentially.
The more buyers who consider a particular property a match for their needs, the stronger the potential demand for that property.
School district location is one of many criteria buyers may use when deciding which homes to tour or purchase.
Other buyers may prioritize:
That’s why effective real estate marketing shouldn’t rely on a single feature.
The goal is to identify and accurately present all of the property’s strengths to the widest appropriate pool of buyers.
•••••••••••••••••••••
Being within ABC Unified School District doesn’t necessarily mean every home has the same assigned schools.
Properties are assigned schools based on ABCUSD attendance boundaries.
That makes the specific property address important.
When preparing to sell your home, verify the schools associated with your address rather than assuming the assignment based on your city, ZIP code or nearby properties.
ABC Unified provides an official School Search:
ABC Unified School District School Search:
https://www.abcusd.us/apps/pages/index.jsp?uREC_ID=1185677&type=d&pREC_ID=1444428
Enter the property’s complete address to find the schools currently associated with that location.
•••••••••••••••••••••
If you’re selling a property within ABC Unified School District, accurate information is important.
Don’t assume your property’s school assignments based solely on:
Instead, verify the current information directly through ABCUSD.
Attendance boundaries can change over time.
ABC Unified’s current School Search has been updated to reflect attendance-boundary changes approved by its Board of Education on November 4, 2025.
That makes verifying the address before marketing the property especially important.
•••••••••••••••••••••
If your property’s address is verified as being within ABC Unified School District, the district can be included as factual information about the property.
For example:
“Located within ABC Unified School District. Buyers are encouraged to verify current school assignments directly with ABCUSD.”
This is different from making subjective statements about which schools are “best,” which neighborhood is “better,” or where a particular buyer should live.
Good real estate marketing focuses on providing accurate information so buyers can research the factors that matter to them and make their own decisions.
•••••••••••••••••••••
Homeowners sometimes hear statements such as:
“Homes in this school district always sell for more.”
That’s too broad.
Even when buyers show strong demand for a particular location, future appreciation is never guaranteed.
Consider two homes in the same school district.
One may be completely remodeled with a desirable floor plan, large lot and excellent condition.
The other may need substantial repairs, have an unusual layout or sit in a location that some buyers find less desirable.
The school district is the same.
The market value may be very different.
That’s why your property’s value should be based primarily on recent comparable sales and the home’s individual characteristics, not on a general assumption about the school district.
•••••••••••••••••••••
The best way isn’t to apply a generic percentage.
Instead, look at the actual local market.
A real estate professional can compare your property with recent sales and evaluate factors such as:
What have similar homes near yours actually sold for?
How does your home’s location compare with nearby sales?
How do square footage, lot size, floor plan, bedroom count and condition compare?
How many similar properties are currently available?
How quickly are comparable properties selling?
Are nearby homes selling below, at or above their asking prices?
Are the comparable properties within the same school district and attendance areas?
Evaluating these factors together provides a much more useful picture of your home’s market value than simply saying, “It’s in ABC Unified, so it must be worth more.”
•••••••••••••••••••••
When selling a home, buyers need more than a list of bedrooms, bathrooms and square footage.
They want to understand the property and its location.
Depending on the home, your marketing strategy may highlight factual features such as:
The strongest marketing strategy presents the complete picture of the property rather than relying on one selling point.
•••••••••••••••••••••
Homeowners sometimes wonder whether school ratings displayed on real estate websites directly determine home values.
They don’t.
Ratings and other third-party school information may be one resource buyers use when conducting their own research, but sellers shouldn’t assume that a particular rating automatically translates into a certain home price.
School information is also available from many different sources and may change over time.
When marketing a property, I prefer to provide buyers with factual information about the school district and assigned schools and direct them to appropriate sources so they can conduct their own research.
•••••••••••••••••••••
Cerritos homeowners often have an advantage that goes beyond any single property feature: there are multiple reasons buyers may consider the area.
When determining how to position your home for sale, it’s important to look at the entire package.
That includes your:
The right listing strategy brings those elements together.
•••••••••••••••••••••
No. Being within ABC Unified School District does not automatically add a specific amount to your home’s value. Market value is determined by factors such as recent comparable sales, location, home size, lot size, condition, upgrades and current buyer demand. School district location may be another consideration for some buyers.
Potentially. Some buyers include a specific school district among their home-search criteria. A verified ABCUSD location may therefore be relevant to buyers specifically searching within the district, but it does not guarantee increased demand or a higher sales price.
Buyers have different priorities when choosing a home, and some specifically include school district boundaries in their search criteria. Homes verified as being within ABCUSD may therefore appear in searches conducted by buyers looking within the district.
If your property is verified as being within ABC Unified School District, it can be included as factual information in your property marketing. Buyers should be encouraged to confirm current school assignments directly with ABCUSD.
Use ABC Unified School District’s official School Search and enter the complete property address:
https://www.abcusd.us/apps/pages/index.jsp?uREC_ID=1185677&type=d&pREC_ID=1444428
The district recommends entering the home address to find the schools associated with the property.
Yes. Attendance boundaries can change. ABCUSD’s current School Search reflects boundary changes approved by the Board of Education on November 4, 2025. Homeowners and buyers should verify current assignments directly with the district.
Third-party real estate websites can be helpful research tools, but homeowners and buyers should verify current school assignments directly with ABC Unified School District when school information is important to the transaction.
The most useful way to estimate your home’s current market value is to analyze recent comparable sales along with your property’s location, size, lot, condition, upgrades and current competition. A local comparative market analysis can provide a more property-specific estimate than a broad neighborhood average or automated online valuation.
•••••••••••••••••••••
If you’re considering selling a home in Cerritos or another community served by ABC Unified School District, your school district may be one piece of your property’s overall marketing story.
But it shouldn’t be the only one.
The strongest pricing and marketing strategy considers your home’s location, condition, upgrades, lot, floor plan, comparable sales, neighborhood, current competition and verified school information together.
As a local real estate professional familiar with Cerritos and the surrounding ABC Unified communities, I can help you determine how your home compares with current and recently sold properties—and identify the features that matter most when positioning it for today’s market.
If you’re curious about your home’s current value, the best place to start is with the actual local data.
A property-specific market analysis can help you understand what homes similar to yours are selling for, what buyers are responding to and how your property could be positioned to compete when you’re ready to sell.
Whether you’re planning a move soon or simply want to understand where your home stands in today’s market, having accurate local information can help you make your next decision with confidence.
••••••••••••••••••••
CHRISTINE ALMARINES
Real Estate Agent | CA Real Estate Group | Caliber Real Estate
📱 714-476-4637
📧 christine@carealestategroup.com
DRE #01412944
Christine Almarines is a top real estate agent in Buena Park and Cerritos helping homeowners sell in Orange County and Los Angeles County.
If you’re thinking about selling a home in Southern California but keep hearing that buyers are sitting on the sidelines, you may be wondering whether it makes sense to put your home on the market right now.
The housing market has certainly changed. Today’s buyers may be more selective, mortgage rates remain higher than many would like, and not every home is selling overnight.
But that doesn’t mean buyers have disappeared.
In fact, recent housing data shows that serious buyers are still actively purchasing homes — including right here in Southern California.
••••••••••••••••••••
One way to measure buyer activity is by looking at pending home sales — homes where a buyer and seller have already entered into a contract but the transaction has not yet closed.
Keeping Current Matters recently highlighted data showing that more homes have been going under contract than during the same period in the previous two years.
The takeaway for homeowners thinking about selling is simple:
People have not stopped buying homes.
Life continues regardless of mortgage rates. Families grow. Jobs change. People relocate. Homeowners downsize. Renters decide they’re ready to buy. Others simply reach the point where waiting no longer makes sense.
Those buyers may be more cautious than they were a few years ago, but many are still motivated and ready to make a move.
••••••••••••••••••••
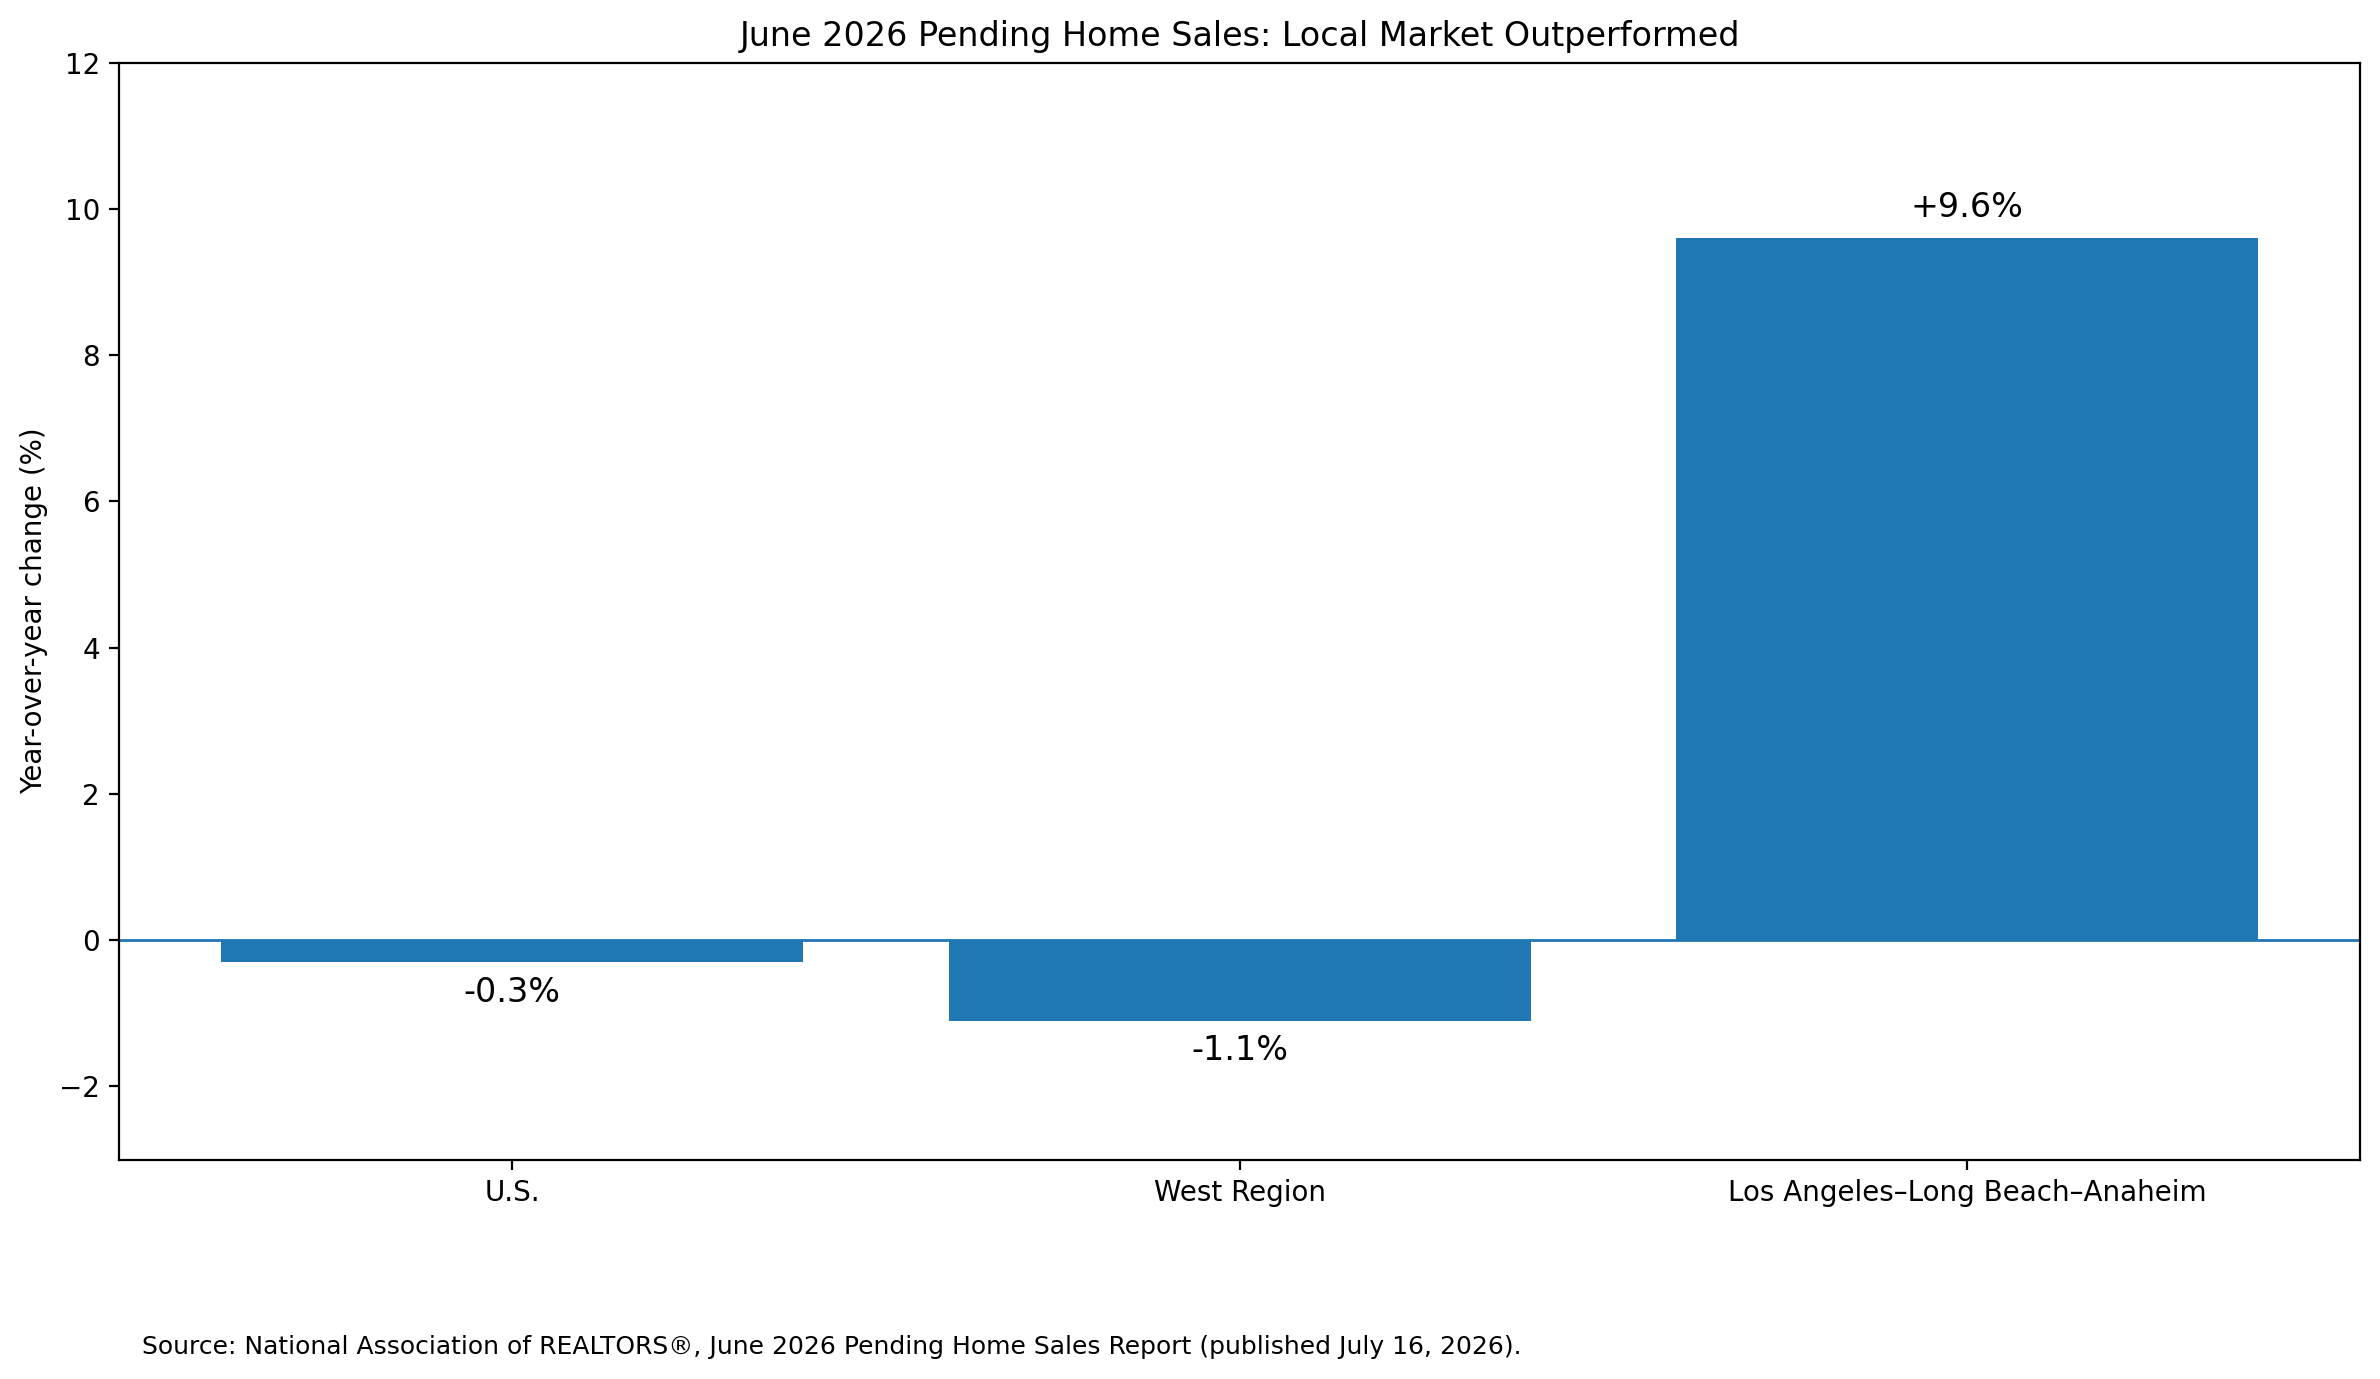
What does the June 2026 pending home sales data show? While pending sales softened nationally, the Los Angeles–Long Beach–Anaheim metro recorded a 9.6% year-over-year increase, showing that Southern California buyer activity remains stronger than national headlines might suggest.
The latest California housing numbers make this especially relevant for homeowners in Orange County and Los Angeles County.
California: +6.0%
Los Angeles Metro: +9.1%
Southern California: +10.8%
According to the California Association of REALTORS®, existing single-family home sales throughout California increased 6.0% in June 2026 compared with June 2025.
Southern California performed even better, with home sales increasing 10.8% year over year.
There are also encouraging numbers closer to home.
The National Association of REALTORS® reported that the Los Angeles–Long Beach–Anaheim metropolitan area saw pending home sales increase 9.6% year over year in June, placing it among the strongest large metro areas in the country for annual pending-sales growth.
For homeowners in communities such as Cerritos, Buena Park, Cypress, Anaheim, Fullerton, Lakewood, Long Beach, Bellflower, Garden Grove, Placentia and surrounding Southern California cities, this is an important reminder:
There are still buyers looking for homes.
••••••••••••••••••••
This is where sellers need to understand how the 2026 real estate market is different.
Having buyers in the market does not mean every property will immediately receive multiple offers.
Buyers generally have more choices today, and they are paying close attention to:
Keeping Current Matters points out that sellers can no longer assume they can price a home however they want or skip preparing it properly for the market. Buyers are willing to wait for the right property at the right price.
That means pricing and positioning matter.
••••••••••••••••••••
National and statewide statistics are helpful, but what matters most is what buyers are actually doing in your local market.
We recently listed a home in Buena Park and welcomed approximately 50 groups of buyers through the property during the first weekend of open houses.
The home also generated multiple offers.
That doesn’t mean every home will receive the exact same response. Every property, neighborhood, price range and market is different.
But it does reinforce what the broader housing data is showing:
Buyers haven’t disappeared. They’re simply becoming more selective about which homes they pursue.
••••••••••••••••••••
For sellers, the question may not be:
“Are there buyers?”
A better question is:
“How do I position my home so the buyers who are already looking choose mine?”
That starts with having the right strategy before your property ever goes on the market.
Your home’s value isn’t determined by what a neighbor sold for several years ago or by an automated online estimate.
Pricing should consider recent comparable sales, current competing listings, neighborhood demand, lot size, condition, upgrades, floor plan and current buyer behavior.
A home priced correctly from the beginning has a much better opportunity to attract serious attention.
Today’s buyers usually see your home online before they ever walk through the front door.
Professional photography, thoughtful preparation, curb appeal and proper presentation can make the difference between someone scrolling past your listing and scheduling a showing.
Buyers are comparing your property with every other home available in their preferred location and price range.
Understanding that competition helps determine how your home should be priced, presented and marketed.
Listing a property is only one part of selling it.
A comprehensive marketing plan may include professional photography and video, digital advertising, social media exposure, open houses, direct marketing, agent networking and outreach to potential buyers.
The goal is to create as much qualified exposure as possible.
Once your home is on the market, showing activity, online engagement and buyer feedback provide valuable information.
A strong real estate strategy shouldn’t stop once the listing goes live. The market should continually be evaluated so adjustments can be made when necessary.
••••••••••••••••••••
From June 2025 to June 2026, unsold inventory declined:
Another factor sellers should keep in mind is housing supply.
California’s Unsold Inventory Index fell to 3.1 months in June 2026, compared with 3.8 months one year earlier. Active listings were also down 10.4% from June 2025.
That doesn’t automatically mean every seller has the upper hand, but relatively limited inventory can create opportunity for homeowners whose properties are well positioned for today’s buyers.
California homes also sold in a median of 23 days in June, and the statewide sales-price-to-list-price ratio was 100%.
Again, real estate conditions vary significantly by city, neighborhood and price point, which is why local market analysis is so important.
••••••••••••••••••••
The 2026 real estate market may feel different from the fast-moving market of several years ago.
That’s okay.
A slower or more balanced market does not mean nobody is buying.
Recent California and Southern California housing statistics show that homes are still selling and buyers are still making offers. The difference is that today’s buyers tend to be more deliberate about which homes they choose and what they’re willing to pay.
For sellers, that makes preparation, pricing, presentation and marketing more important than ever.
The buyers are there.
The opportunity is there.
The right strategy is what connects the two.
••••••••••••••••••••
Before you decide whether now is the right time to sell, let’s look at what is actually happening in your neighborhood and your price range.
CA Real Estate Group can help you evaluate recent comparable sales, current competition, buyer demand and your home’s potential market value so you can make an informed decision — whether you’re ready to sell now or simply planning ahead.
Serving homeowners throughout Cerritos, Buena Park, Anaheim, Bellflower, Cypress, Fullerton, Garden Grove, Lakewood, Long Beach, Placentia and surrounding Orange County and Los Angeles County communities.
Curious what your home could sell for in today’s market? Contact CA Real Estate Group for a personalized home value and selling strategy.
Inspired in part by housing-market insights from Keeping Current Matters. Local and California market statistics sourced from the California Association of REALTORS® and National Association of REALTORS®.
••••••••••••••••••••
Yes. Buyers are still purchasing homes throughout Southern California, although today’s buyers may be more selective about price, condition and overall value. Recent housing data has continued to show sales activity throughout Orange County and Los Angeles County markets. The key for sellers is making sure their home is positioned competitively for the buyers who are actively searching.
Whether 2026 is a good time to sell depends on your specific property, neighborhood, financial goals and future plans. Rather than trying to time the entire housing market, homeowners should look at current inventory, comparable sales, buyer demand and competition within their individual price range and community.
When buyers have more choices, homes that are overpriced, poorly presented or not marketed effectively may take longer to sell. Price, condition, photography, online presentation, competition and local buyer demand can all affect how quickly a property receives offers.
Your asking price should be based on current local market conditions rather than an online home-value estimate alone. A comparative market analysis should consider recent sales, competing listings, location, lot size, square footage, upgrades, condition, floor plan and current buyer activity.
Not necessarily. Some improvements may increase buyer appeal, while others may not provide enough return to justify their cost. Before completing major renovations, it’s helpful to have a real estate professional evaluate the property and identify which repairs or improvements are most likely to influence today’s buyers.
Strong pricing, professional photography, thoughtful preparation and comprehensive marketing can help generate greater exposure. Depending on the property, marketing may include online promotion, social media, video, open houses, direct marketing, agent networking and targeted outreach to potential buyers.
Your home’s potential market value depends on much more than its square footage. Recent comparable sales, neighborhood, lot size, property condition, upgrades, layout, location and current competition should all be considered. A personalized comparative market analysis can provide a more accurate picture of what buyers may be willing to pay today.
If you’re thinking about selling and want to know how your home should be positioned in today’s market, I’d be happy to help.
>> How Much Is My Southern California Home Worth?
CHRISTINE ALMARINES
Real Estate Agent | CA Real Estate Group | Caliber Real Estate
📱 714-476-4637
📧 christine@carealestategroup.com
DRE #01412944
Christine Almarines is a top real estate agent in Buena Park and Cerritos helping homeowners sell in Orange County and Los Angeles County.
One of the most common questions homebuyers ask when searching within ABC Unified School District (ABCUSD) is:
“If I buy a home in ABC Unified School District, can my child attend a different ABCUSD school than the one assigned to our address?”
The answer is:
Possibly—but you should never assume that you can choose any school you want.
A home’s address determines its designated attendance-area school. ABC Unified School District also provides processes that may allow eligible students who live within the district to request another ABCUSD school, including the district’s Schools of Choice open-enrollment program and, at certain times, intra-district permits.
Approval or placement at another school is not something homebuyers should assume will happen.
If attending a particular ABCUSD school is important to your family, it’s best to understand your home’s assigned school and the district’s current enrollment options before buying the property.
•••••••••••••••••••••
An intra-district transfer generally refers to a student who lives within a school district attending a school in that same district other than the school designated for the student’s residential address.
For ABC Unified families, there are important distinctions between the district’s different enrollment options.
ABCUSD offers an annual Schools of Choice process that allows district residents to apply for a school other than their designated attendance-area school.
The district may also accept intra-district permit applications after the Schools of Choice process has concluded.
Because procedures, dates, available schools and eligibility can change, families should always review ABCUSD’s current information rather than relying on previous-year rules.
•••••••••••••••••••••
Before considering another ABCUSD school, start by determining which schools are assigned to the home’s address.
Every property within ABC Unified School District falls within attendance boundaries that determine the schools associated with that address.
You can research a property’s current schools through ABCUSD’s official School Search:
ABC Unified School District School Search:
https://www.abcusd.us/apps/pages/index.jsp?uREC_ID=1185677&type=d&pREC_ID=1444428
Enter the complete property address to see the schools associated with that location.
This is especially important for homebuyers because school attendance boundaries can change. Never rely solely on the city, ZIP code, neighborhood name or school information displayed on a real estate website.
•••••••••••••••••••••
ABC Unified’s Schools of Choice program is the district’s annual intradistrict open-enrollment process.
It allows parents and guardians of eligible ABCUSD resident students to apply for a school other than the designated school within their attendance area.
For the 2026–27 school year, Schools of Choice applications were submitted during December 2025.
Families could list up to four schools in priority order.
When applications exceeded available openings, ABCUSD used a random, unbiased lottery process to determine placement.
This means applying through Schools of Choice does not guarantee that a student will receive the requested school.
•••••••••••••••••••••
Not exactly.
This distinction is important for families researching ABC Unified School District.
Schools of Choice is ABCUSD’s annual open-enrollment process that takes place well before the upcoming school year and uses a lottery when necessary.
ABCUSD also identifies a separate period when intra-district permits open after Schools of Choice has concluded.
For the 2026–27 school year, ABCUSD listed:
Schools of Choice: December 1–31, 2025 application period
Schools of Choice process ended: March 12, 2026
Intra-District Permits opened: April 1, 2026
Dates and procedures can change from year to year, so families should check ABCUSD’s current requirements for the school year they are considering.
•••••••••••••••••••••
Yes, eligible families may have options to request another school within ABCUSD.
However, being an ABC Unified resident does not mean you can automatically select any ABCUSD school.
For Schools of Choice, placement can depend on factors such as:
ABCUSD’s published Schools of Choice process states that applications are subject to a random selection process and that results depend in part on school and grade-level enrollment, the number of available Schools of Choice spaces and the number of applicants.
That is why families should never treat a requested school as guaranteed.
•••••••••••••••••••••
Under the current Schools of Choice process, families may list up to four schools on the application in priority order.
The district’s system considers available space based on the order in which the family ranks those schools.
If a student is offered a Schools of Choice placement, the parent or guardian has a limited period to accept the placement through the district’s application system.
Because procedures can change, families applying in future school years should confirm the current rules with ABCUSD.
•••••••••••••••••••••
No.
Submitting an application does not guarantee placement at the requested school.
ABCUSD uses a lottery when determining Schools of Choice placements, and the number of available seats can vary by school and grade level.
If a student is not accepted through the Schools of Choice process, ABCUSD instructs families to enroll the student at the school of residence.
For homebuyers, that’s an extremely important point.
•••••••••••••••••••••
No.
If attending a particular school is one of the major reasons you’re purchasing a property, the safest approach is to make your buying decision based on the school currently assigned to the home’s address.
Don’t purchase a home assigned to School A while assuming your child will be able to attend School B through Schools of Choice or an intra-district permit.
You may be able to request School B, but that doesn’t mean the request will necessarily be approved.
Before purchasing, ask yourself:
“Would I still be comfortable buying this home if my child attends the school assigned to this address?”
If the answer is no, you may want to reconsider the property or speak directly with ABCUSD before making your decision.
•••••••••••••••••••••
No.
ABCUSD identifies certain schools and programs that do not participate in its Schools of Choice application.
For example, the district currently lists Whitney High School among the schools or programs that are not part of the regular Schools of Choice process.
Whitney High School has its own admissions process.
Other specialized programs may also have separate requirements.
This is another reason buyers should research the specific school they’re interested in, rather than assuming the same enrollment rules apply to every ABCUSD campus.
•••••••••••••••••••••
Families with younger children should pay particular attention to ABCUSD’s Transitional Kindergarten rules.
ABCUSD currently states that TK students must register at their home school based on their residential address.
Because policies can differ by grade level or program, families with a TK-age child should confirm current enrollment rules directly with the district when planning a move.
•••••••••••••••••••••
Whitney High School deserves special mention because buyers sometimes assume that purchasing a home within ABC Unified School District automatically gives their child the ability to attend Whitney.
It does not.
Whitney High School has a separate admissions process, and it is not part of ABCUSD’s regular Schools of Choice program.
If Whitney is specifically part of your family’s educational goals, research Whitney’s current admissions requirements separately before making a homebuying decision.
Do not purchase a home based on an assumption that ABCUSD residency alone guarantees admission to Whitney High School.
•••••••••••••••••••••
When a particular school is an important part of your homebuying decision, consider asking ABCUSD:
Start with the official School Search and verify the exact property address.
Not every school or program participates in the same enrollment process.
Schools of Choice is an annual process with specific deadlines.
Availability can differ by school and grade level.
Understand your student’s assigned school and your other available options before buying.
ABCUSD may accept intra-district permit applications after Schools of Choice has concluded.
Certain schools and programs may have separate enrollment or admissions procedures.
Having this information before purchasing can help you make a much more informed decision.
•••••••••••••••••••••
It’s easy to fall in love with a house and then start researching schools afterward.
When schools are one of your family’s highest priorities, reverse that process.
Research the property.
Verify the assigned schools.
Understand the district’s enrollment options.
Then evaluate whether the home still meets your family’s needs.
A home purchase is a significant long-term decision. Making that decision based on the assumption that a school transfer will happen can create an unnecessary surprise later.
•••••••••••••••••••••
A local real estate professional familiar with Cerritos and the surrounding ABC Unified communities can help you narrow your home search based on your priorities.
That can include:
However, your real estate agent should never guarantee that a student will be accepted into a specific school or approved for a transfer.
School assignments, admissions, Schools of Choice and permit decisions are ultimately determined by ABC Unified School District.
When a particular school matters to your purchase decision, verify the information directly with ABCUSD.
•••••••••••••••••••••
Not automatically. Eligible ABCUSD resident families may apply for another school through programs such as Schools of Choice, but submitting an application does not guarantee placement at the requested school.
Schools of Choice is ABCUSD’s annual intradistrict open-enrollment process. It allows eligible resident families to apply for a school other than the designated school within their attendance area. When demand exceeds available openings, placements are determined through a lottery process.
They are related but are not the same application process. Schools of Choice is ABCUSD’s annual open-enrollment process. ABCUSD also identifies a separate period for intra-district permits after Schools of Choice ends. Families should review the district’s current procedures for the applicable school year.
No. Applying for another school does not guarantee placement. Availability and the applicable district process determine whether a student can attend another school.
Under ABCUSD’s current Schools of Choice process, parents and guardians may list up to four schools in priority order on the application.
ABCUSD instructs applicants who are not accepted through Schools of Choice to enroll at their school of residence.
No. Whitney High School is currently excluded from ABCUSD’s regular Schools of Choice application and has its own admissions process.
Families with TK-age students should check current ABCUSD rules carefully. ABCUSD currently states that TK students must register at their home school based on their residential address.
Use ABC Unified School District’s official School Search and enter the complete property address:
https://www.abcusd.us/apps/pages/index.jsp?uREC_ID=1185677&type=d&pREC_ID=1444428
Buyers should verify the current assignment directly with ABCUSD when schools are an important part of their purchase decision.
No. When a particular school is important to your family, it’s safer to evaluate a home based on the schools currently assigned to its address rather than assuming a future Schools of Choice placement or intra-district permit will be approved.
•••••••••••••••••••••
ABC Unified School District provides families with options that may allow eligible students to attend a school other than the one designated for their residential address.
But those options shouldn’t be confused with a guarantee.
If a particular school is important to your family, start by verifying the schools assigned to the home’s address. Then research ABCUSD’s current Schools of Choice, intra-district permit and, when applicable, school-specific admissions requirements.
Most importantly, don’t purchase a home while assuming that a future transfer will automatically be approved.
As a local real estate professional familiar with Cerritos and the surrounding ABC Unified communities, I can help you identify properties that fit your homebuying budget, lifestyle, preferred neighborhoods and location needs while helping you research the school boundaries associated with the properties you’re considering.
When it comes to enrollment, transfers or admissions, we’ll also make sure you know where to obtain the current information directly from ABC Unified School District.
The more you know before you buy, the more confidently you can choose a home that works for your family.
••••••••••••••••••••
CHRISTINE ALMARINES
Real Estate Agent | CA Real Estate Group | Caliber Real Estate
📱 714-476-4637
📧 christine@carealestategroup.com
DRE #01412944
Christine Almarines is a top real estate agent in Buena Park and Cerritos helping homeowners sell in Orange County and Los Angeles County.
When you’re searching for a home within ABC Unified School District (ABCUSD), it’s easy to assume that a property’s city, ZIP code or mailing address determines which schools your children will attend.
In reality, that’s one of the most important things homebuyers should verify before purchasing a property.
School district boundaries don’t always follow city boundaries.
ABC Unified School District serves Artesia, Cerritos and Hawaiian Gardens, along with portions of Lakewood, Long Beach and Norwalk. That means the individual property address—not simply the city name—matters when determining which schools serve a home.
If attending ABC Unified schools is an important part of your home search, here’s how to verify whether a property is within ABCUSD and which schools are currently assigned to the address.
•••••••••••••••••••••
Many homebuyers begin their search by choosing a city.
That’s a perfectly reasonable starting point, but it isn’t enough when a specific school district or school assignment is one of your priorities.
School district attendance boundaries can cross city lines. They don’t necessarily follow ZIP codes, neighborhood names or mailing addresses.
That means a home in Norwalk, Lakewood or Long Beach could potentially fall within ABC Unified School District, while another property elsewhere in the same city may belong to a different district.
Rather than making assumptions, verify each property individually before making a homebuying decision based on its schools.
•••••••••••••••••••••
The best place to begin is the official ABC Unified School District School Search tool.
ABCUSD provides an online address search that allows you to enter a home address and identify the schools associated with that property.
Official ABC Unified School District School Search:
https://www.abcusd.us/apps/pages/index.jsp?uREC_ID=1185677&type=d&pREC_ID=1444428
Simply enter the address of the property you’re considering.
The district’s current School Search tool has been updated to reflect attendance-boundary changes approved by the ABC Unified School District Board of Education on November 4, 2025.
Because this information comes directly from ABCUSD, it should be your primary starting point when researching a property’s school assignment.
•••••••••••••••••••••
When using ABCUSD’s School Search, enter the complete property address.
Don’t assume that two homes in the same ZIP code, neighborhood or general area automatically have the same school assignments.
If you’re considering several homes, search each address individually.
For example, if you’re comparing three properties in Norwalk, don’t verify one Norwalk address and assume the other two have the same school assignment.
Check all three.
Taking this extra step can prevent confusion later in the homebuying process.
•••••••••••••••••••••
Once you enter the property address, review the schools returned by the ABC Unified School District School Search.
This can help you determine whether the home is associated with the schools you expected.
If a particular school is especially important to your family, take the additional step of confirming the assignment directly with ABCUSD.
You may also want to contact the district when you have questions about:
School assignment and enrollment are related but aren’t necessarily the same thing, so questions regarding eligibility or enrollment should always be directed to ABC Unified School District.
•••••••••••••••••••••
Most major real estate websites display information about nearby schools.
That can be helpful when you’re researching a neighborhood, but it shouldn’t be the final source you use to determine a home’s assigned schools.
A website may show:
A school being nearby doesn’t necessarily mean the home is assigned to that school.
Information on third-party websites may also lag behind current district boundary changes.
When ABC Unified School District is important to your purchase decision, verify the information directly with ABCUSD.
•••••••••••••••••••••
Knowing the general ABCUSD service area can help you expand your home search.
ABC Unified School District serves:
This means you don’t necessarily have to limit your home search to Cerritos if living within ABC Unified School District is your priority.
However, because only portions of Lakewood, Long Beach and Norwalk are served by ABCUSD, buyers should verify every property individually.
•••••••••••••••••••••
When buyers think of ABC Unified School District, they often think of Cerritos first.
However, the safest approach is still to verify the individual property address rather than relying on the city name alone.
School attendance information can change, and buyers should confirm current assignments directly through the district when schools are an important part of their purchase decision.
This same rule applies when searching in Artesia, Hawaiian Gardens, Norwalk, Lakewood or Long Beach.
•••••••••••••••••••••
Yes.
Portions of Norwalk are served by ABC Unified School District.
However, not all Norwalk properties are within ABCUSD boundaries.
That’s why searching by city alone can cause buyers to either overlook qualifying properties or mistakenly assume that a home belongs to the district.
Enter the exact Norwalk property address into ABCUSD’s official School Search before relying on the school information.
•••••••••••••••••••••
Yes.
Portions of Lakewood are served by ABC Unified School District.
Just like Norwalk, however, not every Lakewood address is within ABCUSD.
Buyers searching in Lakewood should verify each property individually through the official district search.
•••••••••••••••••••••
Yes.
Certain portions of Long Beach fall within ABC Unified School District.
Because Long Beach is a large city served by multiple school districts, verifying the specific property address is especially important.
Don’t assume that a nearby school, ZIP code or online property listing determines the district.
Use the official ABCUSD School Search.
•••••••••••••••••••••
School information is worth checking more than once during your home search.
If a particular school assignment plays a significant role in your decision to purchase a property, consider verifying it when:
School attendance boundaries can change, so obtaining the most current information directly from the district is important.
•••••••••••••••••••••
When searching for homes within ABC Unified School District, avoid these common mistakes.
City limits and school district boundaries aren’t necessarily the same.
If your true priority is ABC Unified School District rather than a Cerritos address specifically, you could be overlooking homes in other ABCUSD communities.
Only portions of these cities fall within ABC Unified School District.
Third-party school data can be helpful for research, but verify the property’s current assignment directly with the school district.
When school assignment is an important homebuying criterion, verify it early.
•••••••••••••••••••••
A knowledgeable local real estate professional can help make a school-focused home search more efficient.
Instead of simply searching for homes within one city, your agent can help you explore properties based on several priorities, including:
An agent familiar with Cerritos and the surrounding communities can also help you recognize areas you may not have initially considered.
However, your real estate agent should not be the final authority on school assignment.
When a particular school or district matters to your purchase, verify that information directly with ABC Unified School District.
•••••••••••••••••••••
Use the official ABC Unified School District School Search and enter the complete property address. The tool identifies the schools associated with that address. Buyers should confirm school information directly with ABCUSD when it is an important part of their purchase decision.
Yes. ABCUSD provides an official online School Search that allows users to enter a home address and find the schools associated with that property.
The tool is available at:
https://www.abcusd.us/apps/pages/index.jsp?uREC_ID=1185677&type=d&pREC_ID=1444428
ABC Unified School District serves Artesia, Cerritos and Hawaiian Gardens, along with portions of Lakewood, Long Beach and Norwalk.
Buyers should verify every Cerritos property individually using ABCUSD’s official School Search rather than relying solely on the city name or information displayed on a real estate website.
Yes. Portions of Norwalk fall within ABC Unified School District. Not every Norwalk property is within ABCUSD, so each address should be verified individually.
Yes. Portions of Lakewood are served by ABC Unified School District. Buyers should use the official ABCUSD School Search to verify each property address.
Yes. Portions of Long Beach are served by ABC Unified School District. Because Long Beach is served by multiple school districts, individual addresses should always be verified.
Not necessarily. School district attendance boundaries can cross city limits, which is why a property’s city or ZIP code alone shouldn’t be used to determine its assigned schools.
Yes. If a particular school or school district is important to your homebuying decision, verify the current assignment directly with the school district before purchasing the property.
Yes. Attendance boundaries can change. ABCUSD’s School Search currently reflects boundary changes approved by the Board of Education on November 4, 2025, so buyers should use current district information rather than relying on older listings or school data.
•••••••••••••••••••••
Buying a home involves much more than finding the right number of bedrooms, square footage or price.
For many families, location and schools are also important pieces of the decision.
If ABC Unified School District is one of your homebuying priorities, don’t rely on assumptions based on the property’s city, ZIP code or online listing.
Start with the official ABCUSD School Search, verify each individual property address and contact the district directly when you need confirmation about attendance or enrollment.
And remember: your search doesn’t necessarily have to begin and end in Cerritos.
Artesia, Hawaiian Gardens and qualifying portions of Norwalk, Lakewood and Long Beach may provide additional opportunities within ABC Unified School District.
As a local real estate professional familiar with Cerritos and the surrounding communities, I can help you identify homes that fit your budget, lifestyle, location and property preferences while helping you narrow your search to homes that appear to fall within ABCUSD boundaries.
We’ll also make sure you know exactly where to verify the current school information directly with ABC Unified School District before making your final homebuying decision.
With the right information and a well-planned home search, you can move forward with confidence.
••••••••••••••••••••
CHRISTINE ALMARINES
Real Estate Agent | CA Real Estate Group | Caliber Real Estate
📱 714-476-4637
📧 christine@carealestategroup.com
DRE #01412944
Christine Almarines is a top real estate agent in Buena Park and Cerritos helping homeowners sell in Orange County and Los Angeles County.
If you’re searching for a home in Cerritos because you want your children to attend schools within ABC Unified School District (ABCUSD), you’re not alone. It’s a question I hear frequently from homebuyers searching in Cerritos and the surrounding communities.
But here’s something many buyers don’t realize:
You don’t necessarily have to live in Cerritos to live within ABC Unified School District.
ABC Unified School District serves Artesia, Cerritos and Hawaiian Gardens, along with portions of Lakewood, Long Beach and Norwalk.
That means expanding your home search beyond Cerritos could give you additional neighborhoods, home styles and price points to consider while still searching within ABCUSD boundaries.
The key is knowing where to look—and verifying the school assignment for every individual property before you buy.
•••••••••••••••••••••
Because city boundaries and school boundaries don’t always line up, buyers should check every address individually. Here’s how to verify whether a specific home is in ABC Unified School District before you buy.
Cerritos is often one of the first cities buyers consider when they begin searching for a home within ABC Unified School District.
The city offers established residential neighborhoods, parks, shopping, restaurants and convenient access to several major Southern California freeways. Many of the schools commonly associated with ABCUSD are also located in Cerritos.
As a result, buyers sometimes assume that living within ABC Unified means they have to purchase a home in Cerritos.
They don’t.
ABCUSD boundaries extend into several neighboring communities, giving buyers more places to consider.
This can be especially helpful when available Cerritos inventory doesn’t match your budget, preferred home size or other priorities.
•••••••••••••••••••••
Yes.
ABC Unified School District serves:
For a complete overview of the district’s service area, see our guide to the cities and communities served by ABC Unified School District.
For a homebuyer, the most important thing to understand is that school district boundaries do not necessarily follow city boundaries.
While Artesia, Cerritos and Hawaiian Gardens are communities served by ABCUSD, only portions of Lakewood, Long Beach and Norwalk fall within the district.
Therefore, you should never assume a property belongs to ABC Unified School District based solely on its city, ZIP code or proximity to another ABCUSD property.
Always verify the individual address.
•••••••••••••••••••••
If your original home search included only Cerritos, expanding into neighboring ABC Unified communities could provide additional options.
Located immediately next to Cerritos, Artesia is one of the first communities buyers may want to add to an ABCUSD home search.
The city offers a mix of single-family homes, condominiums and townhomes and provides convenient access to many of the same shopping, dining and transportation options found around Cerritos.
For buyers who like the Cerritos area but haven’t found the right property, Artesia can be an important community to consider.
Hawaiian Gardens is another community served by ABC Unified School District.
Because it is smaller than surrounding cities, buyers sometimes overlook Hawaiian Gardens when searching for homes in the district.
Depending on available inventory and your particular needs, adding Hawaiian Gardens to your search may uncover additional opportunities.
Certain portions of Norwalk fall within ABC Unified School District, but not all Norwalk homes are in ABCUSD.
That distinction is particularly important.
Buyers may find different home styles, neighborhood characteristics and price points in Norwalk, making qualifying areas worth exploring when Cerritos inventory is limited.
However, every address should be verified individually.
Portions of Lakewood are also located within ABC Unified School District.
Lakewood is known for its established residential neighborhoods and wide variety of single-family homes. For buyers searching for particular lot sizes, floor plans or neighborhood characteristics, qualifying Lakewood properties may provide additional choices.
Again, not all of Lakewood is within ABCUSD, so checking the individual address is essential.
Certain Long Beach addresses also fall within ABC Unified School District.
Because Long Beach is a large city served by multiple school districts, buyers need to pay particularly close attention to school boundaries.
A Long Beach mailing address alone does not tell you which school district serves the property.
Verify the home through ABCUSD before relying on its school assignment.
•••••••••••••••••••••
One of the most common misconceptions among homebuyers is that city limits and school district boundaries are the same.
They aren’t.
School districts have their own geographic boundaries, which can cross city lines.
That means a property in Norwalk, Lakewood or Long Beach could potentially fall within ABC Unified School District even though it doesn’t have a Cerritos address.
It also means two homes relatively close to each other may not necessarily have the same assigned schools.
For buyers who consider ABCUSD a priority, this makes address-by-address research an important part of the home search.
•••••••••••••••••••••
The best place to start is the official ABC Unified School District School Search tool.
Enter the property’s home address to see the schools associated with that location.
Official ABC Unified School District School Search:
https://www.abcusd.us/apps/pages/index.jsp?uREC_ID=1185677&type=d&pREC_ID=1444428
ABCUSD’s School Search tool reflects current district attendance information and should be checked for each property you are considering.
Because attendance boundaries can change over time, buyers should confirm a property’s school assignment directly with ABC Unified School District before purchasing a home.
•••••••••••••••••••••
Real estate websites often display nearby schools or estimated school assignments on property listings.
While that information can be useful when initially researching a home, it should not be your final source for determining which schools a child would attend.
Third-party websites may contain outdated information, and a nearby school isn’t necessarily the school assigned to that property’s address.
If attending ABC Unified School District is important to your homebuying decision, verify the address directly through ABCUSD.
•••••••••••••••••••••
Limiting a home search to one city naturally limits the number of properties available to you.
Expanding your search beyond Cerritos while remaining within ABC Unified School District may give you:
This doesn’t mean one community is better than another.
It simply means you have more information—and potentially more choices.
For some buyers, Cerritos will still be the best fit. For others, the right home may be a few minutes away in Artesia or in a qualifying area of Norwalk, Lakewood or Long Beach.
Price is often another reason buyers broaden their search. If you’re comparing Cerritos with surrounding communities, our Cost of Living in Cerritos guide can help put housing expenses and affordability into perspective.
•••••••••••••••••••••
If living within ABCUSD boundaries is one of your priorities, consider approaching your home search a little differently.
Instead of telling your real estate agent, “I only want Cerritos,” explain that your actual priority is finding a home within ABC Unified School District.
That distinction may significantly expand the properties available to you.
Never assume that a property is within ABCUSD because another home nearby is.
Verify every individual address using the district’s official School Search.
Consider the entire home—not just the city name.
Compare price, location, lot size, floor plan, condition, commute, neighborhood and other factors that matter to your household.
When a particular district or school is an important reason for purchasing a home, confirm the assignment directly with the school district before moving forward.
•••••••••••••••••••••
Searching for a home within a school district that crosses several city boundaries can be more complicated than simply searching by ZIP code.
A local real estate professional familiar with Cerritos and the surrounding communities can help you broaden your search without losing sight of your priorities.
Your search can take into account factors such as:
A local agent can help identify possibilities, but school assignments should always be confirmed directly with ABC Unified School District.
•••••••••••••••••••••
No. ABC Unified School District serves Artesia, Cerritos and Hawaiian Gardens, along with portions of Lakewood, Long Beach and Norwalk. Buyers should verify every individual property address before purchasing a home based on its school district.
ABC Unified School District serves Artesia, Cerritos and Hawaiian Gardens, as well as portions of Lakewood, Long Beach and Norwalk.
Yes. Artesia is one of the communities served by ABC Unified School District.
Yes. Hawaiian Gardens is served by ABC Unified School District.
Some Norwalk addresses are within ABC Unified School District, but not all of Norwalk is served by ABCUSD. Buyers should verify the individual property address.
Some Lakewood addresses are within ABC Unified School District. Because only a portion of Lakewood is served by ABCUSD, each address should be verified individually.
Certain Long Beach addresses fall within ABC Unified School District. Long Beach is served by multiple school districts, so buyers should verify the specific property address.
Use the official ABC Unified School District School Search tool and enter the property’s address:
https://www.abcusd.us/apps/pages/index.jsp?uREC_ID=1185677&type=d&pREC_ID=1444428
Because attendance boundaries can change, buyers should confirm current school assignments directly with ABCUSD.
Yes. School attendance boundaries and assignments can change over time. Buyers should verify the current school assignment with ABC Unified School District rather than relying only on previous listings or third-party real estate websites.
•••••••••••••••••••••
Searching within ABC Unified School District doesn’t mean your home search has to begin and end in Cerritos.
Artesia, Hawaiian Gardens and qualifying portions of Norwalk, Lakewood and Long Beach can provide additional possibilities for buyers who want to explore homes within ABCUSD boundaries.
Sometimes expanding your search by just a few miles can introduce you to neighborhoods, homes and price points you hadn’t previously considered.
As a local real estate professional familiar with Cerritos and the surrounding southeast Los Angeles County communities, I can help you identify homes that fit your budget, lifestyle, location and home preferences while narrowing your search to properties that appear to be within ABC Unified School District.
We’ll also make sure you know how to verify the property’s current school assignments directly with ABCUSD before making your final decision.
If you’re thinking about buying a home in Cerritos, Artesia, Norwalk, Lakewood, Long Beach, Hawaiian Gardens or another nearby Southern California community, let’s create a home search strategy that helps you explore all of your options with confidence.
Still deciding whether Cerritos itself is the right fit? Take a look at A Local’s Guide to Spending the Perfect Saturday in Cerritos for a more everyday look at the community.
••••••••••••••••••••
CHRISTINE ALMARINES
Real Estate Agent | CA Real Estate Group | Caliber Real Estate
📱 714-476-4637
📧 christine@carealestategroup.com
DRE #01412944
Christine Almarines is a top real estate agent in Buena Park and Cerritos helping homeowners sell in Orange County and Los Angeles County.
If you’re searching for a home in southeast Los Angeles County, you may have come across the ABC Unified School District (ABCUSD). One of the most common questions homebuyers ask is:
What cities are in the ABC Unified School District?
The answer may give you more homebuying options than you expected.
ABC Unified School District serves Artesia, Cerritos and Hawaiian Gardens, along with portions of Lakewood, Long Beach and Norwalk. Because school district boundaries do not always follow city boundaries, buyers should verify the assigned schools for each individual property before purchasing a home.
While many people associate ABC Unified primarily with Cerritos, you do not necessarily have to buy a home in Cerritos to live within the district.
Whether you’re relocating, buying your first home, moving closer to family, or simply trying to find the right neighborhood, this guide explains which communities are served by ABCUSD, why school boundaries matter, and how to verify the schools assigned to a particular address.
••••••••••••••••••••
ABC Unified School District serves communities in southeast Los Angeles County and offers a variety of educational programs for local students.
The district provides opportunities in areas such as college and career readiness, STEM education, performing arts, athletics and other academic and extracurricular programs.
For many families searching for homes in Cerritos and the surrounding communities, access to ABC Unified schools becomes an important part of the homebuying decision.
However, buyers should remember that simply purchasing a home within a certain city does not automatically mean the property is located within ABCUSD.
The property’s specific address matters.
••••••••••••••••••••
ABC Unified School District serves:
This distinction is important because school district boundaries and city boundaries are not always the same.
For example, one home in Norwalk may fall within ABC Unified School District while another Norwalk home may belong to a different school district.
The same can be true in Lakewood and Long Beach.
That is why buyers should never rely solely on the city name, ZIP code, real estate listing or information from a third-party website when determining school assignments.
Always verify the specific property address.
••••••••••••••••••••
No.
Although Cerritos is strongly associated with ABC Unified School District, homes in several neighboring communities also fall within ABCUSD boundaries.
This can be especially helpful for buyers who want to expand their home search beyond Cerritos.
Depending on available inventory, budget, home size, neighborhood preferences and current market conditions, buyers may find additional opportunities in Artesia, Hawaiian Gardens or qualifying portions of Norwalk, Lakewood and Long Beach.
If Cerritos isn’t the only community you’re considering, you may also want to read Can You Live Outside Cerritos and Still Attend ABC Unified School District?, where we take a closer look at the additional communities buyers can explore.
••••••••••••••••••••
Cerritos continues to attract buyers looking for an established community, convenient location and access to ABC Unified School District.
If you’re specifically considering Cerritos, you can also explore our guide to why buyers consider Cerritos when searching within ABC Unified School District, including local parks, amenities and community resources.
However, your home search does not necessarily need to stop at the Cerritos city limits.
Expanding your search into other ABCUSD communities may provide additional housing choices.
Artesia is located directly adjacent to Cerritos and offers a variety of housing options, including single-family homes, condominiums and townhomes.
Homes in Artesia can be worth considering for buyers who want to remain close to Cerritos while also searching within ABC Unified School District.
As with any property, buyers should verify the assigned schools for the specific address.
Hawaiian Gardens is another community served by ABC Unified School District.
Because it is smaller than many surrounding cities, buyers sometimes overlook it when beginning their home search.
Depending on inventory and your housing needs, Hawaiian Gardens may provide another option for buyers who want to remain within ABCUSD.
Portions of Norwalk fall within ABC Unified School District, but not every Norwalk home is within ABCUSD.
That makes address verification particularly important.
Depending on the neighborhood and current housing market, buyers may find different price points, lot sizes and home styles than they might find in Cerritos.
Portions of Lakewood are also served by ABC Unified School District.
Lakewood offers a wide variety of residential neighborhoods and home styles, making it another community worth considering when expanding an ABCUSD home search.
However, only certain addresses fall within the district, so buyers should confirm the school assignment for each property.
Certain Long Beach addresses are located within ABC Unified School District boundaries.
Because Long Beach is a large city served by multiple school districts, buyers should be especially careful about assuming which school district serves a particular home.
Always verify the address before making a purchase decision based on school attendance.
••••••••••••••••••••
One of the biggest mistakes homebuyers can make is assuming that every property within a city belongs to the same school district.
The best place to start is the official ABC Unified School District School Search tool.
Enter the property’s address to view the schools associated with that location:
ABC Unified School District School Search:
https://www.abcusd.us/apps/pages/index.jsp?uREC_ID=1185677&type=d&pREC_ID=1444428
Because attendance boundaries can change, buyers should verify school information directly with the school district before purchasing a home.
It is also a good idea to confirm school assignments again during your homebuying process rather than relying only on information shown in a real estate listing.
Once you’ve identified a community, the next step is checking the individual property. Our guide to how to verify if a home is in ABC Unified School District before you buy walks through that process step by step.
••••••••••••••••••••
For many homebuyers, schools are one of several important factors when deciding where to live.
A buyer may love a particular house, neighborhood or city but later discover that the property is not assigned to the school or school district they expected.
That is why school boundaries should be researched before submitting an offer, especially when a particular school or district is a priority.
School boundaries can also affect the way buyers compare homes in neighboring communities.
For example, a buyer initially searching exclusively in Cerritos may discover that an Artesia property or a qualifying home in Norwalk, Lakewood or Long Beach better matches their desired home size, location or budget while remaining within ABC Unified School District.
••••••••••••••••••••
Many real estate websites display nearby schools or estimated school assignments alongside property listings.
These tools can be useful for initial research, but they should not be treated as the final authority.
A website may show schools that are geographically close to a property without confirming that the property is actually assigned to those schools.
School information may also become outdated when attendance boundaries change.
When ABC Unified School District is an important part of your home search, verify the property’s address directly through ABCUSD.
••••••••••••••••••••
Searching for a home within a specific school district can become complicated when district boundaries cross multiple cities.
A knowledgeable local real estate professional can help you narrow your search based on:
Your real estate agent can also help identify homes in neighboring communities that you may not have considered when beginning your search.
However, buyers should always make the final school-assignment verification directly with ABC Unified School District.
••••••••••••••••••••
ABC Unified School District serves Artesia, Cerritos and Hawaiian Gardens, as well as portions of Lakewood, Long Beach and Norwalk.
No. Homes located in several neighboring communities are also served by ABC Unified School District.
Yes. Artesia is one of the communities served by ABC Unified School District.
Yes. Hawaiian Gardens is served by ABC Unified School District.
No. Only certain portions of Norwalk are located within ABC Unified School District. Buyers should verify each property’s address individually.
No. Only portions of Lakewood fall within ABC Unified School District boundaries.
No. Only certain Long Beach addresses fall within ABC Unified School District. Long Beach is served by multiple school districts, so individual addresses should always be verified.
Use the official ABC Unified School District School Search tool and enter the property’s address:
https://www.abcusd.us/apps/pages/index.jsp?uREC_ID=1185677&type=d&pREC_ID=1444428
Because attendance boundaries can change, confirm school assignments directly with ABCUSD before purchasing a home.
Yes. School attendance boundaries and assignments can change over time. That is another reason buyers should verify the current information directly with the school district rather than relying exclusively on older listings or third-party websites.
••••••••••••••••••••
If you’re searching for homes within ABC Unified School District, don’t automatically limit your home search to Cerritos.
Artesia, Hawaiian Gardens and qualifying portions of Norwalk, Lakewood and Long Beach may provide additional opportunities while keeping your home search within ABCUSD boundaries.
Expanding your search can sometimes uncover different home styles, lot sizes, neighborhoods and price points that may better fit what you’re looking for.
As a local real estate professional familiar with Cerritos and the surrounding southeast Los Angeles County communities, I can help you identify homes that match your budget, lifestyle and location preferences while helping you narrow your search to properties that appear to fall within ABC Unified School District.
Before moving forward with a property based on its schools, we can also make sure you know where to verify the home’s current school assignments directly with ABCUSD.
If you’re thinking about buying a home in Cerritos, Artesia, Norwalk, Lakewood, Long Beach, Hawaiian Gardens or another nearby Southern California community, let’s create a home search strategy that gives you the information you need to move forward with confidence.
Ready to explore actual properties? Our Cerritos homes and neighborhood guide can help you compare available homes, locations and neighborhoods throughout the city.
••••••••••••••••••••
CHRISTINE ALMARINES
Real Estate Agent | CA Real Estate Group | Caliber Real Estate
📱 714-476-4637
📧 christine@carealestategroup.com
DRE #01412944
Christine Almarines is a top real estate agent in Buena Park and Cerritos helping homeowners sell in Orange County and Los Angeles County.
Your water heater works every day behind the scenes, providing hot showers, clean dishes, and warm water for laundry. Like any hardworking appliance, it performs best with regular maintenance.
One of the most important—and often overlooked—maintenance tasks is draining your water heater once a year. Flushing the tank removes built-up sediment and minerals that can reduce efficiency, shorten the unit’s lifespan, and increase your energy bills.
Over time, minerals naturally settle at the bottom of your water heater tank. This sediment creates a barrier between the burner or heating element and the water, forcing the system to work harder.
Routine flushing helps:
If you’re comfortable tackling a basic home maintenance project, here’s the general process:
Turn the cold-water supply back on briefly until the water flowing from the hose runs clear. This helps flush out remaining sediment.
Close the valves, disconnect the hose, allow the tank to refill completely, and then restore power or relight the gas according to the manufacturer’s instructions.
If your water heater is older, showing signs of corrosion, leaking, or you’re uncomfortable working with plumbing or gas appliances, hiring a licensed plumber is a smart investment.
Professional water heater flushing typically costs between $75 and $150, making it an affordable way to improve efficiency and potentially extend the life of your system.
A yearly water heater flush is one of the easiest ways to keep your plumbing system running efficiently. Spending a little time—or hiring a professional—can help reduce energy costs, improve performance, and prevent expensive repairs down the road.
•••••••••••••••••••••
Most homeowners should flush their water heater once a year to remove sediment buildup and maintain efficiency.
Minerals naturally found in water settle to the bottom of the tank over time, especially in areas with hard water.
Yes. Removing sediment allows the water heater to operate more efficiently, which can reduce energy consumption and utility costs.
If you’re unfamiliar with plumbing systems or have a gas water heater, hiring a licensed professional is often the safest option.
Christine Almarines is a top real estate agent in Buena Park and Cerritos helping homeowners sell in Orange County and Los Angeles County.
If you’re thinking about selling and want to know how your home should be positioned in today’s market, I’d be happy to help.
Get FREE ACCESS to these helpful resources!
>> How Much Is My Southern California Home Worth?
>> How to Sell Your Home in Southern California Fast
>> Buy a Home in Southern California with Confidence
Christine Almarines
📱 714-476-4637 | DRE #01412944
Anaid Bautista
📱 949-391-8266 | DRE #02179675
Hablo Español
Letty Luna
📱 562-879-4181 | DRE #02174000
Hablo Español
Real Estate Agents | CA Real Estate Group | Caliber Real Estate
Please fill out the form below and we will be contacting you shortly
with information about your home.
