Fall is here and that means care for your lawn and garden will differ greatly from the spring and summer months. As colder temperatures roll in, it may be time to start prioritizing other gardening tasks and stop others like mowing your lawn.
Luckily, gardening pros are here to set the record straight on when you should officially stop mowing your lawn, read on for more information.
Why Mowing Your Lawn Is Important
Mowing your lawn isn’t just for superficial reasons or to be the best looking lawn on the block. Mowing your lawn properly and frequently will help keep your grass at the right height, allowing nutrient absorption and deep root growth. It also helps prevent any insect damage and diseases in your yard.
More so, mowing your lawn helps tremendously with weed control, so pesky weeds don’t take over your beloved yard during the spring and summertime. But, do you have to continue mowing your lawn when the temperatures plummet? And what is the exact timeline for that?
Why You Should Stop Mowing Your Lawn
Most experts say that your lawn usually needs to be kept at a height of 2 ½ to 3 inches all year long. But, because grass and other plants grow at a much slower pace when the leaves start to fall and temperatures go from 70 degrees to around 50 degrees, many lawn experts agree that mowing your lawn is unnecessary.
The Ideal Timeline
So now to the bigger question: what is the perfect or ideal timeline for mowing your lawn, and when should you stop taking care of your grass? Although there is no “perfect” timeline, it’s suggested by experts to continue to mow your grass until you notice it not growing as rapidly. This will likely be around late October or early November when the temperatures drop below 50 degrees. But, it depends entirely on where you live. For some climates, you can continue to mow your lawn until early December.
Mowing your lawn prior to temperatures plummeting has been commonly suggested in the past as a way of reducing spring damage from snow molds and voles. However, cutting your grass too short will cause more of a stress to the grass than what your lawn will experience from diseases or animals.
If your usual mowing height for your lawn is 2.5 to 3 inches, experts at the University of Minnesota suggest keeping it exactly there. But, if the preferred height of your lawn is 3+ inches, then they would recommend bringing it down to 3 inches before winter (again this could be late October or early December depending on where you live).
Remember that your lawn will go into dormancy once temperatures get too cold, but don’t fret—your lawn and nature know what it’s doing. It will come out of dormancy once the air and soil temperatures rise come spring.
Wicker baskets may look cute, but are they functional?
From the bedroom closet and inside kitchen cabinets to your kids’ playroom, keeping the house organized isn’t easy. We typically rely on organizers to tame clutter, whether it be shelves for books and baskets, hooks for hanging jackets or categorized bins for toys. But, not all storage solutions are created equal — turns out, there are some items professional organizers always avoid.
Not-so-helpful items, like excessively heavy containers or wooden hangers, can actually thwart your organizing efforts. Before investing in any storage essentials, consider these products professional organizers would encourage you to ditch forever.
1. “Pretty” storage solutions
“When it comes to storage, I avoid solutions that sacrifice function for form. This includes tapered bins that waste precious shelf space, wicker baskets that snag clothes and excessively heavy or super fragile containers. I like to think of storage solutions like an empty suitcase — if it’s heavy or overly complicated before you even pack, it’s not going to do anything but create more burden. I steer clear of oversized containers that become clutter magnets, like large toy chests.” — Laura Kinsella, founder of Urban Organyze.
2. Shelves that can’t adjust
“I stay away from shelving units and cupboards without adjustable shelves. The items people want to store vary in size and height, so the shelves need to be adaptable.” — Julie Stobbe of Mind Over Clutter
3. Organizers with a niche purpose
“If a company went out of their way to create something to fill a niche, I avoid it, as I find that most people never organize that way — we crave basic ways to get organized, like drawers, shelves and cabinets. Think hanging closet shelves, over-the-door organizing pockets, vacuum storage bags — any targeted, customized storage solution.” — Maeve Richmond, founder of the organizing coaching service Maeve’s Method
4. Toy organizers with tilted bins
“I’m not a fan of any kid’s storage shelf that holds between nine and 12 bins that sit on a slant. It seems like a good idea so children can see into the bins, but the bins are small and because they’re on a slant, toys fall onto the floor.” — Julie Stobbe
5. Stacked plastic drawers
“These may be cheap, but they just don’t last; I always find that they break. They also get dirty very easily, and can be difficult to open. The ease of your organizers is the most important factor for sticking with your system. Invest in sturdier drawers instead.” — Rachel Rosenthal, professional organizer at Rachel and Company
6. Free-standing coat racks
“A coat rack is a monster that just keeps growing. Instead, hang just a couple hooks, and store other coats, scarves and hats out of sight. Your entryway will thank you for slaying this beast.” — Jeni Aron, the Clutter Cowgirl
7. Bed frames with built-in drawers
“I find the drawer space to be limiting, and when the bed is pushed into a corner, you lose half the storage. Instead, use bed risers to create a helpful place for suitcases and bins of seasonal clothing.” — Amelia Meena, founder and professional organizer at Appleshine
8. Over-the-toilet shelving units
“If it’s your only option, fine. But I much prefer a floating shelf with attractive baskets on an opposite wall away from the commode. There’s a slimmer chance of something jumping overboard.” — Jeni Aron
9. Wooden hangers
“People choose these because they look pretty, but I hardly ever use them for everyday items. They’re so bulky, and clothes tend to slip off easily. I use slim felt-covered hangers instead, which take up much less space and keep clothes secure.” — Rachel Rosenthal
10. Label makers
“There’s a time and place for label makers, but that’s usually not at home. I’m not saying that labels are terrible, but it’s often unnecessary to use yet another electronic device (which you’ll have to store) to make them. Instead, write labels by hand. This will help you better remember where you’ve stored things, and handwriting is much more pleasing and personal than a printed sticker.” — Marla Kabashima, professional organizer
11. Stacked desk trays
“Thanks to computers and our increasingly paper-free lifestyle, there is less need for organizers that hold stacks of mail or tons of office supplies. I often see people with desk stackers stuffed with items they haven’t used in years. Let the stack go, and replace it with a simple tray or bowl for the few things you do use.” — Maeve Richmond
If you’ve been keeping an eye on the housing market over the past couple of years, you know sellers have had the upper hand. But is that going to shift now that inventory is growing? Here’s a breakdown of what you need to know.
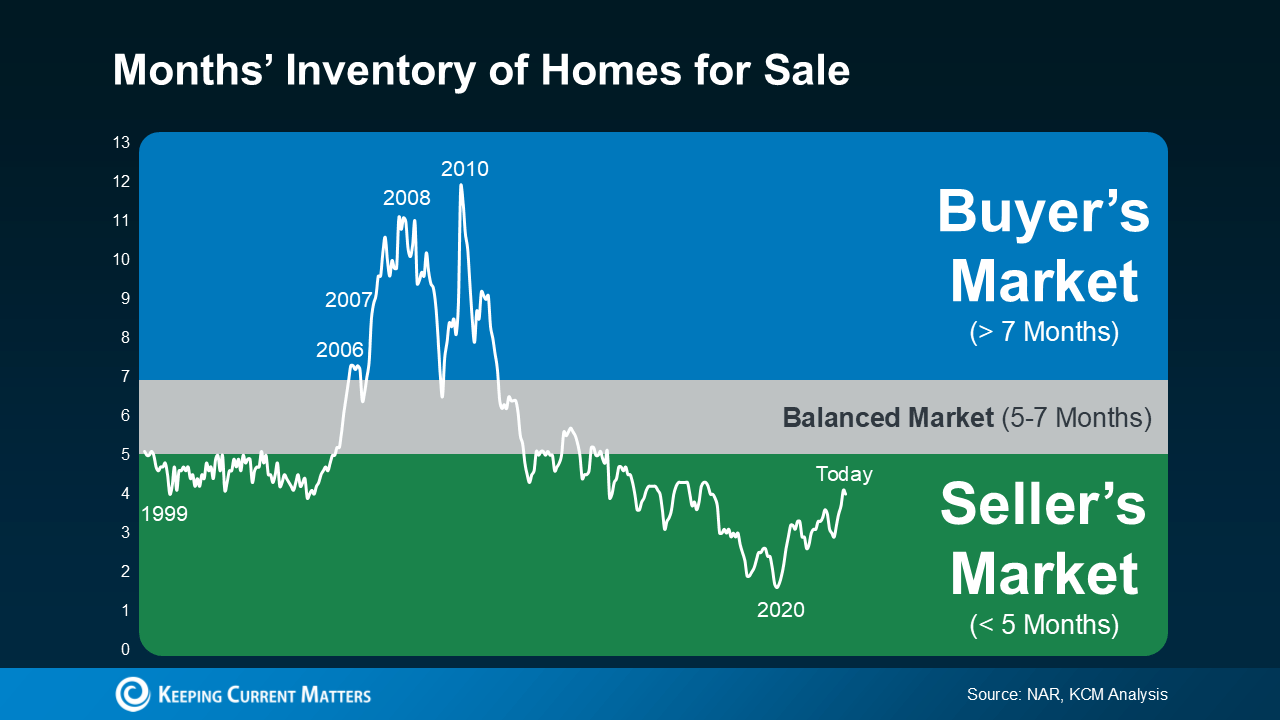
What Is a Balanced Market?
A balanced market is generally defined as a market with about a five-to-seven-month supply of homes available for sale. In this type of market, neither buyers nor sellers have a clear advantage. Prices tend to stabilize, and there’s a healthier number of homes to choose from. And after many years when sellers had all the leverage, a more balanced market would be a welcome sight for people looking to move. The question is – is that really where the market is headed?
After starting the year with a three-month supply of homes nationally, inventory has increased to four months. That may not sound like a lot, but it means the market is getting closer to balanced – even though it’s not quite there yet. It’s important to note this increase in inventory is not leading to an oversupply that would cause a crash. Even with the growth lately, there’s still nowhere near enough supply for that to happen.
The graph below uses data from the National Association of Realtors (NAR) to give you an idea of where inventory has been in the past, and where it’s at today:
For now, this is still seller’s market territory – it’s just not as frenzied of a seller’s market as it’s been over the past few years. As Mark Fleming, Chief Economist at First American, says:
“The faster housing supply increases, the more affordability improves and the strength of a seller’s market wanes.”
What This Means for You and Your Move
Here’s how this shift impacts you and the market conditions you’ll face when you move. Lawrence Yun, Chief Economist at NAR, explains:
“Homes are sitting on the market a bit longer, and sellers are receiving fewer offers. More buyers are insisting on home inspections and appraisals, and inventory is definitively rising on a national basis.”
The graphs below use the latest data from NAR and Realtor.com to help show examples of these changes:
Homes Are Sitting on the Market Longer: Since more homes are on the market, they’re not selling quite as fast. For buyers, this means you may have more time to find the right home. For sellers, it’s important to price your house right if you want it to sell. If you don’t, buyers might choose better-priced options.
Sellers Are Receiving Fewer Offers: As a seller, you might need to be more flexible and willing to compromise on price or terms to close the deal. For buyers, you could start to face less intense competition since you have more options to choose from.
Fewer Buyers Are Waiving Inspections: As a buyer, you have more negotiation power now. And that’s why fewer buyers are waiving inspections. For sellers, this means you need to be ready to negotiate and address repair requests to keep the sale moving forward.
How a Real Estate Agent Can Help
But this is just the national picture. The type of market you’re in is going to vary a lot based on how much inventory is available. So, lean on a local real estate agent for insight into how your area stacks up.
Whether you’re buying or selling, understanding how the market is changing gives you a big advantage. Your agent has the latest data and local insights, so you know exactly what’s happening and how to navigate it.
Bottom Line
The real estate market is always changing, and it’s important to stay informed. Whether you’re buying or selling, understanding this shift toward a balanced market can help. If you have any questions or need expert advice, don’t hesitate to reach out to CA Real Estate Group.
This fall, seasonal decorating is all about simple updates. Enhance your home through a mix of artisanal additions, heirloom pieces, and connections to nature. Color and texture, including rich jewel tones and cheerful doses of blues, yellows, and greens, will also be used with significant impact to lift spirits and offer tactile moments while cozying up at home. Here are the top 2024 fall decorating trends, according to interior designers and industry experts.
Jeff Herr
1. Showcase Heirlooms
“We’re seeing shoppers enter their ‘heirloom era’ this fall, a trend that represents different ways to bring retro and inherently unique items to homes and wardrobes,” says Etsy trend expert Dayna Isom Johnson. This fall decorating style is all about antique vases, rocking chairs, candlestick holders, embroidered pillows, and even old books.
It’s easy to personalize this trend with inherited pieces, but there are fun possibilities for creating special moments with new fall decor, too. Johnson highlights handmade treasures like customized cutting boards showcasing handwritten recipes, while Pottery Barn suggests an Americana look achieved through table linens and bedding.
Julie Soefer
2. Add Artisanal Elements to Your Table
“Artisanal textures and antiques are a long-lasting trend we’ve seen this year, encouraging the purchase and use of handmade and quality items from an era where craftsmanship was held in high regard,” says Brittany Zimmerman of Bleu Bee Designs. “You can incorporate these trends seamlessly by creating a fall tablescape using a collection of antique or vintage brass candlesticks scattered around textured artisanal trays made of copper, plaster or terracotta, which adds a cozy and handmade texture to your tabletop.”
This year, Pinterest identified coffee stations as the new bar cart with their Cafécore trend. Part of elevating the café aesthetic at home is incorporating sculptural and tactile mugs that offer an artisanal look and hand-hewn feel.
Adam Albright
3. Bring in Cheerful Colors
This year’s top trending paint colors have favored soothing earth tones and deep moody hues. And while these shades continue to be popular, Suzan Wemlinger of Suzan J Designs expects to see bright, bold pops of color uplifting interiors this fall. “Orange, turquoise, greens, blues, yellows will be out there,” says Wemlinger.
While smaller doses are expected, she says the colors may also start appearing in wallpaper and paint in addition to accessories like pillows and artwork. “I think that bright and bold is trending because people are yearning for happiness and feel-good vibes,” says Wemlinger. “These colors almost without question lighten one’s mood.”
Adam Albright
4. Let Nature Inspire Your Accessories
“From last year’s cottagecore to this summer’s ‘garden girl,’ the earthy decor and fashion trends inspired by the natural world will bleed into fall, this time in the form of ‘nature reborn’,” says Johnson.
According to Johnson, Etsy shoppers are looking to bring the outdoors in this season through accessories such as pinecones, dried fruit, and log candle holders, while wooden utensils offer a functional take on the trend.
Frontgate’s fall 2024 collection offers natural whimsy with pieces like novelty glass and gold decorative acorns and pomegranate-accented serveware.
Stephen Kent Johnson
5. Accent Botanicals with Jewel Tones
Biophilic design—which emphasizes creating harmony between your home and the world outside—remains a popular interior style after several years in the spotlight. Fall foliage and seasonal gourds are staples of fall decorating, and this fall Zimmerman expects to punctuate these looks with jewel-tone botanicals. “This includes sprinkling in mums in hues of cranberry and plum and rich, dark green magnolia stems and wreaths,” she says.
Crate & Barrel’s fall collection similarly promotes pairing jewel tones and botanical elements, featuring berries, eucalyptus leaves, and floral stems in bold burgundies.
🏡 5045 Twilight Canyon Rd 33F, Yorba Linda
🏡 2 bd | 2 ba | 1,252 SQ FT
———– OPEN HOUSE SCHEDULE:
🚩 SAT, SEP 28, 1:00-4:00 PM
🚩 SUN, SEP 29, 1:00-4:00 PM ———–
🌴 Welcome to the Hills Condominium Community in Yorba Linda. This unit is an end unit on the 2nd floor. Better views of the hills and trees from this unit from the balcony that is a wraparound connecting the living room, kitchen, and primary bedroom all with sliders to exit. Refurbished throughout with paint, carpet, redone counters and sinks and bathtubs and showers. Beautifully decorated for your visiting pleasure to give you great ideas when you are the buyer. New appliances in the kitchen include the stove, dishwasher, and microwave. This is a perfect home for somebody that likes to dine in or sit in the living room and enjoy the fireplace or venture outside onto the balcony. With high ceilings, this space seems to grow as you sit back and relax. With all the great amenities of a pool, spa, gym, tennis court and well as water and trash paid, why would you look anywhere else?
———–
See more photos of this gorgeous property here: https://carealestategroup.com/search/listing/5045-twilight-canyon-road-33f-yorba-linda-ca–PW24200003/
———–
Letty Luna @lettylunarealestate
Buyers Agent Realtor DRE # 02174000
(562) 879-4181 | letty@carealestategroup.com
———–
(Listing by Edie Israel [DRE#01399225] and Keller Williams Realty)
🏡 5015 Twilight Canyon Rd 36D, Yorba Linda
🏡 2 bd | 2 ba | 1,252 SQ FT
———–
OPEN HOUSE SCHEDULE:
🚩 SUN, SEP 29, 1:00-4:00 PM
———–
🌴 Here is your opportunity to get in on the ground floor for this special 2 bedroom and 2 bath condo in the Hills Condominium Community in Yorba Linda. Located at the back of the development gives you a better view of the hills. This unit has received a lot of love with paint, carpet, and redone kitchen counters as well as a new stove and microwave and dishwasher! Just sit down in your breakfast nook and enjoy the views to the hills, maybe feed the birds, or read a book. Walk out the slider from the kitchen and relax on the balcony. That same balcony is also accessible from the living room slider or the primary bedroom slider. At the end of the balcony is the laundry room. One full bath is a part of the master suite with a walk-in closet. The other bath has a shower and both bathrooms have had the counters, tub and shower refurbished. So many good things about the condo as it also has a dining room and a good-sized living room with a fireplace. The HOA is generous as it provides great amenities with the pool and spa area, and the gym, in addition to the tennis court. The HOA pays for the water and the trash and parking is accessible right outside your front door. ———–
See more photos of this gorgeous property here: https://carealestategroup.com/search/listing/5015-twilight-canyon-road-36d-yorba-linda-ca–PW24200010/
———–
Anaid Bautista @wealthwithanaid
Buyers Agent Realtor DRE # 02179675
(949) 391-8266 | anaid@carealestategroup.com
CA Real Estate Group | Caliber RE Group
———–
(Listing by Edie Israel [DRE#01399225] and Keller Williams Realty)
Lower mortgage rates and rising inventory are giving home buyers a window of opportunity at an unusual time of year. Lower mortgage rates have improved affordability significantly for home buyers, and competition among them could extend into the fall instead of fading away as is typical at this time of year.
Mortgage rate drops equate to serious savings
Mortgage rate declines have made buying a home “affordable” again at the national level (meaning monthly payments generally take less than one-third of median household income), assuming a buyer puts 20% down and before taxes and insurance are accounted for. Nationwide, the monthly payment on a typical home purchase has fallen by more than $100 since a peak in May. That drop is more than $300 a month in the ultraexpensive San Francisco metro area.
Lower rates also make it easier for buyers to qualify for a mortgage on more of the inventory listed in a given area, functionally increasing the choices available to them.
Home shoppers gain choices, bargaining power
Beyond lower costs, a number of metrics are moving in buyers’ favor. The Zillow market heat index shifted from being in favor of sellers into neutral territory in July. For the past two years, sellers held their edge nationally until October.
Homes are taking longer to sell than in recent history, but shorter than in pre-pandemic times. Homes that sold in August took 20 days to go pending, two more than in July, but about six days faster than at this time of year before the pandemic. And while inventory growth has slowed, nearly 1.18 million homes are on the market, more than any month since September 2020.
Added interest could extend summertime competition
Lower rates could stall or slow the cooldown in housing market activity that typically takes place this time of year, because right now buyers are more likely to be motivated by lower rates than sellers are.
Spring is normally the prime time to list because sellers often want to make sure they are in their new home before the school year and fall holidays start. Most homeowners (80%) are influenced to sell by life events, such as an addition to the family or a new job, and not necessarily by optimizing the mortgage rate on their next home, according to Zillow surveys.
Some signals are already pointing to an altered trajectory in the housing market. The share of listings on Zillow with a price cut ticked down from July to August, reversing an upward trend of rising every month since March. Just under 26% of homes on the market had a price cut in August. That’s relatively high for this time of year, but not a record, as seen in recent months.
Home values
This month, the typical home in the US was $362,143. The typical monthly mortgage payment, assuming 20% down, was $1,827. Lower mortgage rates pushed monthly mortgage costs down 3.4% from July to August.
Home values climbed month-over-month in 9 of the 50 largest metro areas in August. Gains were biggest in Buffalo (0.7%), New York (0.6%), Providence (0.4%), Hartford (0.3%), and Philadelphia (0.3%).
Home values fell, on a monthly basis, in 37 major metro areas. The largest monthly drops were in San Francisco (-1.3%), San Jose (-1.1%), Austin (-1%), Denver (-0.7%), and New Orleans (-0.6%).
Home values are up from year-ago levels in 44 of the 50 largest metro areas. Annual price gains are highest in San Jose (9.1%), Hartford (8%), Providence (7.1%), New York (7%), and San Diego (6.2%).
Home values are down from year-ago levels in 5 major metro areas. The largest drops were in New Orleans (-4.6%), Austin (-4.6%), San Antonio (-2.9%), Birmingham (-0.9%), and Dallas (-0.4%).
The typical mortgage payment is down 2.9% from last year and has increased by 103.8% since pre-pandemic.
Inventory & new listings
New listings decreased by 1.1% month-over-month in August.
New listings increased by 0.8% this month compared to last year.
New listings are 21.3% lower than pre-pandemic levels.
For-sale inventory (the number of listings active at any time during the month) in August increased by 0.2% from last month.
There were 22.1% more for-sale listings active in August compared to last year.
Inventory levels are -30.8% lower than pre-pandemic levels for the month.
Price cuts & share sold above list
25.9% of listings in August had a price cut, compared to 26.2% in July and 23.4% in August 2023.
33.4% of homes sold above their list price last month. That’s compared to 35.4% in June and 39.1% in July of 2023.
Newly Pending Sales
Newly pending listings decreased by 5% in August from the prior month.
Newly pending listings decreased by 2.9% from last year.
Median days to pending, the typical time since initial list date for homes that went under contract in a month, is at 20 days in August, up 2 days since last month.
Median days to pending increased by 7 days from last year.
Market Heat Index
Zillow’s market heat index shows the nation is currently a neutral market.
The strongest seller’s markets in the country are Buffalo, Hartford, San Jose, Boston, and New York.
The strongest buyer’s markets in the country are New Orleans, Miami, Jacksonville, Austin, and Tampa.
Rents
Asking rents increased by 0.2% month-over-month in August. The pre-pandemic average for this time of year is 0.4%.
Rents are now up 3.4% from last year.
Rents fell, on a monthly basis, in 2 major metro areas – Austin (-0.4%) and Boston (-0.1%).
Rents are up from year-ago levels in 49 of the 50 largest metro areas. Annual rent increases are highest in Hartford (7.7%), Cleveland (7.2%), Louisville (7.1%), Richmond (6.8%), and Virginia Beach (6.6%).
For many families, the kitchen is the social hub of the home, so it’s important that you clean often. Some areas of your kitchen will require consistent attention, such as the counters. Others, like larger appliances such as the refrigerator or oven, can be addressed on a weekly or perhaps monthly basis.
Below, you’ll find daily, weekly, monthly, and seasonal kitchen cleaning checklists to simplify your routine. These detailed guides will help you create and maintain a tidy kitchen space.
Supplies You’ll Need
The Spruce / Sanja Kostic
Before you get started, make sure you have the proper tools and cleaning solutions on hand. The following is a comprehensive list, detailing all of the supplies you need for the four kitchen cleaning checklists in this guide.
For your daily kitchen cleaning checklist, focus your attention on the counters and floors. Keeping these high-use areas clean will help you cultivate a more hygienic environment.
Remove any decor, appliances, or clutter from the countertops.
Wipe down the counters with a clean, damp cloth and an all-purpose cleaner or warm, soapy water. You can also use a DIY all-purpose cleaner, made of diluted vinegar. Consider wiping down high-use areas at this time as well, such as the drawer and cabinet pulls and the handle on your microwave.
Sweep the floors.
Return the items you moved to their proper homes on the countertop or elsewhere.
Unload your dishwasher and tackle any dirty dishes by handwashing or loading the dishwasher.
Wipe down the faucet and inside of your sink with an all-purpose cleaner. Pay close attention to any corners and crevices that may be collecting grime.
Take out the trash and recycling.
Put any cleaning rags or kitchen towels in the laundry and replace them with clean ones.
Weekly Kitchen Cleaning Checklist
The Spruce / Jenelle Botts
In addition to your daily cleaning regimen, your weekly routine should include frequently used appliances like your microwave and refrigerator. Start your weekly cleaning routine with the steps below, then finish with your daily kitchen cleaning checklist above.
Clean the interior and exterior of your countertop kitchen appliances, including your toaster, coffee maker, and microwave.
Next, it’s time to clean the refrigerator. You’ll need to rearrange or remove items as you clean, so you’re able to wipe down all of the shelf and drawer space. As you go, check for expired goods and toss them. Remember to wipe down the face and handles of your refrigerator too. (Save the freezer for your monthly kitchen cleaning checklist.)
Wipe down your stovetop with a store-bought or DIY all-purpose cleaner. Don’t forget to wipe down the face of your oven too.
Next, wipe down additional high-use areas, such as light switches, drawer pulls, cabinet handles, and door knobs.
Turn off (at the breaker box) and clean your garbage disposal, using distilled white vinegar and baking soda.
Finally, you can move on to the daily cleaning checklist and finish your weekly routine by mopping your kitchen floors.
_____
Tip
During your weekly kitchen cleaning routine, take a look at your supplies and see if any cleaning solutions or tools need to be replaced or replenished. Take this opportunity to add those items to your grocery list.
Monthly Kitchen Cleaning Checklist
The Spruce / Sanja Kostic
Your monthly kitchen cleaning checklist provides an opportunity to tidy and disinfect areas that are not frequently used, but still collect dust and grime over time. This includes cabinet and drawer faces, windows, and even the inside of your garbage can. Start with your daily kitchen cleaning checklist, then move onto the tasks below.
Remove the contents of your cabinets and drawers to prepare for cleaning and organizing (we recommend following steps three and four for one cabinet or drawer at a time). This includes your pantry.
Wipe out the inside of your drawer or cabinet with an all-purpose cleaning solution, then move onto the cabinet or drawer face.
Return the contents of your cabinet or drawer, organizing as you go. Move onto the next drawer or cabinet and repeat steps three and four until you’ve tackled all of the storage space.
Wipe down any tiles and grout, such as a kitchen backsplash, with your all-purpose cleaner.
Next, wipe down areas that may be collecting dust, such as the tops of cabinets and light fixtures.
Clean the inside of your dishwasher with a soft abrasive brush or sponge, distilled white vinegar, and baking soda. Be sure to wipe down the face of your dishwasher with an all-purpose cleaner when you’re finished.
Seasonal Kitchen Cleaning Checklist
The Spruce / Ana Cadena
While the checklists above will help you maintain a clean and sanitary kitchen, there are a few leftover tasks you should complete every few months.
Set your oven to the self-clean setting. Keep in mind this process requires some prep (such as removing the racks and turning on the oven vent) and can take a couple of hours.
Using a microfiber cloth and all-purpose cleaning solution, wipe down the ceiling and walls in your kitchen. When you complete this step, pay close attention to areas that may have gathered grease or steam, such as the wall behind your kitchen faucet and the ceiling area above your vent hood.
When you empty and deep clean the cabinets and drawers in your kitchen (during the monthly kitchen cleaning checklist), search for any kitchen tools and utensils you can donate or toss. For cabinets or drawers with food (as well as the pantry), see if there are any items that need to be replaced or replenished, such as expired goods or spices running low.
Unplug your refrigerator and pull it away from the wall. Clean the top of your fridge, the floor underneath it, and even the coils behind it. Use a microfiber cloth and all-purpose cleaner for the top of your refrigerator and the coils, then a broom, dustpan, and mop for the floor. Plug the refrigerator back into the outlet, then return it back to it’s proper home.
Tips for Sticking to Your Kitchen Cleaning Schedule
Following the kitchen cleaning checklists above will take time and discipline, but there are several tips you can use to help you keep up with the chores.
Schedule kitchen cleaning days in your calendar. This is especially important for your monthly and seasonal kitchen cleaning checklists.
Keep your kitchen organized.Maintaining an organized kitchen will help prevent clutter, optimize your food storage, and notice and address any grease, spills, and other debris quickly.
Store your cleaning supplies in bins. Keeping the supplies needed for each checklist in labeled plastic bins can help you grab what you need quickly when it’s time to complete a cleaning checklist.
Declutter often. Instead of waiting until it’s time to complete your kitchen cleaning checklist, make sure you are frequently looking for and removing any expired products or tools/utensils that aren’t being used.
In today’s fast-paced world, many families opt to enjoy meals around a kitchen table or breakfast bar, often leaving the formal dining room empty and unused. Here are a few ways you can revamp your formal dining room into a fun or functional space.
Make a Work Area
Boost your productivity by designating a separate space that prevents work and homework from overtaking the rest of your home. Furnish the room with a desk, a supportive chair and a small worktable for projects. Be sure to include baskets or other storage bins to organize supplies.
Set Up a Game Room
Score big on family bonding with a game room that brings everyone together in a fun, modern way — much like the dining room table once did. Consider a ping-pong or pool table with an add-on tabletop feature and surround it with comfortable chairs. Include cabinetry to store board games.
Start an Indoor Garden
Show off your green thumb with a variety of plants in their very own garden room. Use colorful planters and vases to bring character to the space, but make sure you place planters on waterproof surfaces.
Build a Library
Line the walls with shelves and fill them with your favorite books. For something unusual, consider creating a music library with your favorite vinyl albums or a small movie room to house your favorite films. Don’t forget to include some plush seating to enjoy your media collection.
Create a Sitting Room
Ditch the TV and create an inviting conversation space with comfortable furnishings arranged to encourage family connection. Add soft lighting and an electric fireplace for added warmth.
Organize a Decor Swap
Transform your space without spending a dime by trading trinkets for newfound treasures at a decor swap.
Plan the Perfect Swap
Send invitations to friends and family. Include instructions detailing how many pieces to bring, what items are acceptable and what to leave at home. You might even try a themed swap, like “seasonal splendor” or “vintage vibes.”
Host With Style
Create an inviting atmosphere with light background music and refreshments. Arrange tables to display the featured pieces and allow everyone to browse, then have your guests make selections. Keep the process simple by drawing two or three names at a time and setting a time limit for choosing items. Allow extra time for any additional swapping between guests.
Any unclaimed items remaining after the decor swap is over can be donated to a local nonprofit or posted online in a Buy Nothing group.
Lighting Hacks
Proper lighting can make or break a room’s look and feel. Every room is different, so it’s important to tailor lighting to the function of the space.
Soft lighting works well in rooms where you want to relax, such as bedrooms and living rooms. Skip the overhead lights and opt for table lamps or wall sconces to create a sense of coziness.
Practical lighting is essential in areas where you want to be productive, such as an office or workout room. In these spaces, the right overhead lighting and functional fixtures can add brightness and boost productivity.
Versatile lighting is key in the areas of your home where you can be both productive and relaxed, such as the kitchen or primary bedroom suite. Install dimmer switches for overhead lighting to adjust the mood as needed. Add lamps or battery-operated LED candles to create a warm, inviting atmosphere during relaxation time, and consider under-cabinet lighting for practical tasks. Layering your lighting options allows you to easily transition the space from bright and functional to soft and soothing.
The Dirty Truth About Kitchen Towels
Keeping your kitchen sparkling clean isn’t just about scrubbing surfaces and washing fruits and veggies. One often overlooked culprit for bacteria buildup is the kitchen towel.
While cloth towels are an economical and environmentally friendly alternative to paper, they’re breeding grounds for bacteria. Even after rinsing towels in the sink, salmonella can still grow quickly overnight. Towels used to wipe down counters and clean up spills should be laundered in a washing machine with hot water after one day’s use. If towels are used only to dry hands, they should be laundered after three or four days. Experts also recommend replacing kitchen towels every year or two.
Recipe: Penne With Smoked Sausage
Ingredients
1 Tbsp. olive oil
1 lb. smoked sausage
½ cup diced onion
1 Tbsp. minced garlic
½ tsp. salt
½ tsp. pepper
2 cups chicken broth
1 (10 oz.) can diced tomatoes
½ cup milk
2 cups dry penne pasta
Crushed red pepper
Shredded Parmesan cheese
Basil leaves
Arugula leaves
Directions
Heat olive oil in a large pan over medium heat. Slice sausage into bite-sized pieces. Brown sausage and onion in olive oil. Add garlic, salt and pepper. Continue cooking for about 30 seconds.
Add chicken broth, tomatoes, milk, and dry pasta to the pan and bring to a boil. Reduce heat to low and cover. Simmer for 15 minutes. Remove from heat and top with crushed red pepper and Parmesan cheese. Garnish with basil and arugula leaves.
August 17, 2024 marks a seismic shift in the real estate industry.
It’s a day that will reshape how buyers and sellers interact, and most importantly, it will redefine the relationship between buyers and their agents.
For those of us who have been in real estate for decades, this change feels almost revolutionary. But the seeds of this transformation were planted back in the 1990s when buyers first began advocating for buyer’s agents to be true fiduciaries, safeguarding their interests above all else. This movement was driven by a desire for transparency, accountability, and a partnership that ensured buyers were fully represented in one of the most significant financial decisions of their lives.
The Shift in Commissions
Traditionally, buyer agents were compensated through the MLS, with commissions often baked into the sale price of a home. Come August 17th, however, this practice will no longer be the default. Commissions for buyer agents will be removed from the MLS, meaning buyers and agents alike will be in the dark about whether compensation is available. This is a significant departure from the status quo, where both parties had clear expectations going into a transaction.
New Requirements for Buyers
Another key change is the introduction of mandatory signed agreements before buyers can even tour a property privately with an agent. These agreements come in various forms:
Exclusive Buyer Agency Contract: A commitment that binds the buyer to an agent for a specified period, often requiring compensation upfront for their services.
Single Property Tour Form: A more flexible agreement for buyers who want to tour a specific property without long-term commitment.
Non-Exclusive Buyer Agency Contract: Ideal for investors, this agreement allows buyers to work with multiple agents simultaneously, offering flexibility in their search.
The introduction of these forms signals a new era where the choice of representation matters more than ever. Buyers must be more strategic in selecting their agents, ensuring they align with their needs and goals.
Historical Context: The Evolution of Buyer Representation
In the 1990s, the concept of a buyer’s agent being a fiduciary was a radical idea. Before that, most agents worked primarily for the seller, even if they were showing homes to buyers. The introduction of buyer agency contracts changed the game, giving buyers their own advocates in the transaction process. Today’s changes build on that legacy, pushing the industry toward even greater transparency and fairness.
What Buyers Need to Do Now
As we navigate this new landscape, it’s crucial for buyers to understand their options and the implications of these changes:
Educate Yourself: Understanding the different types of agreements and how they affect your buying power is more important than ever.
Choose Wisely: The agent you work with will significantly impact your experience and outcome. Make sure they are fully informed and able to articulate their value proposition.
Plan Ahead: The days of casually touring homes without a plan are over. Buyers must now be more deliberate in their approach, ensuring they have the right representation in place from the start.
Questions to Consider
Are you prepared for the new requirements in the home-buying process starting August 17th?
How will the removal of buyer agent commissions from the MLS affect your home search strategy?
What should you look for in a buyer’s agent in this new era of real estate?
Conclusion
The real estate market is on the cusp of a significant change, but with the right preparation and understanding, buyers and sellers can navigate these new waters successfully. Who you work with matters more than ever, and having the right representation can make all the difference in achieving your real estate goals. That’s why you can call any of our CA Real Estate Group agents to help you navigate your next real estate purchase or sale.
 For now, this is still seller’s market territory – it’s just not as frenzied of a seller’s market as it’s been over the past few years. As Mark Fleming, Chief Economist at First American, says:
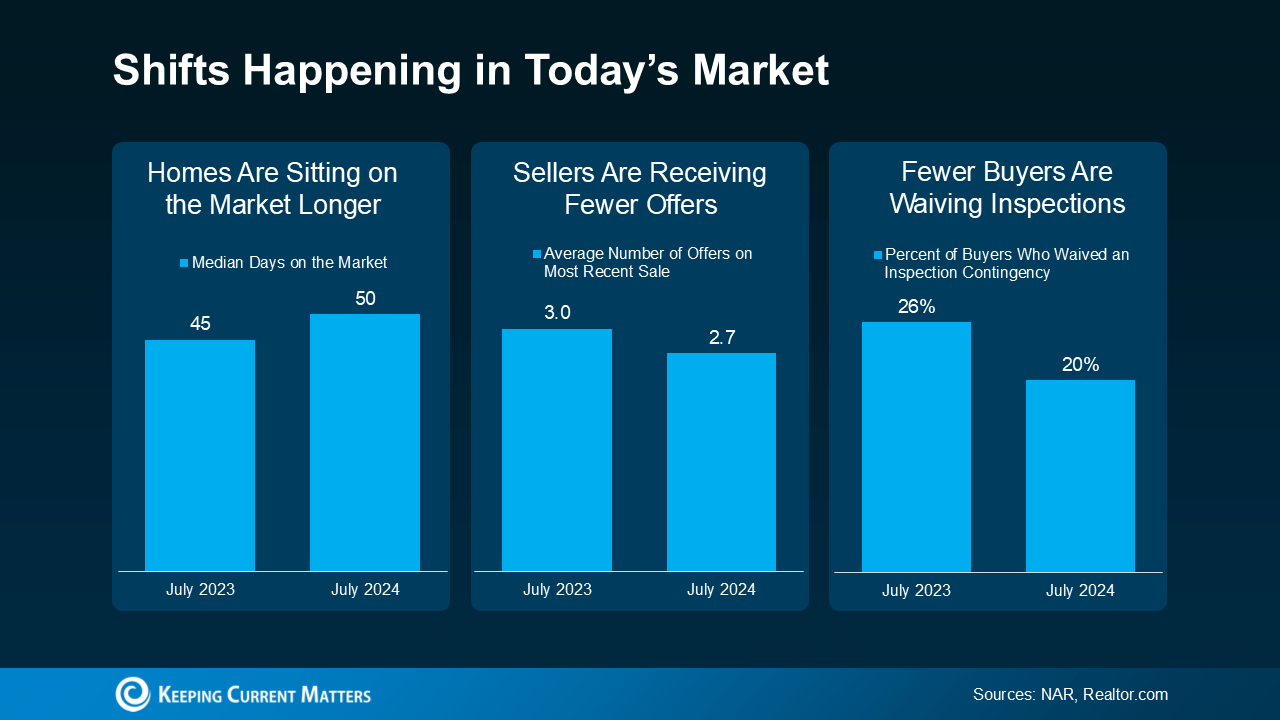 Homes Are Sitting on the Market Longer: Since more homes are on the market, they’re not selling quite as fast. For buyers, this means you may have more time to find the right home. For sellers, it’s important to price your house right if you want it to sell. If you don’t, buyers might choose better-priced options.
:strip_icc():format(webp)/Meredith.Modern.Farmhouse.Style.Jungmeyer_16_preview-c6a49346e0a14271b1d96d592993f437.jpg)
:strip_icc():format(webp)/Fall-harvest-centerpiece-7452_211202_Meredith_76KkasiLq65BArrciOelcM-902e8c057e344e2880528e097870e2b3.jpg)
:strip_icc():format(webp)/detail-front-porch-pink-mums-pumpkins-stone-6_MR-uUTaDjBVtlJ_NmMQh-83df8bff55a441eca0131edd8de0e593.jpg)
:strip_icc():format(webp)/fall-table-setting-leaves-branches-f4d0443f-44c14b7f80f54644b8a7a63e2e119e71.jpg)
:strip_icc():format(webp)/102679979_preview-d9063914ee0140b6ba42773b5913b4c2.jpg)


:max_bytes(150000):strip_icc():format(webp)/kitchen-cleaning-checklist-6831396_06-12773541c7614c479e8fa0f24feeedeb.jpg)
:max_bytes(150000):strip_icc():format(webp)/kitchen-cleaning-checklist-6831396_22-0c01c2d56c52418b8481a1b2725b6284.jpg)
:max_bytes(150000):strip_icc():format(webp)/baking-soda-in-the-microwave-1900607-04-E-57505de715f549c1ad3737238ac61003.jpg) The Spruce / Jenelle Botts
The Spruce / Jenelle Botts:max_bytes(150000):strip_icc():format(webp)/kitchen-cleaning-checklist-6831396_08-0f654827d0424f7a88c15c7eafef9e49.jpg)
:max_bytes(150000):strip_icc():format(webp)/SPR-how-to-deep-cleaning-house-7152794-part-02-step-01-5738dadc88ec442aaa10d433e18cb7d7.jpg)


 ©2024 The Personal Marketing Company. All rights reserved. Reproductions in any form, in part or in whole, are prohibited without written permission. If your property is currently listed for sale or lease, this is not intended as a solicitation of that listing. The material in this publication is for your information only and not intended to be used in lieu of seeking additional consumer or professional advice. All trademarked names or quotations are registered trademarks of their respective owners.