
Pets are a beloved part of many families, and creating a safe and enjoyable outdoor space for them is important.
Whether you have a dog, cat, or other outdoor pet, there are several steps you can take to make your yard or garden safe for them.
Creating a safe and enjoyable outdoor space for your pets requires some extra effort, but it is well worth it. By following these steps, you can help to ensure that your pets stay safe and happy in your yard or garden. Remember to check for poisonous plants, install fencing, avoid toxic chemicals, create shade, provide water, keep your yard clean, and provide toys and play areas.
Experience the world’s best hotels for the day, no overnight stay required.
• Discover Daycations: Select a date and explore pool, spa, beach access and more, at 1,000+ top hotels.
• Book Confidently: After booking, receive check-in instructions, parking details, and all necessary information.
• Flexible Support and Cancellation: Invite guests or cancel bookings as needed with support on our website or app.
• Experience serenity with a spa pass starting at $35: Enjoy a day of steamy saunas, cold plunges, pools, and more. Massages and other treatments may also be purchased, ensuring you leave feeling your very best.
• Give a daycation: Know someone who could use some pampering and relaxation in their life? A day of luxury is the perfect gift.
Maintaining a beautiful lawn in Southern California can be a challenging task due to the hot and dry climate, but with proper lawn care tips, it is possible to have a lush and healthy lawn all year round.
Here are some lawn care tips that can help you achieve a beautiful lawn in Southern California:
We loved these ideas so much that we’re reposting these for Mother’s Day 2024! I’m sure you’ll find something here that she’ll love and appreciate. 🙂
BY WOMANSDAY.COM UPDATED: MAY 4, 2021
These meaningful gifts for mom may not cost money, but will show you care all the same.
While it’s important to remind your mom how much you love and appreciate her on Mother’s Day, that reminder doesn’t have to break the bank. There are plenty of affordable Mother’s Day gifts under $25 that look anything but cheap and, if you’re crafty, you can always make a DIY Mother’s Day present for that special lady in your life. However, if the ongoing Covid-19 crisis has put you on a very tight budget, then these free and frugal Mother’s Day gifts can be used to tell your mom, grandma, stepmom, mother-in-law, or any other maternal figure you know and love just how much you care. The best part? They won’t require you to spend more than a few bucks (or no money at all!).
Saying “I love you” on Mother’s Day doesn’t have to entail an actual gift. You can show your appreciation by making a special Mother’s Day brunch, helping her around the house, or planning a Mother’s Day activity for the two of you to enjoy. A thoughtful Mother’s Day card is also a great way to express your gratitude. But if you’re looking for a small memento to give your mom on May 9, and after a particularly difficult year, then these free (or basically free) gifts are the way to go.
Your love doesn’t have to cost a thing, and these free Mother’s Day gifts prove it. The best part: These gift ideas all make perfect last-minute Mother’s Day presents if you accidentally procrastinated this year.

Give your mom the freedom to choose how she spends her special day with a free download of an adorable book of coupons.
Get the printable from Skip to My Lou.

If you consider yourself handy in the kitchen, then you should whip up a yummy Mother’s Day dessert, such as this Giant Sugar Cookie Bouquet.

Forget expensive store-bought cards. There are plenty of free printable Mother’s Day cards available, which you can fill with your own heartfelt message.
Get the printable from Alice & Lois.

Make a mini succulent even sweeter with a printable flag label, which reads, “Mom, thank you for helping me grow.” You can also decorate a mason jar plant holder if you’re feeling creative.
Get the printable from Lolly Jane.

To give your mom her own custom wine bottle, all you need is an inexpensive bottle of wine and a free printable Mother’s Day label.
Get the printable from Online Labels.

If your mother would prefer a candle to wine, then pick up a cheap candle and make it special with your own printable label.
Get the printable from Down Redbud Drive.

Nothing says Mother’s Day like breakfast in bed — and you can really make your mom’s day by having her fill out her own free printable “room service” door hanger.
Get the printable from Somewhat Simple.

With the help of a pinewood board, wood stain, and a printable label, you can create a photo display that your mom is sure to treasure forever.
Get the printable from Shanty 2 Chic.

A mom with a sweet tooth is sure to enjoy her own personalized mason jar, which you can fill with her favorite small candies.
Get the printable from Uncommon Designs.

If your mom loves to read, then she’s sure to appreciate a custom bookmark, which you can gift to her alone or alongside a new book.
Get the printable from The 36th Avenue.

This pocket-sized flip book can serve as a sweet reminder of how much you love your mom, and you can customize it however you’d like.
Get the printable from The Creative Place.

If you have frame lying around, then you can create a beautiful piece of art with a printable quote, which can be printed in any size you like.
Get the printable from Gluesticks & Gumdrops.

Though this custom canvas requires a bit more work than simply printing and framing, you can easily create a professional-looking canvas with a few tools and a printable template.
Get the printable from Craftaholics Anonymous.

Puzzle-loving moms will definitely get a kick out of this Mother’s Day-themed word search, which you can give to her along with some cute pens.
Get the printable from Hey, Let’s Make Stuff!

Want to remind your mom of all her best qualities? Then fill a mason jar with slips of paper containing sweet compliments, either by themselves or affixed to small pieces of candy.
Get the printable from Positively Splendid.

If you’ve got a tea aficionado in your life, then you can gift her a tea bag (or a few) inside these custom tea bag covers.
Get the printable from The Thrifty Couple.

Rather than giving your mom flowers, let her grow her own with seeds tucked inside these cute packet cards.
Get the printable from Mom Brite.

Make a mini scrapbook of your mom’s life with this digital template, which you can fill with facts about your mama and customize however you’d like.
Get the printable from Simple As That.

A simple candy bar can be transformed into a personalized Mother’s Day gift with one of these brightly-colored labels.
Get the printable from Lil’ Luna.

Give your mom her own custom “super mom” notepad for jotting down reminders (and you can stick them inside a cheap pencil box to make this gift extra thoughtful).
Get the printable from Living Locurto.

Every mom could use an emergency stash of candy, and with the help of an inexpensive plastic organizer and some treats, you can make a customized candy box.
Get the printable from Eighteen 25.
We’ve been fantasizing about it for months, and finally warmer weather has arrived. We know: You just want to fire up the grill and start working on your tan—we do, too! But before you can kick back in your hammock (or in your pool on your giant patriotic bald eagle float, if that’s your thing), there are a few tasks you’ll need to tackle.
And you can bet they’re all outside.
“The old adage ‘April showers bring May flowers’ rings true and makes May prime time for landscaping and lawn care in most of the country,” says Missy Henriksen, vice president of public affairs for the National Association of Landscape Professionals.
But it goes beyond gardening and yard work. Now’s the last chance to take care of all that winter wear and tear and transform your home’s outdoor space into something worthy of the host with the most.
The good news? We’re here to make it as quick and easy on you as possible—with our handy checklist of home maintenance chores, you can knock them out and get back to that pool float ASAP. We’ve provided tips for doing each task faster and easier—or with the help of a pro.
Task: Freezing temperatures can wreak havoc on hardscape surfaces made of loose (unmortared) brick, stone, and concrete paving materials. Check to see if frost heave and erosion have caused pavers to shift, rise, or sink. You’ll want to fix any unevenness for safety as well as aesthetic reasons.
Shortcuts: Repair hardscape surfaces using a wheelbarrow filled with playground sand and a sturdy trowel. Pry up displaced pavers, smooth and even out the bed with fresh sand, and replace the paver.
Call in the pros: This is a good job for a handyman. Expect to pay $30 to $60 an hour, depending on your location.
Task: After a wet spring, your lawn might be looking quite rich and lush. Since Mother Nature did the hard work, you can sit back and relax, right? Not so fast. Grass loves nutrients, so now’s the time to add high-nitrogen fertilizer to help suppress weeds and keep your lawn looking great all summer.
Shortcuts: A push-powered broadcast spreader makes quick work of fertilizing your lawn. You’ll find spreaders suitable for an average suburban lawn for $35 to $100. If you have a cooking compost pile, you can substitute home-grown compost for commercial fertilizers.
Call in the pros: A lawn care company will spray on a chemical fertilizer for about $40 an application.
Task: Cycles of cold and wet weather cause wood to move, twist, and warp. That can make garden gates fall out of alignment, and can cause fence pickets to loosen or fall off. Check for signs of loose fencing, and fix sagging gates.
Shortcuts: A cordless battery-powered nail gun ($250) makes quick work of refastening pickets and fence supports. Use only galvanized nails for outdoor work. Use a power drill fitted with a screw tip or a hex driver to remove or tighten loose screws and bolts in gates.
Call in the pros: This is a good job for a handyman. You’ll pay $30 to $60 an hour, depending on your location.
Task: Prevent evaporation and help keep weeds in check by insulating planting beds with 2 to 4 inches of mulch.
Shortcuts: Set aside a mulching day, and have a landscaping service deliver bulk mulch and dump it where you can get to it easily (like your driveway). Plan on 1 cubic yard of mulch to cover 100 square feet, with mulch 3 inches deep.
Call in the pros: A landscaping service will put in the mulch, but it’ll cost you—to the tune of $300 to $600 for 500 square feet, depending on your location.
Task: As your yard takes shape and your gardens come into full bloom, you’ll want to see everything clearly. It’s time to wash away winter’s dirt and grime from your windows.
Shortcuts: Have a partner clean the outside while you do the inside of the same window. That way, you can identify which side of the glass contains lingering streaks and smudges, and get rid of them on the spot. Plus, who wants to clean alone?
Call in the pros: In addition to cleaning the glass, a professional window washer will remove and clean screens and remove accumulated dirt from sliding tracks for $2 to $7 per window.
Task: Nobody wants a rack of ribs with last year’s grill gunk on them. Before you fire up the ol’ barbecue, make sure your grill is clean and that any gas hoses and connections are secure.
Shortcuts: No matter what kind of grill you have, invest in a grill brush or other coarse cleaning brush, remove the grates and metal plates beneath them, and soak them in hot soapy water for five to 10 minutes. Then scrub hard. To rinse, spray them with the hose.
Cover the area where the grates usually go with foil, and use a stiff grill brush to clean grime from the hood and inside walls. Use a cleaner specifically designed for your grill’s surface (e.g., stainless steel, porcelain, or cast iron), and reassemble all parts.
Call in the pros: There are professional grill cleaners who will take your barbecue from slimy to spotless, but it will cost you the equivalent of a few porterhouse steaks. This Denver cleaning service offers quotes from $185 to $279.
Task: Now’s your last chance to double-check your air-conditioning unit and make sure it’s in good working order before the mercury starts to rise.
Shortcuts: Hook up a garden hose and spray the outside of the condenser to remove any dust that’s settled on the unit and connections. (Yes, dust can affect your AC’s effectiveness.) Don’t use a brush, and be careful if pressure washing—you could damage or bend the fins. Make sure to change the filter, too.
Call in the pros: Having a pro service your AC system costs a few hundred dollars and includes cleaning the condenser and lubricating the fan motor.
View this post on Instagram
You don’t want to miss this!
The newest Mexican food hall and market in OC is packed with 20+ places to eat. A foodie destination that should be on your list on your trip to Orange County.
There are a lot of food halls but this one is filled with good food and good vibes. This place gets so packed they even offer valet parking.
Open Monday-Tuesday & Sunday 6am-10pm, Friday & Saturday 6am-11pm.
They bring in live music on weekends and offer cooking classes throughout the year.
View this post on Instagram
Compliments of @localemagazine…
Keeping Current Matters | Apr 16, 2024
If you’ve got a move on your mind, you may be wondering whether you should wait to sell until mortgage rates come down before you spring into action. Here’s some information that could help answer that question for you.
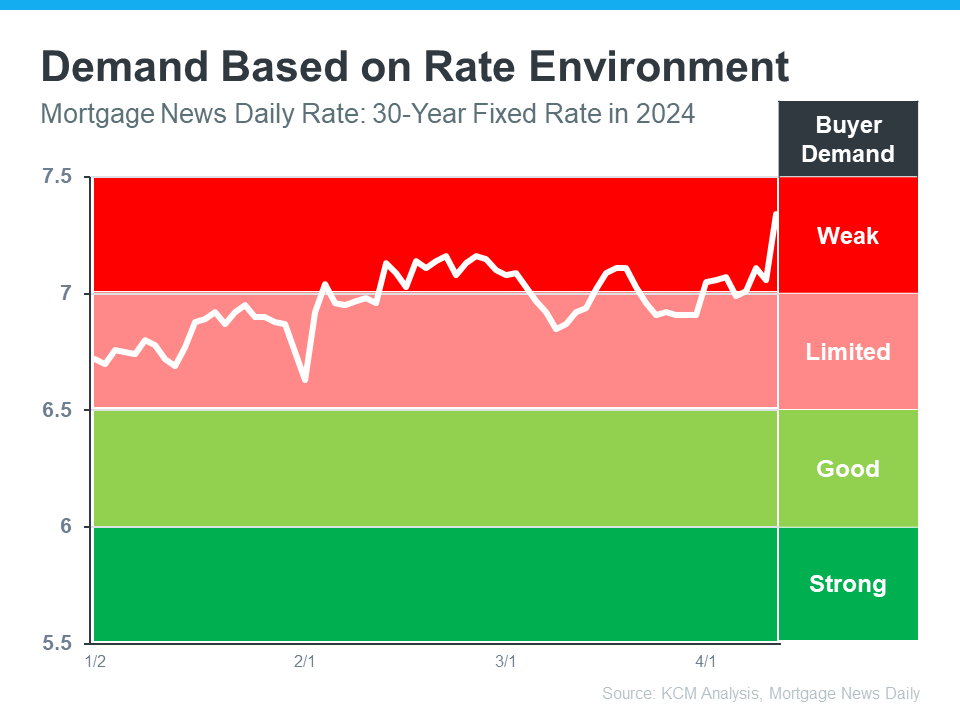
In the housing market, there’s a longstanding relationship between mortgage rates and buyer demand. Typically, the higher rates are, you’ll see lower buyer demand. That’s because some people who want to move will be hesitant to take on a higher mortgage rate for their next home. So, they decide to wait it out and put their plans on hold.
But when rates start to come down, things change. It goes from limited or weak demand to good or strong demand. That’s because a big portion of the buyers who sat on the sidelines when rates were higher are going to jump back in and make their moves happen. The graph below helps give you a visual of how this relationship works and where we are today:
As Lisa Sturtevant, Chief Economist for Bright MLS, explains:
“The higher rates we’re seeing now [are likely] going to lead more prospective buyers to sit out the market and wait for rates to come down.”
If you’re asking yourself: what does this mean for my move? Here’s the golden nugget. According to experts, mortgage rates are still projected to come down this year, just a bit later than they originally thought.
When rates come down, more people are going to get back into the market. And that means you’ll have a lot more competition from other buyers when you go to purchase your next home. That may make your move more stressful if you wait because greater demand could lead to an increase in multiple offer scenarios and prices rising faster.
But if you’re ready and able to sell now, it may be worth it to get ahead of that. You have the chance to move before the competition increases.
If you’re thinking about whether you should wait for rates to come down before you move, don’t forget to factor in buyer demand. Once rates decline, competition will go up even more. If you want to get ahead of that and sell now, talk to a CA Real Estate Agent.
Let’s connect and plan your next steps. Find out if we’re the right real estate team for you!
CA Real Estate Group | Caliber RE Group
👩🏻 Christine Almarines @carealestategroup
Realtor DRE# 01412944 | 714-476-4637
👩🏻 Anaid Bautista @wealthwithanaid
Realtor DRE# 02179675 | 949-391-8266
Hablo español
Apr 15, 2024
