Keeping Current Matters | Octo 21, 2022
![3 Questions You May Be Asking About Selling Your House Today [INFOGRAPHIC] | MyKCM](https://files.mykcm.com/2022/10/20151852/3-questions-you-may-be-asking-about-selling-your-house-today-MEM-1046x2637.png)
- If you’re planning to sell your house this year, you likely have questions about what the shift in the housing market means for your home sale.
- You might be wondering: Should I wait to sell? Are buyers still out there? And can I afford to buy my next home?
- Let’s connect so you can get answers to these questions and learn about the opportunities you still have in today’s housing market.
🍁🎃👻 Look no further if you’re planning a Halloween party or fall festival and in need of some hilarious Halloween games that are great for all ages?!
For detailed instructions on how to play the MYSTERY BOX GAME and a list of 30 awesome and creepy household items to use in your mystery box, go to https://www.thespruce.com/halloween-feel-box-game-1357636

Feel that nip in the early-morning air? That’s right, fall is delivering cooler temperatures and shorter daylight hours, which signals California’s broadleaf trees to get their colors on. Grab a thermos of steaming, pumpkin-spiced something and hit the road—maybe to a California State Park—to see oaks, aspens, dogwoods, and willows cloaked in their candy-colored coats.
When’s the best time of year to witness this autumnal splendor? That depends on many factors: the type of tree, the region, and the elevation, to name a few. But foliage report websites such as California Fall Color and Mono County’s Fall Color Report can provide real-time conditions. Typical foliage seasons are provided below, but keep in mind that as with any general guideline, it could change—in this case, due to a single storm or cold spell. Check local websites or other resources (if you are visiting a state or national park, a call to one of their ranger stations might provide some insight). For optimal leaf-peeping without the weekend crowds, plan a midweek trip to these autumn hotspots, listed south to north:
SOUTHERN CALIFORNIA
Julian, San Diego County
In Julian, autumn is the grandstand season, both for apple-pie eating and leaf-peeping. Sample the town’s homemade apple confections, then watch black oaks do their color-changing trick at Lake Cuyamaca in Cuyamaca Rancho State Park. A scenic 45-minute drive leads to Palomar Mountain State Park, where you can put some miles on your feet while you admire bracken ferns and leafy oaks on the Thunder Ridge and Chimney Flat Loop. Or hike the Five Oaks Trail at Volcan Mountain Wilderness Preserve, home to some of the oldest and largest black oaks in San Diego County. Typical peak season: early to mid-November.
Temecula Valley and Murrieta, Riverside County
In Southern California’s wine country, colorful leaves cling to gnarled grapevines after the harvest, making autumn’s magic last well into November. Savor vintages and vineyards decked out in fall colors as you drive past 19 wineries on Rancho California Road plus 10 more on De Portola Road. In neighboring Murrieta, pedal your mountain bike or hike through Cole Canyon‘s oak woodlands and Sylvan Meadows’ bunchgrass prairie. At the end of the day, nab a patio seat for fall-themed dining in Old Town Temecula. Typical peak season: late November to early December
Oak Glen, San Bernardino County
At this rural enclave in the San Bernardino Mountain foothills, autumn stakes its claim in the golden oaks punctuating the hillsides and orange pumpkins dotting Riley’s Farm. At the Wildlands Conservancy’s Oak Glen Preserve, a 2.4-mile loop leads from park headquarters downhill through the apple orchards of century-old Los Rios Rancho, Southern California’s largest apple farm. Typical peak season: mid-October to early November
Santa Maria Valley, Santa Barbara County
Southern Santa Barbara County is known for palm trees and sandy beaches, but northern Santa Barbara—aka the Santa Maria Valley—is known for tasty Pinot Noir, Syrah, and Chardonnay. Drive the 30-mile Foxen Canyon Wine Trail to see pastoral vineyards showing off their autumn regalia. Hop on your bike and ride through 14 miles of forested canyon on Tepusquet Road, a one-lane byway near Byron Winery. Or drive to Guadalupe’s Oso Flaco Lake to see golden-hued arroyo willows and walk its 1.5-mile boardwalk trail above the tranquil lake (don’t forget binoculars for bird-watching). Typical peak season: as early as August, through mid-October
NORTHERN CALIFORNIA
Bishop to Bridgeport, Inyo and Mono Counties
Expert leaf-peepers never miss a road trip on US 395 to see the Eastern Sierra’s blue-ribbon fall foliage. Catch the aspen show between Bishop and Bridgeport by side-tripping west on major roads heading into the mountains: Highway 168 from Bishop to Sabrina and South Lakes, the June Lake Loop (Highway 158) past Silver and Grant lakes, and Lundy Lake Road seven miles north of Lee Vining. Or keep north on US 395 to see quaking aspen stands glow like stained-glass windows at Conway Summit, then score even more aspen eye-candy by driving Bridgeport’s Twin Lakes Road west to Twin Lakes. The Mono County Fall Color Report offers weekly updates on where the fall colors are looking their best. Typical peak season: mid-September through October
Sonora to Sonora Pass, Tuolumne County
Every autumn, Highway 108‘s aspen groves put on a dazzling color show. Start your trip in Sonora with a hike on Dragoon Gulch Trail, taking in views of Gold Country’s colorful hills. Then head east on Highway 108, cruising up the grade past Pinecrest Lake. Pause at Donnell Vista to admire volcanic ridges gussied up in fiery yellows and oranges, then pop in to Kennedy Meadows Resort to say hello to the horses or fill up with a hearty burger before ascending another 10 miles to Sonora Pass. As you descend down the east side, the aspen show is nearly nonstop. Typical peak season: early September through October
Hope Valley, Alpine County
South of Lake Tahoe, Hope Valley’s dense aspen groves offer nearly traffic-stopping displays of glowing golds, opulent oranges, and brilliant reds. Start your drive from the west on Highway 88 in Jackson or Pioneer, then wind your way uphill until you top out at Carson Pass. A sharp descent plunges you into Hope Valley, where you’ll pull over every quarter-mile to snap another photo. Aspens border both sides of the highway, but especially showy stands are found near Red Lake and Wylder Hope Valley Resort. For even more aspen glory, take a side trip north on Highway 89 over Luther Pass into Meyers and South Lake Tahoe. Gorgeous groves show off their colors all the way north to Emerald Bay. Typical peak season: mid-October to mid-November
Nevada City and Grass Valley, Nevada County
Walk down Nevada Street in Nevada City to see century-old sugar maples and American sweetgums (liquidambars) turning a brilliant stoplight red. Planted by Gold Rush miners in the mid-1800s, these fall foliage champions pair well with the Victorian buildings lining the town’s historic district. Explore downtown, then walk the level Cascade Canal Trail, shaded by red-hued dogwoods and deep green Douglas firs. In nearby Grass Valley, stroll around Empire Mine State Historic Park, where the colorful leaves of ornamental sweetgums, silver maples, and sugar maples accent the subtler gold of native black oaks. Walk any of the trails that start at the Gold Hill Drive Trailhead to see the trees sporting their fall colors. Typical peak season: mid-October to mid-November
Keeping Current Matters | Oct 6, 2022
Rising interest rates have begun to slow an overheated housing market as monthly mortgage payments have risen dramatically since the beginning of the year. This is leaving some people who want to purchase a home priced out of the market and others wondering if now is the time to buy one. But this rise in borrowing cost shows no signs of letting up soon.
Economic uncertainty and the volatility of the financial markets are causing mortgage rates to rise. George Ratiu, Senior Economist and Manager of Economic Research at realtor.com, says this:
“While even two months ago rates above 7% may have seemed unthinkable, at the current pace, we can expect rates to surpass that level in the next three months.”
So, is now the right time to buy a home? Anyone thinking about buying a home today should ask themselves two questions:
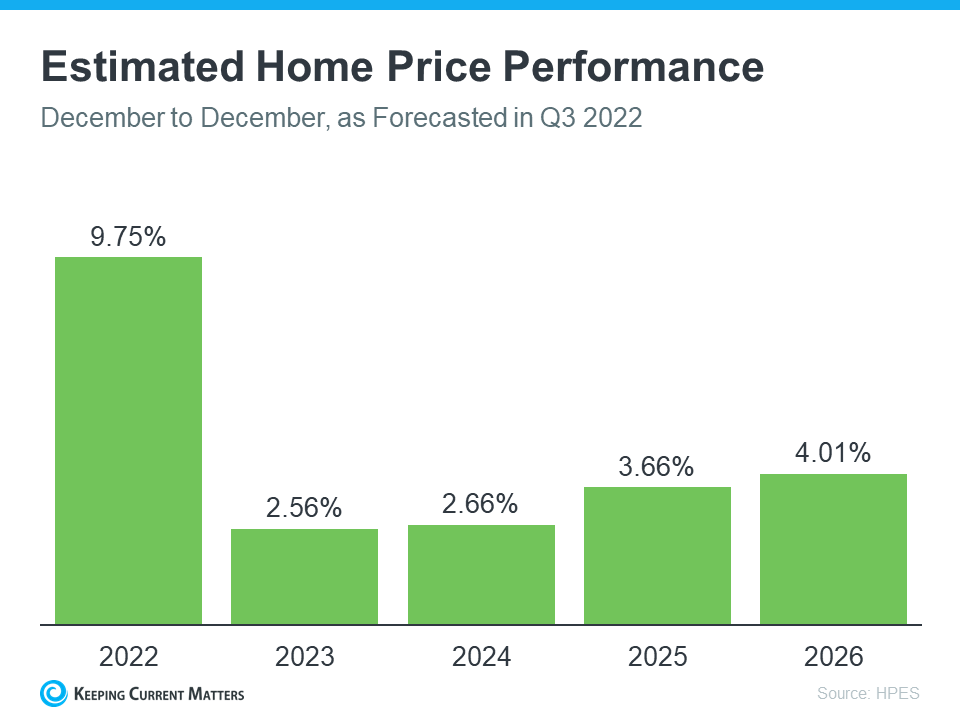
1. Where Do I Think Home Prices Are Heading?
There are two places to turn to answer this question. First is the consensus of what experts are saying. If you look at what experts are projecting for home prices in 2023, they’re forecasting home price appreciation around 2%. While it’s true some are calling for depreciation, most are calling for appreciation in home values over the next year.
The second spot to turn to for information is the Home Price Expectation Survey from Pulsenomics – a survey of a national panel of over one hundred economists, real estate experts, and investment and market strategists. According to the latest release, the experts surveyed are also calling for home price appreciation for the next several years (see graph below):
2. Where Do I Think Interest Rates Are Heading?
Like mentioned above, Ratiu sees mortgage rates rising over the next several months. Another expert agrees. Mark Fleming, Chief Economist at First American, says:
“While mortgage rates are expected to continue to drift higher over the coming months, much of the rapid increase in rates is likely behind us.”
The instability in the world and higher inflation are driving this volatile market, resulting in higher borrowing rates for those looking to buy homes.
Bottom Line
If you’re thinking about buying a home, asking yourself about home prices and mortgage rates will help you make a powerful and confident decision. Experts see both prices and rates rising in the future. The alternative is to rent, but rents are also increasing. That may mean buying a home makes more sense than renting.
Let’s chat and connect!
Christine Almarines @carealestategroup
Realtor DRE # 01412944
714-476-4637 | christine@carealestategroup.com
Michelle Kim @michellejeankim_homes
Realtor DRE # 01885912
714-253-7531 | michelle@carealestategroup.com
Esther Oh @estheroh_realtor
Realtor DRE # 02155451
323-0899-7065 | esther@carealestategroup.com
Realtor.com | Oct 7, 2022
It may not be poolside season any longer, but that doesn’t mean it’s time to call it quits in your backyard living space just yet. With a few more warm days and brisk nights ahead, now’s actually a great time to rethink your outdoor design and make it seasonally appropriate with string lights, cozy decor, and a bit of overhead protection from the sun or rain.
This week’s Instagram decor trends include five looks that will inspire you to polish up your outdoor space—whether it’s an apartment balcony or a spacious backyard seating area—so you can enjoy these last few weeks of outdoor living in style.
1. Scandi-inspired seating
No one knows how to ring in the colder seasons in style quite like the Scandinavians, and this Scandi-inspired seating from @primrose.co.uk illustrates the point perfectly.
We love the minimalist vibe of the seating area made from recycled wooden pallets and faux fur rugs.
“It’s a relatively cheap look to re-create and creates an ideal seating arrangement for a casual meal,” says design and remodeling expert Ben Kuhl, of Shelf Expression. “Use throw pillows and candles to enhance the look.”
Get the look: Add a few of these faux fur throws to your outdoor seating area.
2. Garden-path fairy lights
Another easy way to bring a bit of soothing ambiance to your outdoor space is to line your backyard with string lights, like the ones seen here from @camilliabloomsbury.
“If you have a developed flower garden, this might be just the thing,” says Kuhl. “These fairy lights add romantic mood lighting to your outdoor space—making it perfect for a picnic date with your partner. Use a shepherd’s hook to get the right height for your lights.”
Get the look: Pair these outdoor string lights with these shepherd’s hooks.
3. Patio mirror
Mirrors are an amazing addition to small indoor spaces—and as we can see in this photo from @leopard_print_stairs, the same can be said for their magic effect on outdoor spaces, too.
“Mirrors will fabricate the illusion of extra space, making them perfect for small garden areas,” says interior designer David Lee, of Neutypechic. “Placing a mirror on your patio will create an indoor-outdoor feel and give it a homey vibe.”
4. Bamboo canopy
One of the most inexpensive and effective ways to create some shade from the weather—and cultivate that tucked-in feeling—is with a bamboo canopy like this one from @sallydoessassy.
“If you live in a city where it’s usually hot and sunny, add a bamboo canopy in your backyard,” says Lee.
This overhead cover can also come in handy during a light sprinkle of rain.
Get the look: Grab a few rolls of bamboo or reed fencing to create your perfect vintage canopy.
5. Hanging lanterns
Improving the lighting in your outdoor space while also making it look high-end is as simple as hanging some trendy lanterns like these ones from @fincadelicaibiza.
“Low-hanging lanterns are coming back into fashion, and they will give your patio or backyard an Ibiza-inspired vibe, so you feel like you’re chilling somewhere more exotic than your own backyard,” says Lee.
Get the look: Hang up a few of these natural rattan lanterns or these solar-powered lanterns to give your patio that cocktail lounge glow.
While watching the stock market recently may have started to feel pretty challenging, checking the value of your home should come as welcome relief in this volatile time. If you’re a homeowner, your net worth got a big boost over the past few years thanks to rising home prices. And that increase in your wealth came in the form of home equity. Here’s how it works.
Equity is the current value of your home minus what you owe on the loan. Because there was a significant imbalance between the number of homes available for sale and the number of buyers looking to make a purchase over the past few years, home prices appreciated substantially. And while rising inventory and mortgage rates have cooled the market some in recent months, home prices nationally remain strong.
That’s why, according to the latest Homeowner Equity Insights from CoreLogic, the average homeowner equity has grown by $60,000 over the last 12 months. While that’s the national number, if you want to know what happened, on average, over the past year in your area, look at the map below from CoreLogic:

Why This Is So Important Right Now
Lawrence Yun, Chief Economist at the National Association of Realtors (NAR), helps explain why this matters so much today:
“. . . the decline in the stock market has dented overall net wealth. It has fallen by $6 trillion from the first to the second quarter. Only housing wealth has held on, with homeowners’ real estate wealth (home value minus mortgage balance) rising by $1.2 trillion.”
While equity helps increase your overall net worth, it can also help you achieve other goals like buying your next home. When you sell your current house, the equity you built up comes back to you in the sale, and it may be just what you need to cover a large portion – if not all – of the down payment on your next home.
Bottom Line
There’s volatility in today’s stock market, but home equity is still incredibly strong. To find out just how much equity you have in your current home, let’s connect.
Pumpkin patches bring a touch of farm life to Southern California cities, but many have more to offer than supplying the raw materials for Halloween jack-o-lanterns.
They have carnival rides, activities for children, petting zoos and often live entertainment.
Here are some of the places at are opening between now and early October.
Los Angeles County
Cal Poly Pumpkin Festival: Oct. 1-30. Pumpkin patch with photo stops, hayrides, goat petting, corn maze, fair food and live entertainment. Tickets are only available online for reserved time slots. $6-$10 for general admission; $5-7 for ages 3-12. There will be a preview Sept. 30 with food and drink samples and entertainment; tickets are $70. AGRIscapes Center, Cal Poly Pomona, 4102 S. University Drive, Pomona. cpp.edu/~pumpkinfestival
Carved at Descanso Gardens: Oct. 7-31. Hundreds of carved pumpkins on display, hay maze, holiday foods. $20-$26 for members, $32-$38 for non-members.1418 Descanso Drive, La Cañada Flintridge. 818-949-4200, descansogardens.org
Forneris Farms: Oct. 8-31. Pumpkin patch and corn maze. Entry is $5, cash only, and there are additional charges for other attractions. 15200 Rinaldi St., Los Angeles. fornerisfarms.com
La Verne Heritage Foundation: Oct. 7-30. Pumpkin patch, tractor-pulled rides, petting farm. Heritage Park, 5001 Via De Mansions, La Verne. laverneheritage.org
Mr. Bones Pumpkin Patch: Oct. 7-30. Pumpkin and teepee villages, bounce houses, straw maze, petting zoo, giant rocking horses. Admission $10-$30 depending on date and time, extra charges for activities. 10100 Jefferson Blvd., Culver City. 310-276-9827, mrbonespumpkinpatch.com
Mr. Jack O’ Lanterns Pumpkin Patch, Farmers Market: Oct. 15-31. Games, activities and animals. Free admission, extra charge for activities. 6333 W 3rd St., Los Angeles. mrjackolanternspumpkins.com
Mr. Jack O’ Lanterns Pumpkin Patch, Torrance: Oct. 1-31. Games, activities and animals. Free admission, extra charge for activities. 17520 Prairie Ave., Torrance. mrjackolanternspumpkins.com
Mr. Jack O’ Lanterns Pumpkin Patch, West Los Angeles: Oct. 1-31. Games, activities and animals. Free admission, extra charge for activities. 11852 Santa Monica Blvd., Los Angeles. mrjackolanternspumpkins.com
Pa’s Pumpkin Patch: Sept. 30-Oct. 31. Petting zoo, pony rides, corn stalks and fair foods. Advance reservations are required and can be booked online. 6701 E. Pacific Coast Highway, Long Beach. paspumpkinpatch.com
Shawn’s Pumpkin Patch: Oct. 1-31. Pumpkin bounce house, train rides, petting zoo, carnival games. No entrance fee, but activities cost $3.50-$7. 11650 Santa Monica Blvd. Los Angeles. shawnspumpkinpatch.com
Toluca Lake Pumpkin Patch: Sept. 26-Oct. 31. Petting zoo and haunted maze. $10 for admission to both. 10601 Riverside Drive, North Hollywood. 818-505-8039
Orange County
Hana Field Pumpkin Patch: Oct. 1-29. U-pick pumpkins and sunflowers, corn maze and barnyard. $10 admission, $15 for flower-picking, activities extra. 427 Anton Blvd, Costa Mesa. 949-653-2100.
Irvine Park Railroad: Sept. 17-Oct. 31 Free haunted house, hay maze, hay pyramid, picture stands. Other activities cost extra, including train and hay rides, bounce houses, face painting and panning for gold. Great Pumpkin Weigh-off, Saturday, Sept. 24. Free admission, but parking is $3-$7. Irvine Regional Park, 1 Irvine Park Road, Orange. 714-997-3968, irvineparkrailroad.com
Pick of the Patch Pumpkins: Sept. 17-Oct. 31. Giant slides and inflatables. Admission is free; wristbands for inflatables cost $17-$30. 101 W. Avenida Vista Hermosa, San Clemente. abctreefarms.net
Pumpkin City, Anaheim: Sept. 30-Oct. 31. Carnival rides, games, petting zoo, entertainment. 2180 E. Lincoln Ave., Anaheim. pumpkincity.com
Pumpkin City, Laguna Hills: Sept. 30-Oct. 31. Carnival rides, games, petting zoo, entertainment, Oktoberfest beer garden. Laguna Hills Mall, 24203 Avenida de la Carlota, Laguna Hills. pumpkincity.com
Pumpkin Factory: Oct. 1-31. Rides, bounce houses, paintball target shooting, petting zoo. 1025 Westminster Mall, Westminster. thepumpkinfactory.com
Tanaka Farms: Open now through Oct. 31. U-pick pumpkins, wagon rides, arts and crafts. $10 general admission; extra for activities. Parking passes are required, fee is $10 on weekends. 5380 University Drive, Irvine. 949-653-2100.
Zoomars at River Street Ranch: Saturday, Sept. 24-Oct. 31. Petting zoo with goats, sheep and guinea pigs, pony, train and mini-tractor rides. Admission is $15, $12 for children12 years and younger, 31791 Los Rios St., San Juan Capistrano. 949-831-6550, riverstreetranch.com
Riverside County
Big Horse Corn Maze & Pumpkin Patch: Oct. 1-30. Giant maze at Big Horse Feed and Mercantile. Food vendors and beer garden on weekends. 33320 Temecula Parkway, Temecula. $15 admission, $10 parking on weekends. 951-389-4621, bighorsecornmaze.com
Hunter’s Pumpkin Patch: Open now through Oct. 30. Carnival games, rides, barrel train, food. 12125 Day St., Building Q, Moreno Valley. 951-440-2027, hunterspumpkinpatch.com
Peltzer Pumpkin Farm: Saturday, Sept. 24-Oct. 31. Petting zoo, games, mining, face painting, rides. $2 admission on weekdays, $3 on weekends, extra for attractions. Pumpkin painting classes for $20 Tuesdays and Thursdays in October. 39925 Calle Contento, Temecula. peltzerfarms.com
Pick of the Patch Pumpkins: Saturday, Sept. 24-Oct 31. Giant slides and inflatables. Admission is free; wristbands for inflatables cost $17-$30. 18614 Dexter Ave., Lake Elsinore. abctreefarms.net
Pumpkin Factory: Oct. 1-31. Rides, bounce houses, petting zoo. 1545 Circle City Drive, Corona. thepumpkinfactory.com
San Bernardino County
Frosty’s Forest: Sept. 30-Oct. 30. “Hocus Pocus”-themed corn maze, sunflower labyrinth, petting zoo, bounce houses, carnival games. $5-$10 admission. A scary corn maze called Haunted Harvest is on the property with $30 separate admission.14861 Ramona Ave., Chino. frostysforest.com, thehauntedharvest.com
Greenspot Farms: Opens Oct. 1. Rides, farm animals, duck races, crafts and hay maze. Free admission. Scary nighttime attractions will be offered Oct. 16-31, including Haunted Hayride and Haunted Trail. Tickets are $15-$30. 10133 Ward Way, Mentone. 909-794-7653, greenspotfarms.com
Live Oak Canyon Pumpkin Farm: Open now through Oct. 31. U-pick pumpkins, more than 50 attractions including corn maze, petting zoo and rides. Live entertainment in October. $10-$25 admission for adults, $5-$20 for children; extra charge for some attractions. Live Oak Canyon Road at the 10 Freeway, Yucaipa. liveoakcanyon.com
SkyPark at Santa’s Village: Oct. 8-30. Pumpkin patch, activities, live entertainment and trick-or-treating on weekends. $59 for adults, $49 for children. 28950 Highway 18, Skyforest. skyparksantasvillage.com
Source: https://www.ocregister.com/2022/09/20/where-to-find-pumpkin-patches-for-halloween-2022/
Keeping Current Matters | Sep 8, 2022
There’s no denying the housing market is undergoing a shift this season as buyer demand slows and the number of homes for sale grows. But that shift actually gives you some unique benefits when you sell. Here’s a look at the key opportunities you have if you list your house this fall.
Opportunity #1: You Have More Options for Your Move
One of the biggest stories today is the growing supply of homes for sale. Housing inventory has been increasing since the start of the year, primarily because higher mortgage rates helped cool off the peak frenzy of buyer demand. But what you may not realize is, that actually could benefit you.
If you’re selling your house to make a move, it means you’ll have more options for your own home search. That gives you an even better chance to find a home that checks all of your boxes. So, if you’ve put off selling because you were worried about being able to find somewhere to go, know your options have improved.
Opportunity #2: The Number of Homes on the Market Is Still Low
Just remember, while data shows the number of homes for sale has increased this year, housing supply is still firmly in sellers’ market territory. To be in a balanced market where there are enough homes available to meet the pace of buyer demand, there would need to be a six months’ supply of homes. According to the latest report from the National Association of Realtors (NAR), in July, there was only a 3.3 months’ supply.
While you’ll have more options for your own home search, inventory is still low, and that means your home will still be in demand if you price it right. That’s why the most recent data from NAR also shows the average home sold in July still saw multiple offers and sold in as little as 14 days.
Opportunity #3: Your Equity Has Grown by Record Amounts
The home price appreciation the market saw over the past few years has likely given your equity (and your net worth) a considerable boost. Danielle Hale, Chief Economist at realtor.com, explains:
“Home owners trying to decide if now is the time to list their home for sale are still in a good position in many markets across the country as a decade of rising home prices gives them a substantial equity cushion . . .”
If you’ve been holding off on selling because you’re worried about how rising prices will impact your next home search, rest assured your equity can help. It may be just what you need to cover a large portion (if not all) of the down payment on your next home.
Bottom Line
If you’re thinking about selling your house this season, work with a real estate professional so you have the expert insights you need to make the best possible move today.
💡 For more Real Estate Tips like these, Home Maintenance Tips on Mondays, and Fun Fridays, follow us at @carealestategroup — we are more than just real estate!
👩 Christine Almarines @christine_almarines
Realtor DRE # 01412944 714-476-4637 | christine@carealestategroup.com
👩 Michelle Kim @michellejeankim_homes
Realtor DRE # 01885912 714-253-7531 | michelle@carealestategroup.com
👩 Esther Oh @estheroh_realtor
Realtor DRE # 02155451 323-0899-7065 | esther@carealestategroup.com
Realtor.com | Aug 13, 2022
What’s the dirtiest place in your home? Despite all the germs floating around your bathroom, there’s actually way more nastiness happening in—yikes!—your kitchen, than practically anywhere else in the home, according to a study by the National Sanitation Foundation (NSF).
“The areas in which food is prepared actually contain more bacteria and fecal contamination than many other places in the home,” the study says.
If you’re horrified and ready to grab the disinfectant and head straight to the kitchen, you’re not alone. But you probably want to know which items in your kitchen are making it such a thriving cesspool—and how you can fight against this potentially dangerous bacteria. Here are the grossest items in your kitchen, according to the pros.

Your cutting boards
It’s no surprise this common kitchen item makes the top of the list, with all the food prep we do here. The NSF found that 18% of cutting boards contain fecal contamination from E. coli bacteria, which is often found in raw meat. And in recent years, both wood and plastic cutting boards have proven harder to keep clean than originally thought, especially if they’re several years old.
“The issue arises when people are unable to clean cutting boards properly because they have deep grooves from being used so much,” explains dietitian and food safety expert Bri Bell. “Bacteria can live in the grooves and contaminate your food. It’s time to get a new one if you can fit a fingernail in the groove, because then you know it’s too deep to properly clean.”
A more recent study conducted by Sainsbury’s Home also found that 40% of people are putting themselves at risk by using the same cutting board for meat and vegetables.
“We use cutting boards to prepare foods like raw meat, which can spread salmonella and E. coli,” says Brian Sansoni, spokesman for the American Cleaning Institute. “A good rule of thumb in safe food preparation is to avoid cutting raw meat, poultry, or fish on the same surface without thoroughly cleaning it between uses.”
Even better, he says: “Have two cutting boards: one reserved for meat and the other for fruits and vegetables.”

Your kitchen faucet
If you thought your door handles were dirty (and they are), then this next bit will really make you run for the disinfectant. According to the NSF, 45% of kitchen sinks were found to contain salmonella and E. coli. Even if you aren’t regularly rubbing raw chicken on your kitchen faucet, there’s still a logical reason why it’s one of the nastiest places in your home.
“The faucet is a high-touch area,” Bell says. “We often touch it with dirty or wet hands, so it gets dirty quickly between washes, and people tend to clean them only when they look dirty—not realizing it has bacteria regardless.”
To keep the poop particles out of your kitchen sink, wash the sink regularly with disinfectant.
“Particularly during the fall and winter, when colds and flu are at their peak, it’s a good idea to keep faucet handles clean to prevent the spread of germs,” Sansoni says. “At least once a day, wipe down faucet handles with a disinfectant wipe.”

Your refrigerator
Here’s another item that comes in close contact with our food but tends to be neglected when it comes to regular cleanings. And if you’re anything like the participants of this 2019 study by the American Cleaning Institute, chances are you can’t even remember the last time you cleaned the fridge.
And there’s a reason why that’s scary: “Spoiled food and spills can attract germs,” Sansoni says. To be more specific, these germs include things like salmonella, listeria, and E. coli, according to a 2013 Germ Study by NSF.
The best way to keep yourself from getting sick due to contamination in the fridge is by regularly inspecting and cleaning it.
“Wipe up spills with a paper towel and warm water as they occur,” Sansoni advises. “Every week, before doing your grocery shopping, do a quick purge of food that has expired or gone bad, then clean the inside of the fridge by emptying out all the contents, removing the drawers, and scrubbing with a sponge, warm water, and liquid dish soap.”
It might sound like a lot of work, but it certainly beats food poisoning.

Your kitchen sponge
This item is so gross we decided to save it for last (just in case you started reading this while snacking, now’s a good time to stop). Kitchen sponges, dishrags, dishcloths—whatever you call them—are the downright nastiest thing in your kitchen—if not your entire home.
In fact, more than 75% of sponges contained salmonella and E. coli, the NSF found—and since we often use them on things like countertops and dishes, you can only imagine how that bacteria spreads.
“The sponge holds onto moisture and bacteria from food after washing the dishes,” Bell says, “so it’s a perfect environment for bacteria to multiply, and people don’t tend to clean it, because it’s considered a disposable item.”
Although this news makes it tempting to replace your kitchen sponge between each and every use, Bell explains there’s an easier way to keep the grossness at bay.
“The best way to clean a sponge is to run it through the dishwasher with your regular dishes, or microwave a wet sponge for one minute,” she says. “Both these methods will kill most of the bacteria growing in the sponge that is likely to make you sick, but it will still contain some bacteria.”
In fact, Bell makes a case for ditching the beloved kitchen sponge entirely.
“My recommendation is to actually stop using sponges for washing dishes, and instead use a scrub brush or washcloth that dries quickly and completely between uses,” she says.
But if you can’t live without your beloved sponge, at least do everyone in your household a favor by replacing it every couple of weeks.
As a homebuyer, it’s important to plan and budget for the expenses you’ll encounter when you purchase a home. While most people understand the need to save for a down payment, a recent survey found 41% of homebuyers were surprised by their closing costs. Here’s some information to help you get started so you’re not caught off guard when it’s time to close on your home.
What Are Closing Costs?
One possible reason some people are surprised by closing costs may be because they don’t know what they are or what they cover. According to U.S. News and World Report:
“Closing costs encompass a variety of expenses above your property’s purchase price. They include things like lender fees, title insurance, government processing fees, upfront tax payments and homeowners insurance.”
In other words, your closing costs are a collection of fees and payments made to a variety of individuals and organizations who are involved with your transaction. According to Freddie Mac, while they can vary by location and situation, closing costs typically include:
- Government recording costs
- Appraisal fees
- Credit report fees
- Lender origination fees
- Title services
- Tax service fees
- Survey fees
- Attorney fees
- Underwriting Fees
How Much Will You Need To Budget for Closing Costs?
Understanding what closing costs include is important, but knowing what you’ll need to budget to cover them is critical to achieving your homebuying goals. According to the Freddie Mac article mentioned above, the costs to close are typically between 2% and 5% of the total purchase price of your home. With that in mind, here’s how you can get an idea of what you’ll need to cover your closing costs.
Let’s say you find a home you want to purchase for the median price of $350,300. Based on the 2-5% Freddie Mac estimate, your closing fees could be between roughly $7,000 and $17,500.
Keep in mind, if you’re in the market for a home above or below this price range, your closing costs will be higher or lower.
What’s the Best Way To Make Sure You’re Prepared at Closing Time?
Freddie Mac provides great advice for homebuyers, saying:
“As you start your homebuying journey, take the time to get a sense of all costs involved – from your down payment to closing costs.”
The best way to understand what you’ll need at the closing table is to work with a team of trusted real estate professionals. An agent can help connect you with a lender, and together they can provide you with answers to the questions you might have.
Bottom Line
In today’s real estate market, it’s more important than ever to make sure your budget includes any fees and payments due at closing. Work with a local real estate professional to be sure you have the knowledge you need to be confident going into the homebuying process.
🙌 We can help make sure you’re not surprised by closing costs. DM us with any questions you may have.
👩 Christine Almarines @christine_almarines
Realtor DRE # 01412944
714-476-4637 | christine@carealestategroup.com
👩 Michelle Kim @michellejeankim_homes
Realtor DRE # 01885912
714-253-7531 | michelle@carealestategroup.com


