If you’re a first-time buyer looking to break into the housing market but struggling to find a home to buy, condominiums (or condos) could be a great alternative for you.
Here are a few reasons condos may be something you’ll want to consider.
Exploring Condos Could Add Options That Fit Your Budget
Supply challenges are a reality across the board in today’s housing market. Broadening your home search to include condos could increase your overall pool of options. Just keep in mind, condos generally differ from single-family homes in average space and floorplans.
In a recent article, Bankrate covers some of these differences:
“Condos are generally more affordable because they come with less space — you likely won’t have your own backyard, for example, and the interior tends to be smaller than the square footage of a single-family home.”
But if the size of a condominium meets your needs, they could match your budget as well. Data from the National Association of Realtors (NAR) shows the difference in the median price for both housing types. For single-family homes, the median price is $363,800. And for condominiums, the median price is lower at $305,400.
So, if budget is top of mind for you, a condominium could be a great fit within your target price range.
Not to mention, buying a condo is a great way to break into the market and start building equity that can help power a future move up. The condo you purchase today may not be your forever home, but it can be a great stairstep that can help you buy your dream home later on.
Find Out if Condo Living Is Right for You
In addition, owning and living in a condo is also a lifestyle choice. While it’s true they may be smaller than single-family homes, the amenities condos provide could be a draw for many buyers. Less space in your home might mean minimal upkeep, lower maintenance, and more time for you to spend doing the things you enjoy.
To understand if condo life is for you, Bankrate recommends asking yourself a few simple questions:
“Hate to mow the lawn and trim the hedges? What about pressure washing your driveway? Are your finances such that having to lay out $5,000 or more for a new roof will be a burden? . . . Condos tend to work best for those comfortable with most of the aspects of apartment living, minus the built-in maintenance.”
Ultimately, talking with an expert real estate advisor is the best first step to determining if condo living might work for you.
Bottom Line
Condominiums are a great option for many buyers, especially those looking to buy their first home. If you’re willing to consider condos in your search, you could find something that’s in line with your target numbers and your needs. To learn more, let’s connect so you have an expert in the condo-buying process on your side.
💡 Find out if we’re the right Realtor Team for you! Check out @carealestategroup
👩 Christine Almarines @christine_almarines
Realtor DRE # 01412944
714-476-4637 | christine@carealestategroup.com
👩 Michelle Kim @michellejeankim_homes
Realtor DRE # 01885912
714-253-7531 | michelle@carealestategroup.com
🛠 Projects that add the most value at resale are the favorites of fix-it-and-flip-it professionals—and they should be high on a homeowner’s list, too. While these upgrades will not recoup all of their cost, some will come close.
🏠 The National Association of Realtors (NAR) cites wood flooring (new or refinished), kitchen renovations (new countertops and state-of-the-art appliances), upgraded bathrooms, and basement or attic conversions as projects with some of the highest return on investment, often recouping 80% or more of their cost at resale. Certain exterior work—including roofing, siding, doors, windows, refurbished decks, and energy upgrades—also delivers a lot of bang for the buck at resale.

Taste of Brea & Business Expo – Brea
Thursday, May 26, 2022, 5:00 PM – 9:00 PM
Brea’s Annual Foodie Extravaganza is here! Enjoy a delicious mix of food, drinks, and fun in Brea Downtown at the 2022 Taste of Brea®. Come and enjoy dancing to live music with family and friends. Spend this evening strolling the Brea Downton enjoying tasty samples from our local Brea restaurants and beer/wine providers while reveling in the beautiful domain that Brea has to offer. Got Questions? Contact the Brea Chamber office at (714) 529-3660 www.tasteofbrea.com
LOCATION:
Downtown Brea on Birch Street

Newport Beach Wine Festival – Newport Beach
May 27-29, 2022
Sip your way through Memorial Day weekend at the 13th annual Newport Beach Wine Festival. The festival will take place at Balboa Bay Resort with multiple events each day. This beautiful waterfront setting is ideal for sipping fine wines, savoring delicious entrees, tasting craft beers and more. Learn how to cook a wine-themed meal or take the opportunity to expand your knowledge on wine characteristics and blending. See website for complete schedule of events. $65-$150 per event. 949.630.4146. www.balboabayresort.com/nbwinefestival
LOCATION:
Balboa Bay Resort
1221 West Coast Hwy
Newport Beach, CA

Strawberry Festival – Garden Grove
May 27-30, 2022
The festival is a parade and carnival celebrating the city’s strawberry-growing history. Free admission! INFORMATION: 714-638-0981 www.strawberryfestival.org
LOCATION:
Euclid St & Main St
Garden Grove, CA

Scottish Fest – Costa Mesa
May 28-29, 2022
The event features hundreds of bagpipers and drummers, Scottish and Irish food and vendors, Scottish clans, Highland dancing and traditional Scottish feats of strength like the hammer throw, putting the stone and caber toss. Part of the United Scottish Society, the festival was established in 1932 and was called a Highland Games in the tradition of Scottish heritage. www.scottishfest.com
LOCATION:
OC Fair and Event Center
88 Fair Drive
Costa Mesa, CA 92626

Knott’s Berry Farm Military Days and Memorial Sunday Fireworks – Buena Park
May 28-30, 2022
Enjoy Memorial Day weekend with family and friends at Knott’s Berry Farm. All active, veteran and retired US Military personnel will be honored and celebrated with complimentary admission. Up to six tickets may be purchased for family and friends at a discounted rate. End your day of fun with a spectacular fireworks show that will light up the night sky on Sunday at 9:45 p.m. F-Sa 10 a.m.-10 p.m. Sun 10 a.m.-11 p.m. See website for ticket pricing. 714.220.5200. knotts.com
LOCATION:
Knott’s Berry Farm
8039 Beach Blvd.
Buena Park, CA

Laguna Hills Memorial Day Run – Laguna Hills
May 30, 2022
Celebrate Memorial Day with the City of Laguna Hills 18th annual Memorial Day run, honoring the United States Marine Corps Dark Horse Battalion. Participants can choose between a 5K, 10K or half-marathon. Runners and walkers of all levels are invited to come out and enjoy the Memorial Day festivities. After the race enjoy food from local food trucks, a beer garden and DJ tunes. 8 a.m.-11:30 a.m. Register online. 949.975.8506. lagunahillshalfmarathon.com
LOCATION:
El Toro Road & I-5 Freeway
24155 Laguna Hills Mall
Laguna Hills, CA
Keeping Current Matters | Published May 10, 2022
Many people are wondering: will home prices fall this year? Whether you’re a potential homebuyer, seller, or both, the answer to this question matters for you. Let’s break down what’s happening with home prices, where experts say they’re headed, and how this impacts your homeownership goals.
What’s Happening with Home Prices?
Home prices have seen 121 consecutive months of year-over-year increases. CoreLogic says:
“Price appreciation averaged 15% for the full year of 2021, up from the 2020 full year average of 6%.”
So why are prices climbing so much? It’s because there are more buyers than there are homes for sale. This imbalance is expected to maintain that upward pressure on home prices because homes for sale are a hot commodity in today’s low-inventory housing market.
Where Do Experts Say Prices Will Go from Here?
Experts say the housing market isn’t set up for a price decline due to that ongoing imbalance between supply and demand. In the latest home price forecasts for 2022, they’re calling for ongoing appreciation throughout the year (see graph below):
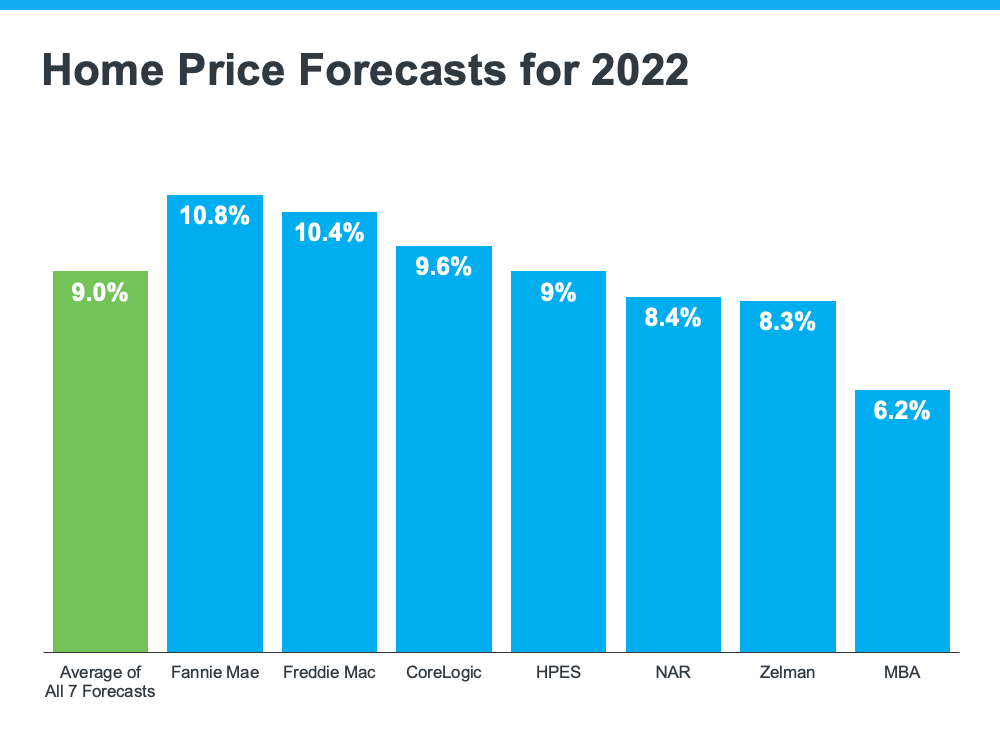
While the experts are forecasting more moderate price appreciation, the 2022 projections show price gains will remain strong throughout this year. First American explains it like this:
“While house price growth is expected to moderate from the rapid pace of 2021, strong home buyer demand against a backdrop of historically tight inventory of homes for sale will likely keep appreciation positive in the coming year.”
What Does That Mean for You?
The biggest takeaway is that none of the experts are projecting depreciation. If you’re a homeowner thinking about selling, the higher price appreciation over the last two years has been great for your home’s value, but it’s also something you should factor in when planning your next steps. If you’ll also be buying a home after selling your current house, you shouldn’t wait for prices to fall. Waiting will only cost you more in the long run because climbing mortgage rates and rising home prices will have an impact on your next home purchase. Freddie Mac says:
“If you’re thinking about waiting until next year and that maybe rates are higher, but you’ll get a deal on prices – well that’s risky. It may be more advantageous to purchase this year relative to waiting until 2023 at this time.”
Bottom Line
If you’re thinking of selling to move up, you shouldn’t wait for prices to fall. Experts say prices will continue to appreciate this year. That means, if you’re ready, buying your next home before prices climb further may make the most financial sense. Let’s connect to begin the process of selling your current home and looking for your next one before prices rise higher.

Hidden Costs of iBuying
Think of them as digital house flippers who scour mountains of data for typically off-market homes.
iBuying Explained
Known as iBuyers, these platforms buy houses for cash online. If the algorithms align well, homeowners who’ve submitted an online form will receive instant offers from interested iBuyers. The entire process usually takes place with no person-to-person contact. After buying the house sight-unseen (except for photos), iBuyers quickly resell, usually to other investors.
Transaction Fees
While iBuying may sound convenient, it has financial downsides. Industry experts say transaction fees can be significantly higher than in traditional home sales. Expect fee rates of around 7% of the home price, but be prepared for fee rates as high as 13%. Additionally, iBuyers most often make offers below market value.
Trust an Expert
You may think iBuyers can save you time and money. But an experienced real estate professional will work to get the best offer for your property and will be there to help find your next home.

Print This Article

When Is Buying More Affordable Than Renting?
Realtor.com® nailed it when they said the U.S. housing market was in for another whirlwind year. Its 2022 housing forecast predicted continued increases in housing prices, rent and mortgage rates in “a mixed bag of housing affordability challenges and opportunities.”
We’ve heard a lot about rising housing prices over the past few years, but rents are projected to increase at a pace of 7.1% compared to 6.6% for home sale prices. The report even goes so far as to say that buying a starter home would be cheaper than renting in some of the country’s largest metropolitan areas.
Choosing whether to rent or buy is a huge decision in any market. Fear of making “the wrong decision” intensifies as the market tightens. Still, you may be surprised to find that you can afford to buy after looking at your financial picture.
Consider these advantages of buying over renting.
Homeownership Is an Investment
At the end of a lease, you’ll walk away with nothing. At the end of a mortgage, you’ll own property with equity.
Stable Payments
Rent payments can rise with every new lease you sign. A fixed-rate mortgage offers stability.
Creative Freedom
A rental property is not yours to change as you please. But when you buy a house, you have the freedom to turn it into your dream home.
When deciding to buy or rent, carefully examine your budget, and think about your lifestyle and goals. If you’re considering buying but are apprehensive about the current market, a real estate professional can help you understand what’s happening in your community.
Print This Article
Supply Chain Issues Affect Housing Market
It’s no secret real estate values increased during the pandemic, with an unprecedented number of homes selling in bidding wars. Due to material shortages, delivery delays and cost increases, new home construction has struggled to keep up with the demand for housing. Lumber prices tripled from pre-pandemic levels, and these costs are often passed along to home buyers.
Although single-family housing starts have decreased, the number of homes under construction is actually up because houses aren’t getting finished. Besides a shortage of building materials, construction – like other industries – has experienced major labor shortages, a considerable hurdle to completing projects.
Despite current construction woes, experts predict home builders will overcome supply shortages this year, enabling them to speed up construction to meet ongoing demands for new housing. More inventory should help keep prices in check and curb last year’s sizable increases in home values.
Analysts are hoping that a gradual tapering down in housing starts may provide some relief, allowing builders to catch up with the backlog of demand.
Print This Article
6 Home Maintenance Tips for Sellers
Routine maintenance can be just as important after you’ve accepted an offer as it is before listing your home. To keep your house well-maintained throughout the transition, Realtor.com® recommends tending to these six areas.
- Carefully maintain the yard and walkways. Clean out flower beds and keep the yard tidy and free from leaves and downed tree limbs.
- Keep your gutters cleared to prevent water damage. Check the roof before the inspection.
- Service your HVAC system. Check your furnace, clean out ductwork and replace filters.
- Keep critters out by covering any holes and vents.
- Wash your windows no matter what time of year it is.
- Keep up with the current season. Decorations for long-passed holidays and other telltale signs that nobody’s home can be a nuisance to your neighbors.
Print This Article
Home Seller Tips for the Closing Process
OK, squint a little. See that? That’s the finish line, just ahead of you! After all the anxiety, hard work and waiting, you’ve almost made it to closing day. Don’t end up disappointed about a deal gone wrong because you skipped a few steps.
As annoying as it is, complete all promised repairs. No, you won’t be able to enjoy them, but they can make or break your sale. Plan to have everything finished and in working order at least one week before closing. This will allow time for any last-minute adjustments. Save receipts and invoices, and take before-and-after photos of repaired or improved items.
When flying through those closing documents, slow down when you get to the settlement statement. Check all of these numbers carefully to make sure they match what you were expecting to receive from the sale.
Print This Article
 ©2022 The Personal Marketing Company. All rights reserved. Reproductions in any form, in part or in whole, are prohibited without written permission. If your property is currently listed for sale or lease, this is not intended as a solicitation of that listing. The material in this publication is for your information only and not intended to be used in lieu of seeking additional consumer or professional advice. All trademarked names or quotations are registered trademarks of their respective owners. ©2022 The Personal Marketing Company. All rights reserved. Reproductions in any form, in part or in whole, are prohibited without written permission. If your property is currently listed for sale or lease, this is not intended as a solicitation of that listing. The material in this publication is for your information only and not intended to be used in lieu of seeking additional consumer or professional advice. All trademarked names or quotations are registered trademarks of their respective owners.
The Personal Marketing Company
11511 W. 83rd Terrace
Lenexa, KS 66214 |
With a limited number of homes for sale today and so many buyers looking to make a purchase before mortgage rates rise further, bidding wars are common. According to the latest report from the National Association of Realtors (NAR), nationwide, homes are getting an average of 4.8 offers per sale. Here’s a look at how that breaks down state-by-state (see map below):
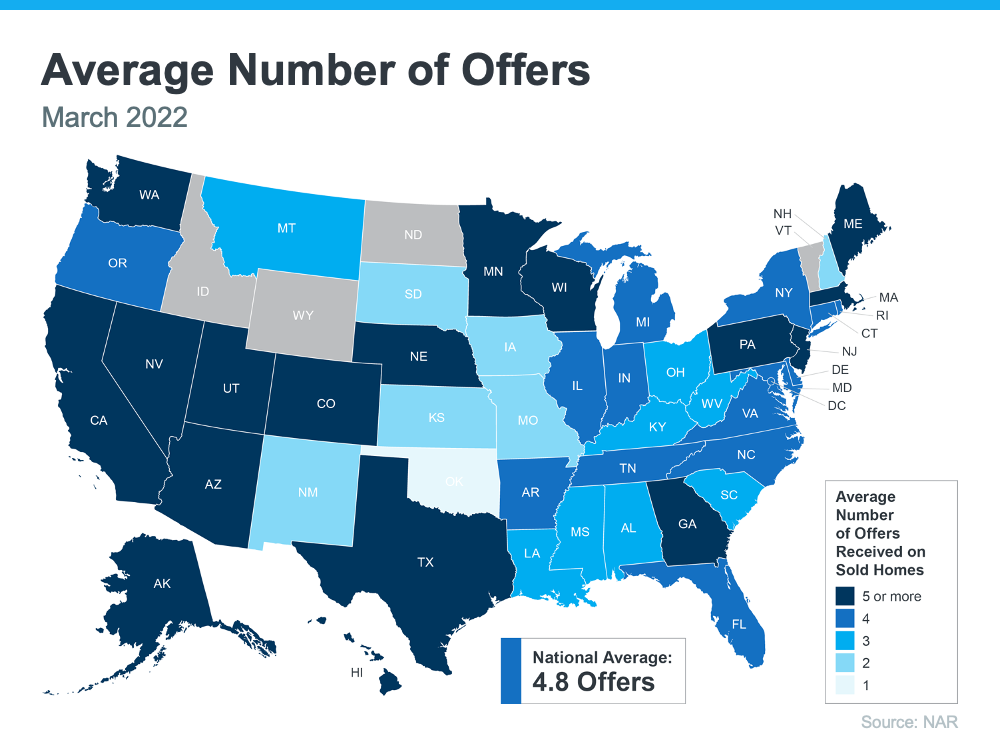
The same report from NAR shows the average buyer made two offers before getting their third offer accepted. In this type of competitive housing market, it’s important to know what levers you can pull to help you beat the competition. While a real estate professional is your ultimate guide to presenting a strong offer, here are a few things you could consider.
Offering over Asking Price
When you think of sweetening the deal for sellers, the first thought you likely have is around the price of the home. In today’s housing market, it’s true more homes are selling for over asking price because there are more buyers than there are homes for sale. You just want to make sure your offer is still within your budget and realistic for the market value in your area – that’s where a local real estate professional can help you through the process. Bankrate says:
“Simply put, being willing to pay more money than other buyers is one of the best ways to get your offer accepted. You may not have to increase it by a lot — it’ll depend on the area and other factors — so look to your real estate agent for guidance.”
Putting Down a Bigger Earnest Money Deposit
You could also consider putting down a larger deposit up front. An earnest money deposit is a check you write to go along with your offer. If your offer is accepted, this deposit is credited toward your home purchase. NerdWallet explains how it works:
“A typical earnest money deposit is 1% to 2% of the home’s purchase price, but the amount varies by location. A higher earnest money deposit may catch a seller’s attention in a hot housing market.”
That’s because it shows the seller you’re seriously interested in their house and have already set aside money that you’re ready to put toward the purchase. Talk to a professional to see if this is something you can do in your area.
Making a Higher Down Payment
Another option is increasing how much of a down payment you’re going to make. The benefit of a higher down payment is you won’t have to finance as much. This helps the seller feel like there’s less risk of the deal or the financing falling through. And if other buyers put less down, it could be what helps your offer stand out from the crowd.
Non-Financial Options To Make a Strong Offer
Realtor.com points out that while increasing these financial portions of the deal can help, they’re not your only options:
“. . . Price is not the only factor sellers weigh when they look at offers. The buyer’s terms and contingencies are also taken into account, as well as pre-approval letters, appraisal requirements, and the closing time the buyer is asking for.”
When it’s time to make an offer, partner with a trusted professional. They have insight into what sellers are looking for in your local market and can give you expert advice on what levers you may or may not want to pull when it’s time to write an offer.
From a non-financial perspective, this can include things like flexible move-in dates or minimal contingencies (conditions you set that the seller must meet for the purchase to be finalized). For example, you could make an offer that’s not contingent on the sale of your current home. Just remember, there are certain contingencies you don’t want to forego, like your home inspection. Ultimately, the options you have can vary state-to-state, so it’s best to lean on an expert real estate professional for guidance.
Bottom Line
In today’s hot housing market, you need a partner who can serve as your guide, especially when it comes to making a strong offer. Let’s connect so you have a trusted resource and coach on how to make the strongest offer possible for your specific situation.
💡 Find out if we’re the right Realtor Team for you! We’re active in our community…check out @carealestategroup
👩 Christine Almarines @christine_almarines
Realtor DRE # 01412944
714-476-4637 | christine@carealestategroup.com
👩 Michelle Kim @michellejeankim_homes
Realtor DRE # 01885912
714-253-7531 | michelle@carealestategroup.com
CA Real Estate Group is powered by Keller Williams Realty
The information contained, and the opinions expressed, in this article are not intended to be construed as investment advice. Keeping Current Matters, Inc. does not guarantee or warrant the accuracy or completeness of the information or opinions contained herein. Nothing herein should be construed as investment advice. You should always conduct your own research and due diligence and obtain professional advice before making any investment decision. Keeping Current Matters, Inc. will not be liable for any loss or damage caused by your reliance on the information or opinions contained herein.
Realtor.com | Jul 16, 2021
With the rocky year we’ve all had, it’s important to have a sanctuary in your own home where you can relax, unwind, and have a “Calgon, take me away” kind of experience. Establishing that personal space can do a lot of good for your mental health and well-being. But did you know it can also help increase your home’s value?
Bathroom renovations remain one of the most valuable home improvements. In fact, a midrange bathroom remodel can return up to 60% of your investment at the time of resale, according to Remodeling magazine’s Cost vs. Value report.
“We believe that a well-designed bathroom can make you a better person, which may seem like a bold statement,” says Joseph A. Tsedaka, principal at Nomi, which specializes in luxury bathroom remodels. “For some, that means including spalike features so you can unwind after a stressful day.”
Creating a luxurious bathroom space that you never want to leave can be done with a few simple tricks. Here’s what the design experts have to say.
Spa additions
If you’re trying to emulate luxury spas and saunas, providing the right shower experience is everything.
“Double showers are a must. We often recommend double showers with rain heads, hand-held features, and multiple faucets to create a truly relaxing experience,” says Tsedaka. He recommends adding a body sprayer, which can be customized to a homeowner’s height.
Other deluxe features to consider include built-in speakers and heated floors, to avoid that nasty shock of stepping onto cold tile with your bare feet.
Tsedaka says another popular addition is a smart home feature that allows everything (including lights, audio, and even the shower) to be controlled from the homeowner’s phone or an iPad on the wall.
Choose high-quality materials
“Even a neutral-tone bathroom can be elevated with finishes and hardware,” says Marlaina Teich of Marlaina Teich Designs in New York. “Choose unique tile for the shower, or consider marble chair rail molding around the bathroom for a classy, timeless look.”
Tsedaka says spa bathrooms tend to have more earthy materials like wood floors or natural stone in the shower.
“We love to use ipe wood, a naturally treated wood from Brazil that reacts excellently to water and moisture,” he says. “Teakwood also has a similar effect.”
Mel Bean of Mel Bean Interiors in Tulsa, OK, says thoughtfully curated mirrors can add to the look of your posh bathroom. Consider a classic rectangular mirror with a brass frame (CB2, $229) or something more geometric that’ll bring unique visual interest.
Layout
From toiletries to towels, the layout of your spa bathroom can add to the pleasing appearance.
“If you have the space, I would recommend installing a double vanity so each person has their own space, storage, and some privacy,” says Tsedaka.
He says it’s important to consider how you live, too. Do you actually take baths, or are you just including a bath for aesthetic reasons?
“We recommend coming from a place of functionality when considering the layout,” says Tsedaka.
For example, he says he prefers to have a drop-down tub if used frequently instead of a free-standing tub, which limits space.
“If you do have a free-standing tub, however, I always like to put it next to a window or a place where you can add a shelf to hold shampoo, soap, etc.,” says Tsedaka.
Lighting
Lighting, whether it’s natural or added, gives your bathroom a calming ambiance and a sense of sophistication.
When working with natural light, you’ll want to pick the right type of shades.
“To let in light when you want it, while also allowing for a darker, relaxing atmosphere, consider transitional or roller shades in the bathroom,” says James Brewer, a design consultant from Stoneside Blinds and Shades.
As for electrical light, Tsedaka recommends three different types of lighting: normal can lights, mood lighting using a dimmer, and chromotherapy lighting for inside the shower. “This is LED lighting that can change to any color you want,” he says.
For mood lighting he suggests using 4 inches for can lights on dimmers instead of the traditional 6-inch can light. He also says under-cabinet lighting or step light can be great for middle-of-the-night use when you don’t want to have direct light.
DOWNLOAD >> FULL PAGE OPEN HOUSE FLYER
🚩 OPEN HOUSE THIS WEEKEND!
🚩 JUST LISTED IN ANAHEIM HILLS!
———–
🏡 5504 E Vista Del Dia, Anaheim Hills, CA 92807
🏡 2 BD | 2.5 BA | 1404 SQ FT
———–
🚩 Fri, May 6 @ 4-7 pm
🚩 Sat, May 7 @ 12-4 pm
🚩 Sun, May 8 @ 1-5 pm
———–
🌳 Located in the highly sought after Yorba Rancho Community in Anaheim Hills.
🌳 Private courtyard entrance upgraded with natural stone and flower beds.
🌳 Direct 2-car garage access, 2 primary suites, each with en-suite bathrooms.
🌳 Spacious, bright, filled with natural light and recessed lights. Enjoy natural light or control it with the plantation shutters.
🌳 Warm yet modern feel with laminate wood floors, stacked stone fireplace, recessed lights, light and bright white paint throughout and updated bathroom.
🌳 Three sliding doors — 1 has access to the backyard greenbelts, 2 access the front courtyard.
🌳 Community center and pool are a short walk from the unit.
🌳 Conveniently located within walking distance to schools, parks, grocery stores, restaurants and more while tucked away in a very quiet neighborhood.
🌳 Easy access to the 91, 241, 55 and 57 freeway.
———–
More photos and description:
📷 https://agentboostervideos.hd.pics/view/?s=558376&nohit=1
———–
🚩 For Open House and Listing info, please contact Christine Almarines at 714-476-4637.
———–
Christine Almarines @christine_almarines
Listing Agent, DRE # 01412944
CA Real Estate Group | Keller Williams Realty @carealestategroup
714-476-4637
christine@carealestategroup.com
linktr.ee/carealestategroup
———–
#carealestategroup #realtorsofinstagram #anaheim #anaheimhills #canyonhighschool #yorbalinda #listing #justlisted #forsale #homeforsale #buyer #houseforsale #orangecounty #losangeles #openhouse
🏠 Are you a first time homebuyer? We can help customize a realistic plan that’ll help prepare you to buy your first home. The first step is to call us today!
💡 Find out if we’re the right Realtor Team for you! We’re active in our community…check out @carealestategroup
👩 Christine Almarines @christine_almarines
Realtor DRE # 01412944
714-476-4637 | christine@carealestategroup.com
👩 Michelle Kim @michellejeankim_homes
Realtor DRE # 01885912
714-253-7531 | michelle@carealestategroup.com
CA Real Estate Group is powered by Keller Williams Realty
Homelight | Jan 28, 2021
We’re continuing in our Weekly Series of “The 7 Most Painfully Expensive Home Repairs to Avoid.”
Today, we’re covering “Termite Damage.”
The average homeowner spent a total of $4,832 on routine and emergency home repairs in 2019. However, some of the most expensive home repairs have the ability to wipe out your entire yearly maintenance savings and then some.
On top of being pricey, major problems like pest infections and structural instability can make your home difficult to market and sell, not to mention tank your property value. With this guide, real estate experts identify the worst home repairs for your wallet and offer expert insights into preventive maintenance and early detection.
Termite damage ($3,000)
If they can find it, termites love to eat the wood in a house. Often, homeowners only discover signs of termite damage after these destructive little pests have weakened the wood in their home to a significant extent. Mitigating this damage can cost a lot of money, so catching termite activity early is key.
Estimated cost to repair:
According to pest control specialist Orkin, $3,000 is the average amount people spend to mitigate termite damage.
Warning signs:
These signs of termite damage should be on your radar:
- Wood that makes a hollow sound when tapped
- Crumbling wood
- Mud tubes on the side of your home’s foundation
- Peeling paint
- Mold or mildew smell
- Wings, termite bodies, or termite droppings
Key prevention tactics: If you have the ability to avoid contact between wooden parts of your home and the ground, you can reduce your termite risk. Special layers and meshes exist to make it hard for termites to access the home. Moving mulch away from your foundation is also a good idea — you don’t want to create a “red carpet” for termites to waltz into your abode so easily.
Who to call for help:
Who to call for help: Call CA Real Estate Group at (714) 476-4637 for our preferred termite and pest control experts to evaluate the situation. Sites with reviews like HomeAdvisor have information on your local pest control specialists; you can usually get a termite inspection from the company with the best reputation and then use their services for mitigation if needed.