Keeping Current Matters | Feb 3, 2022
If your needs are changing, you may be thinking about sharing a home with additional loved ones, such as grandparents, adult children, or other extended family members. Whether it’s for financial or health-related circumstances, or simply because you’ve reached a new phase of life, you might be wondering if living with multiple generations under the same roof is a good move for you. Many people have found themselves in a similar situation and they’ve already made the choice to live in a multigenerational home.
The Pew Research Center defines a multigenerational household as a home with two or more adult generations. They include households with grandparents and grandchildren under the age of 25. As you weigh your options and decide if multigenerational living is right for you, here’s some helpful information highlighted by other homeowners living with additional loved ones.
A recent report from Generations United surveyed individuals living in a multigenerational setting and asked them about the key benefits of this housing arrangement. It says:
“Nearly all Americans who live in a multigenerational household (98%) feel their household functions successfully, citing various aspects of home design, family relationships and interactions, and supports and services influencing their success.”
The study identifies some of the top benefits of this lifestyle as an improved financial situation, better mental and physical health, strengthened bonds with loved ones, and more (see chart below):
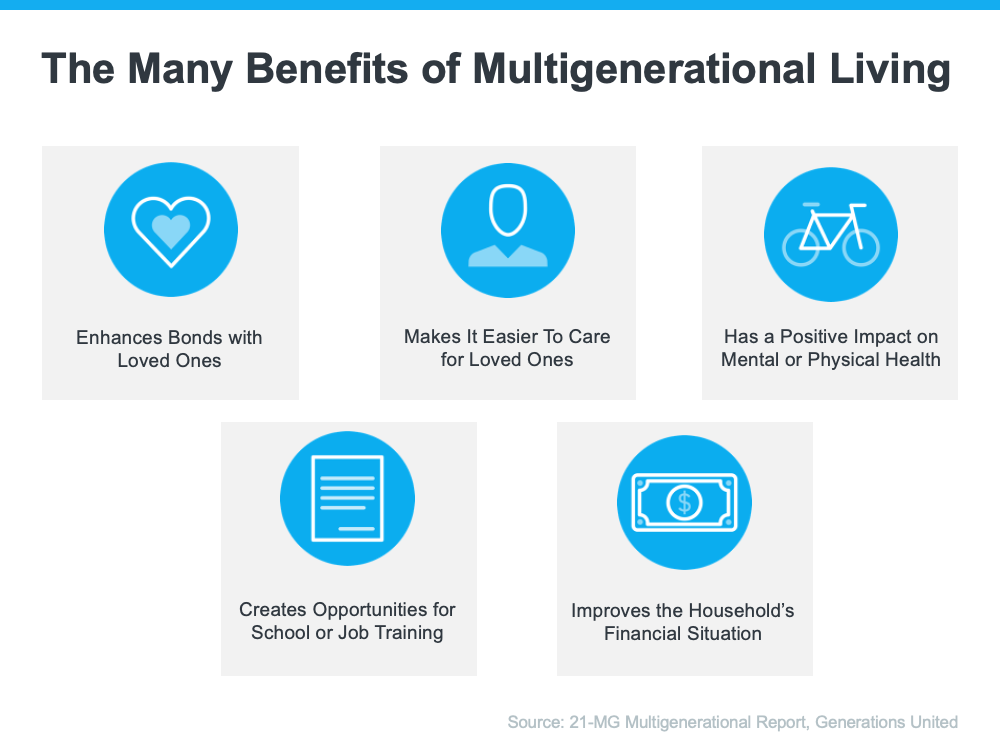
Those are just some of the reasons why most people who decide to live in this situation find it worthwhile. As Donna Butts, Executive Director at Generations United, says:
“Families may come together from need, but they are staying together by choice. Indeed, more than 7 in 10 (72 percent) of those currently living in a multigenerational household plan to continue doing so long-term.”
If you decide to look for a multigenerational home, it’s important to understand what everyone will need to make the arrangement work to its fullest. Something that often makes the top of the list for homeowners living with multiple generations is additional space for privacy. This could mean more bedrooms and bathrooms or features like an in-law suite or a basement.
If you’re realizing your current house doesn’t provide the room you need for multigenerational living, an expert real estate advisor can help you navigate the process to find the right home that works for you and your loved ones.
Living in a multigenerational household has real and impactful benefits. If you’re interested in learning more about these options in our local area, let’s connect so you can find a home that fits your changing needs.
Homelight | Jan 28, 2021
We’re continuing in our Weekly Series of “The 7 Most Painfully Expensive Home Repairs to Avoid.”
Today, we’re covering “Electrical Rewiring.”
The average homeowner spent a total of $4,832 on routine and emergency home repairs in 2019. However, some of the most expensive home repairs have the ability to wipe out your entire yearly maintenance savings and then some.
On top of being pricey, major problems like pest infections and structural instability can make your home difficult to market and sell, not to mention tank your property value. With this guide, real estate experts identify the worst home repairs for your wallet and offer expert insights into preventive maintenance and early detection.
An older home’s electrical system easily can become overtaxed, causing fires and injury. In some cases a partial retrofit will suffice to make a house safe to live in. However, a number of old homes still have knob and tube wiring or aluminum wiring, both of which are fire hazards. If your house needs a full rewiring, the cost will be substantially higher.
Estimated cost to repair:
(Source: Thumbtack, which tracks estimates from the millions of homeowners who use the site)
Warning signs:
If your breakers blow frequently, you see any visible damage to your wires, or notice a burning scent in the home, call an electrician to investigate the problem. An electrical inspection can determine whether old, outdated modes of wiring the house have put you in danger.
Key prevention tactics:
“In older homes, we’re finding that we need to have an electrician come out to cover lines to the water heater, so it isn’t a bare wire going from the water heater to the wall,” Harrison shares. While this won’t solve all the issues with old wiring, covering bare wires is key to reducing your fire risk, and a more thorough electrical inspection can help you find other concerning areas.
You should also install GFCI (ground fault circuit interrupter) outlets in the bathroom, kitchen, and anywhere outlets may come in contact with liquid. GFCI outlets interrupt an abnormal current flow to reduce the chance of electric shock.
Who to call for help: Call CA Real Estate Group at (714) 476-4637 for our preferred electricians to evaluate the situation, or check out Better Business Bureau’s Electricians Near Me portal helps you identify local electricians with proper credentials and positive ratings from past clients.
Keeping Current Matters | Feb 18, 2022
![What’s Driving Today’s High Buyer Demand? [INFOGRAPHIC] | MyKCM](https://files.mykcm.com/2022/02/16141917/20220218-MEM-1046x1947.png)
🏃 There’s an influx of buyers looking for homes today, and that means your house is in high demand. Here are a few reasons why so many people are looking to buy a home.
🏃 Buyers are motivated to beat rising mortgage rates, and many want to escape rising rents. There’s also additional demand from millennials who are reaching peak homebuying age.
🏃 If you’re thinking about selling your house, today’s demand is great news. Let’s connect to begin the process of listing your house while buyers are ready to purchase.
👩 Christine Almarines @christine_almarines
Realtor DRE # 01412944
714-476-4637 | christine@carealestategroup.com
👩 Michelle Kim @michellejeankim_homes
Realtor DRE # 01885912
714-253-7531 | michelle@carealestategroup.com
CA Real Estate Group @carealestategroup is powered by Keller Williams Realty
Homelight | Jan 28, 2021
We’re continuing in our Weekly Series of “The 7 Most Painfully Expensive Home Repairs to Avoid.”
Today, we’re covering “HVAC Replacement.”
The average homeowner spent a total of $4,832 on routine and emergency home repairs in 2019. However, some of the most expensive home repairs have the ability to wipe out your entire yearly maintenance savings and then some.
On top of being pricey, major problems like pest infections and structural instability can make your home difficult to market and sell, not to mention tank your property value. With this guide, real estate experts identify the worst home repairs for your wallet and offer expert insights into preventive maintenance and early detection.
An HVAC performs the essential function of keeping your home a comfortable temperature year-round. While an HVAC has a typical life expectancy of about 15 years, it can fail much sooner than that if you don’t properly maintain the unit. As a complex piece of machinery, it has also earned a reputation for being one of the most expensive items to replace or repair in a house.
Estimated cost to repair:
(Source: HomeAdvisor heating and cooling cost estimate guide)
Warning signs:
If your system is having trouble turning on and off or fails to keep the home at the comfortable temperature that you’re accustomed to, you’ll want to get the HVAC serviced. Checking for problems before your system stops can be the difference between a reasonably priced repair and an expensive replacement.
Key prevention tactics:
Yearly maintenance by professionals can help you catch concerns early. In addition, replacing the air filter every couple of months will help prevent wear and tear.
Who to call for help: Call CA Real Estate Group at (714) 476-4637 for our preferred HVAC specialists to evaluate the situation, or check out BBB’s listings of HVAC Companies. Then check reviews on Google as well as around the web before selecting your top options for an HVAC company.
![How Remote Work Impacts Your Home Search [INFOGRAPHIC] | MyKCM](https://files.mykcm.com/2022/02/03134442/20220204-MEM-1046x2435.png)
Homelight | Jan 28, 2021
We’re continuing in our Weekly Series of “The 7 Most Painfully Expensive Home Repairs to Avoid.”
Today, we’re covering “Mold Removal.”
The average homeowner spent a total of $4,832 on routine and emergency home repairs in 2019. However, some of the most expensive home repairs have the ability to wipe out your entire yearly maintenance savings and then some.
On top of being pricey, major problems like pest infections and structural instability can make your home difficult to market and sell, not to mention tank your property value. With this guide, real estate experts identify the worst home repairs for your wallet and offer expert insights into preventive maintenance and early detection.
Mold spores are usually harmless in small numbers, but when they find a warm or wet space that has a surface they can live upon, they reproduce. Some mold is dangerous to health, while other molds cause decay to your home’s structure. Finding mold damage after it has gotten out of control can be costly to repair.
Estimated cost to repair:
Average: $1,140
Low end: $60
High end: $4,300
(Source: Thumbtack, which tracks estimates from the millions of homeowners who use the site)
Warning signs:
If you notice little black spots that creep up the wall behind your water heater, line your basement windowsill, or colonize the area behind your washing machine, you’ve got mold and should take action to remove it.
If you don’t see mold but people in your home are having unexplained allergic or coughing symptoms, you might want a mold inspection. A moldy odor, especially when paired with water damage or a discovery of moisture and leaks, can also be a warning sign.
Key prevention tactics:
If you find small areas of mold (less than a total of 10 square feet), you can take a bleach solution to it. However, cleaning up mold, whether with bleach or another gentler solution, will only handle the mold growth — not the spores.
After the area builds up a resistance to the homemade mixture, the mold will drink up any water you are feeding it. For larger jobs, you’re better off calling a professional mold remediation service. You should also watch your home’s humidity levels and improve ventilation to prevent further mold growth.
Who to call for help: Call CA Real Estate Group at (714) 476-4637 for our preferred mold inspectors to evaluate the situation. Mold inspectors are well-versed in finding and mitigating mold and many will do free estimates for the extent of the work required.
Keeping Current Matters | Jan 21, 2022
![Americans Choose Real Estate as the Best Investment [INFOGRAPHIC] | MyKCM](https://files.mykcm.com/2022/01/20142632/20220121-MEM-1046x2199.png) 💰🇺🇸 Americans choose real estate as the best investment once again!
💰🇺🇸 Americans choose real estate as the best investment once again!
🏠 According to a Gallup poll, real estate has been rated the best long-term investment for eight years in a row.
🏠 Real estate tops the list because you’re not just buying a place to call home – you’re investing in your future. Real estate is typically considered a stable and secure asset that can grow in value over time.
🏠 Let’s connect today if you’re ready to make real estate your best investment this year.
💡 Find out if we’re the right Realtor Team for you! We’re active in our community…check out @carealestategroup
👩 Christine Almarines @christine_almarines
Realtor DRE # 01412944
714-476-4637 | christine@carealestategroup.com
👩 Michelle Kim @michellejeankim_homes
Realtor DRE # 01885912
714-253-7531 | michelle@carealestategroup.com
CA Real Estate Group is powered by Keller Williams Realty
Homelight | Jan 28, 2021
We’re continuing in our Weekly Series of “The 7 Most Painfully Expensive Home Repairs to Avoid.”
Today, we’re covering “Water damage.”
The average homeowner spent a total of $4,832 on routine and emergency home repairs in 2019. However, some of the most expensive home repairs have the ability to wipe out your entire yearly maintenance savings and then some.
On top of being pricey, major problems like pest infections and structural instability can make your home difficult to market and sell, not to mention tank your property value. With this guide, real estate experts identify the worst home repairs for your wallet and offer expert insights into preventive maintenance and early detection.
Water in a home can destroy your ceiling, walls, flooring, and personal belongings, while moisture in the wrong places can lead to harmful mold. You don’t need a flood or other catastrophic event for water to intrude your home, either. A burst pipe, roof leak, clogged gutter, sewage backup, rotted siding, or broken fixture like an old bathtub can all cause water damage.
Unfortunately, water damage is a common home occurrence. Every day 14,000 Americans face a water damage emergency, while 98% of basements will have water damage at some point in their lifetime. However, there are steps you can take to protect your home from water intrusion.
Estimated cost to repair:
(Source: Data reported by 1,106 HomeAdvisor members)
Warning signs:
Beyond walking down the stairs to find a flooded basement, these are few signs that you’ve got a water leak:
Key prevention tactics:
Since water damage can stem from a bunch of places including your plumbing, roof, or basement, you’ll need a multi-pronged prevention strategy:
Who to call for help: If you have a leaky pipe or stained ceiling or wall, call CA Real Estate Group at (714) 476-4637 for our preferred plumbing experts to evaluate the situation. To remediate water damage, we can refer you to the remediation experts that we work with or you can contact a water damage cleanup professional or restoration service.
Source: https://www.norwalk.org/city-hall/departments/community-development/housing-neighborhood-development/emergency-rental-assistance-program-erap
The COVID-19 Emergency Rental Assistance Program’s (“ERAP”) objective is mitigating potential homelessness and displacement of existing Norwalk residents and workers who may not be residents, but support the local economy by working in the City, who are experiencing a decrease in household income due to the COVID-19 pandemic and unable to pay their rent, mortgage and/or utilities. By providing a grant to assist eligible tenants to pay for delinquent rent, mortgage and/or utilities, the City is providing a much-needed resource to ensure residents of Norwalk stay in their homes and not become homeless.
The program is funded through the Department of Housing and Urban Development’s Community Development Block Grant program, including special one-time funding available through the CARES Act. The Program shall be operated in compliance with CDBG and CARES Act regulations, including 24 CRF 570.201(e) and 570.207(b)(2)(4).
The Application Period begins May 3, 2021.
Click here for the flyer for the Emergency Rental Assistance Program
Click here for program application.
Click here for upload instructions.
Click here to upload application and supporting documents.
Applicant Eligibility
To be considered eligible for the Norwalk’s Emergency Rental Assistance Program, applicants must meet the following requirements, as determined by CDBG and CARES Act regulations:
Amount of Assistance
In accordance with CDBG regulations, the City will provide a maximum of three (3) months of rental, mortgage, and/or utility assistance. Payments will be made directly to the applicant’s landlord or property management firm. No direct payments will go to Emergency Rental Assistance Program applicants. Eligible applicants are funded on a first come, first serve basis.
Required Documentation
Applicants must provide the following documentation to the City of Norwalk Community Development Department:
Homelight | Jan 28, 2021
We’re continuing in our Weekly Series of “The 7 Most Painfully Expensive Home Repairs to Avoid.”
Today, we’re covering “Roof replacements.”
The average homeowner spent a total of $4,832 on routine and emergency home repairs in 2019. However, some of the most expensive home repairs have the ability to wipe out your entire yearly maintenance savings and then some.
On top of being pricey, major problems like pest infections and structural instability can make your home difficult to market and sell, not to mention tank your property value. With this guide, real estate experts identify the worst home repairs for your wallet and offer expert insights into preventive maintenance and early detection.
Many homeowners, especially those in areas with a lot of sun, wind, and rain, are surprised when an inspection reveals the need for a new roof so soon. Robb Harrison, a top real estate agent in Ocala, FL, says that Florida weather can damage roofs prematurely, and a lack of ongoing maintenance can lead to irreparable problems.
“From the ground a roof can look amazing, but when someone gets up on the roof, you may find that it needs a new one,” says Harrison.
“It’s happened a few times where the inspection report came back that the house needed a new roof and everyone is shocked when it’s only been 15 or 20 years on 30-year shingles. You just really need to keep an eye on it.”
Estimated cost to repair:
(Source: Fixr, estimates based on data from contractors, subcontractors, material suppliers, and more)
The good news is that a new roof adds value to your home. Data from HomeLight’s Top Agent Insights Survey for Q3 2019, featuring the expertise of over 400 real estate agents, found that a roof replacement costs an estimated $11,992, but recoups an average $10,842 for a 94% cost recovery.
Warning signs:
If you have a ladder long enough to see the roof safely, check for these red flags that it’s time for a roof replacement:
Stains, streaks, or water in the attic are additional signs of a roof problem.
Key prevention tactics:
Kennamer, the general contractor in Alabama, recommends keeping an eye on cracks in roof boots and flanges.
“If they are cracked, you can re-caulk them with an all-weather caulk or replace them if they are decayed. Usually, to do it yourself it would cost in the range of $20-$30 or to hire a professional it will range from $75-$150,” he says.
Consider these additional tips to preserve your roof:
Who to call for help: Call CA Real Estate Group at (714) 476-4637 for our preferred roof experts or you can use the Better Business Bureau’s Roofing Contractors Near Me feature. When in doubt, cross-reference a few different sites to gauge client ratings and reviews for any particular roofer you’re considering.