If you’re thinking about buying or selling a home, you’ll want to keep a pulse on what’s happening with mortgage rates. Rates have been climbing in recent months, especially since January of this year. And just a few weeks ago, the 30-year fixed mortgage rate from Freddie Mac approached 4% for the first time since May of 2019. But that climb has dropped slightly over the past few weeks (see graph below):
The recent decline in mortgage rates is primarily due to growing uncertainty around geopolitical tensions surrounding Russia and Ukraine. But experts say it’s to be expected.
Here’s a look at how industry leaders are explaining the impact global uncertainty has on mortgage rates:
Odeta Kushi, Deputy Chief Economist at First American, says:
“While mortgage rates trended upward in 2022, one unintended side effect of global uncertainty is that it often results in downward pressure on mortgage rates.”
“Geopolitical events play an important role in impacting the long end of the yield curve and mortgage rates. For example, in the weeks following the ‘Brexit’ vote in 2016, the U.S. Treasury bond yield declined and led to a corresponding decline in mortgage rates.”
Kushi’s insights are a reminder that, historically, economic uncertainty can impact the 10-year treasury yield – which has a long-standing relationship with mortgage rates and is often considered a leading indicator of where rates are headed. Basically, events overseas can have an impact on mortgage rates here, and that’s what we’re seeing today.
Will Mortgage Rates Stay Down?
While no one has a crystal ball to predict exactly what will happen with rates in the future, experts agree this slight decline is temporary. Sam Khater, Chief Economist at Freddie Mac, echoes Kushi’s sentiment, but adds that the decline in rates won’t last:
“Geopolitical tensions caused U.S. Treasury yields to recede this week . . . leading to a drop in mortgage rates. While inflationary pressures remain, the cascading impacts of the war in Ukraine have created market uncertainty. Consequently, rates are expected to stay low in the short-term but will likely increase in the coming months.”
Rates will likely fluctuate in the short-term based on what’s happening globally. But before long, experts project rates will renew their climb. If you’re in the market to buy a home, doing so before rates start to rise again may be your most affordable option.
Bottom Line
Mortgage rates are an important piece of the puzzle because they help determine how much you’ll owe on your monthly mortgage payment in your next home. Let’s connect so you have up-to-date information on rates and trusted advice on how to time your next move.
💡 Find out if we’re the right Realtor Team for you! We’re active in our community…check out @carealestategroup and call 714-476-4637!
The average homeowner spent a total of $4,832 on routine and emergency home repairs in 2019. However, some of the most expensive home repairs have the ability to wipe out your entire yearly maintenance savings and then some.
On top of being pricey, major problems like pest infections and structural instability can make your home difficult to market and sell, not to mention tank your property value. With this guide, real estate experts identify the worst home repairs for your wallet and offer expert insights into preventive maintenance and early detection.
Sinking or settling foundation ($4,000-$10,000)
Your foundation serves as the base for your entire home. It needs to be in solid condition for the rest of your house to remain structurally sound. If it becomes damaged, the issue can spread and compromise almost any other part of the home in the form of jammed doors or sinking or uneven floors.
One of the most common foundation problems you can encounter is settling. Any foundation is going to settle gradually over time. However, trouble arises when there are drastic or sudden shifts in soil moisture levels, which can put pressure on the foundation and cause it to crack.
Here’s a summarized example provided by Family Waterproofing Solutions serving Illinois and Indiana for 25 years: Let’s say your house was built during the rainy season when the soil was damp and swollen. A few years later there’s a drought and the soil dramatically retracts. Because the soil wasn’t properly prepared at the time of the build, the house plunges five inches downward, damaging the foundation in the process.
Estimated cost to repair:
Average foundation repair: $4,488
Minor cracks: $500
Major foundation repair (involving hydraulic piers): $10,000
(Source: HomeAdvisor, project costs reported by 3,102 HomeAdvisor members)
Key prevention tactics: You need to catch and fix foundation problems early on or they will only get more expensive to repair. “Check for cracks in brick or block foundations. If the crack is small and runs in a straight line, it could be settling,” advises Ray Kennamer, a general contractor of nearly 25 years in Albertville, Alabama.
If you suspect a foundation issue, a professional can help identify and diagnose it. Most likely, they will fill in any cracks with a cement mixture and install drainage solutions to halt the changes in moisture levels. Your foundation will thank you for it!
Warning signs:
Foundation cracks that grow longer and wider over time
Cracked or bowing walls
Fractures above windows or door frames
Doors or windows that stick
Uneven floors
Who to call for help: Call CA Real Estate Group at (714) 476-4637 for our preferred foundation experts or search the Foundation Repair Network to find a local professional who can inspect and make recommendations for foundation repair.
You can’t read an article about residential real estate without the author mentioning the affordability challenges that today’s buyers face. There’s no doubt homes are less affordable today than they were over the last two years, but that doesn’t mean homes are now unaffordable.
There are three measures used to establish home affordability: home prices, mortgage rates, and wages. Let’s look closely at each of these components.
1. Home Prices
The most recent Home Price Insights report by CoreLogic shows home values have increased by 19.1% from last January to this January. That was one reason affordability declined over the past year.
2. Mortgage Rates
While the current global uncertainty makes it difficult to project mortgage rates, we do know current rates are almost one full percentage point higher than they were last year. According to Freddie Mac, the average monthly rate for last February was 2.81%. This February it was 3.76%. That increase in the mortgage rate also contributes to homes being less affordable than they were last year.
3. Wages
The one big, positive component in the affordability equation is an increase in American wages. In a recent article by RealtyTrac, Peter Miller addresses that point:
“Prices are up, but what about wages? ADP reports that job holder incomes increased 5.9% last year but rose 8.0% for those who switched employers. In effect, some of the higher cost to buy a home has been offset by more cash income.”
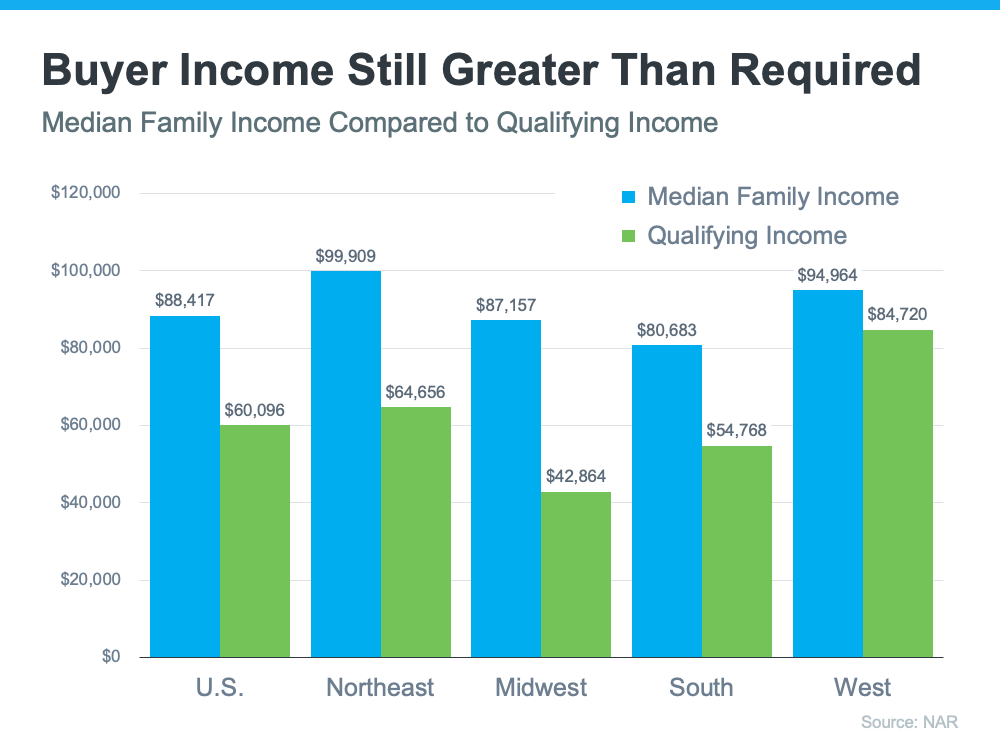
The National Association of Realtors (NAR) also recently released information that looks at income and affordability. The NAR data provides a comparison of the current median family income versus the qualifying income for a median-priced home in each region of the country. Here’s a graph of their findings:
As the graph shows, the median family income (shown in blue on the graph) is greater than the qualifying income needed to buy a median-priced home (shown in green on the graph) in all four regions of the country. While those figures may vary in certain locations within each region, it’s important to note that, in most of the country, homes are still affordable.
So, when you think about affordability, remember that the picture includes more than just home prices and mortgage rates. When prices rise and rates rise, it does impact affordability, and experts project both of those things will climb in the months ahead. That’s why it’s less affordable to buy a home than it was over the past two years when prices and rates were lower than they are today. But wages need to be factored into affordability as well. Because wages have been rising, they’re a big reason that, while less affordable, homes are not unaffordable today.
Bottom Line
To find out more about affordability in our local area, let’s discuss where home prices are locally, what’s happening with mortgage rates, and get you in contact with a lender so you can make an informed financial decision. Remember, while less affordable, homes are not unaffordable, which still gives you an opportunity to buy today.
Home maintenance and repairs never come at a convenient time. It’s a good idea to set aside a certain amount each year to pay for expected and unexpected things that may arise.
For buyers, expect competition, be ready to move fast, and be prepared to submit your strongest offer. For sellers, know your house will be the center of attention and that it’ll likely sell quickly and get multiple offers.
If you’re ready to move, let’s connect to talk about our local area and how you can take advantage of today’s unprecedented housing market.
What are automatic shut-offs? Much like breakers within your home’s electric panel, did you know there are technologies available to stop or limit damage that may be caused by a gas or water leak as well?
Automatic Gas Shut-Off Valveswere invented to limit the possibly disastrous consequences of gas leaks within the home, primarily as the result of an earthquake. As of 2000, all newly constructed buildings in California must install automatic earthquake shut-off valves. These devices (seen here in red) can be installed on older homes as well. More info here
Automatic Water Shut-Off Valves vary widely in their capabilities, and technological know-how requirement of their owners 😉 Control freaks rejoice! You can know within seconds if there is unwanted water anywhere in your home, and with a tap on your phone (or automatically of course), you can have the water turned off. More info here
-Discounts on homeowners insurance may be available to homeowners who have these safety devices in place. Be sure to ask your agent!
-Ask your local, trusted plumber about suitability and installation.
👩 Michelle Kim @michellejeankim_homes
Realtor DRE # 01885912
714-253-7531 | michelle@carealestategroup.com
CA Real Estate Group is powered by Keller Williams Realty
🤔 Deciding on the right 🏡 neighborhood 🏡 is an important decision when you look for a home. Here are some important factors to consider before making that final decision.
Home is where your heart is — in precious family members, irreplaceable heirlooms, treasured memories, prized valuables, and in the comfort you feel when you return to rest your head after a crazy day. So how can you protect all of that from a devastating house fire?
“I’ve stood shoulder to shoulder with clients while their home was in flames, watching firefighters run through the house, kicking holes in the wall, throwing things out of the windows to try to save items for the family. It’s just heart-wrenching,” recalls Rick Fuller, an experienced real estate agent in the Antioch, CA area of San Francisco Bay.
Unfortunately, many homeowners deal with house fires every year. Data from the National Fire Protection Association (NFPA) shows an estimate of 339,500 reported home fires in 2019. In those house fires, 1,900 people died, and 7,000 of those fires resulted in injuries.
Source: (FEMA)
The potential losses from a house fire make preventing one in your own home a high priority. Unfortunately, there is no way to 100% fireproof your house. But there are steps you can take to keep your home and family as safe from fire hazards as possible. Here are 7 to prioritize.
Step 1: Check your smoke alarm system (and replace batteries often).
Fires move fast. It takes only 30 seconds for a small flame to become a raging house fire — a fact that makes early detection essential. Smoke alarms are your best defense against a full-on house fire, but simply having smoke detectors isn’t enough.
Are your alarms in the right spot?
Strategic placement of smoke alarms considers both where fires are most likely to occur, and where family members are likely to be in the house. The Federal Emergency Management Agency (FEMA) recommends that you have smoke alarms on every level of the house, alarms inside and outside of every bedroom, and that the alarms be fewer than 10 years old.
The Home Fire Safety Survey put out by the NFPA takes smoke alarm recommendations even further. In the survey, NFPA advises placing one smoke detector for every 500 square feet of space, especially in larger homes.
The association also advises placing kitchen fire alarms at least 10 feet from cooking appliances — this is to prevent heat, steam, or smoke generated by everyday cooking from triggering the alarms. The last thing you want is to disconnect an alarm while cooking, forget to reconnect it, and lose your house to an undetected fire.
Source: (Jalen Hueser / Unsplash)
Are your alarms talking to each other?
According to the NFPA, connection between fire alarms offers the best protection. Old-school fire alarms that are independent from each other sound the alarm only in the area where the smoke or fire is detected.
Interconnected, or smart fire alarm systems, communicate with each other so that if a fire starts in the kitchen or living room while you’re asleep, connected alarms will go off in your bedrooms at the same time, rather than there being a lag.
The good news is that interconnected smoke alarms don’t necessarily need to be hardwired into your electrical system. First Alert offers a number of wireless interconnected smoke alarm systems that range in price from $47 to $103 per alarm. These interconnected alarms include a variety of features, including integrated carbon monoxide detectors and voice alerts that tell you where in the house the fire has been detected.
Will your alarms detect both flaming and smoldering fires?
Not only should smoke alarms be interconnected, but they should provide different types of smoke detection — specifically both ionization and photoelectric detection.
Ionization detectors use an ionizing radiation chamber to detect smoke from a flaming fire. When smoke enters the chamber, the ionizing radiation is disrupted and the alarm sounds. Photoelectric detection is best for detecting smoldering fire. It works by using light beams to detect smoke particles suspended in the air before it reaches the stage of flaming fire.
What kind of shape are your alarms in?
Finally, you need to keep your fire alarms in good, working condition. You should test your alarms every month and change the batteries regularly, whether you think they need to be replaced or not. Even if they rate as “good” on a battery tester, they could lose their charge within a few months, before your next scheduled date to change them.
“Create a schedule to regularly change your smoke detector batteries,” advises Fuller. “For example, make a habit of replacing your fire alarm batteries every time you change your clocks when we spring forward or fall back for Daylight Savings.”
Step 2: Install an automatic extinguishing system.
Smoke alarm systems alert you when there is a fire, but they do nothing to put that fire out. For homeowners who want the added protection of automatic assistance in extinguishing the fire, you need an automatic extinguishing system (AES), also known as residential fire sprinklers.
According to the NFPA:
“The death rate per 1,000 reported fires was 87% lower in properties with sprinklers than in properties with no automatic extinguishing systems (AES). The civilian injury rate was 27% lower and the firefighter fireground injury rate per 1,000 fires was 67% lower in sprinklered properties than in fires in properties without AES.
In fires considered large enough to activate the sprinkler, sprinklers operated 92% of the time. Sprinklers were effective in controlling the fire in 96% of the fires in which they operated. Taken together, sprinklers both operated and were effective in 88% of the fires large enough to operate them. In three-fifths of the fires in which the sprinkler failed to operate, the system had been shut off.”
Despite these telling statistics, some homeowners are reluctant to install sprinkler systems in their homes. They envision accidentally triggering the fire sprinkler system with candle usage, cigarette smoking, or a burnt dinner — which they imagine would turn on the whole sprinkler system, causing unnecessary water damage throughout the house.
In reality, fire sprinkler systems are designed to activate unit by unit, so only the sprinkler above the detected fire should activate. And it’s unlikely that you’ll accidentally activate your sprinkler system. According to Frontier Fire, a company that offers fire protection services, there’s only a one in 16 million chance that your sprinkler system will misfire and activate when there is no fire.
Installing a fire protection system in your home is less expensive than you might think. The National Sprinkler Association estimates that the installation of a sprinkler system in a new home averages to around $1.35 per square foot, or $3,375 for a 2,500 square-foot home. However, the price varies depending on where you live, ranging from $0.81 to $2.47 per square foot.
Source: (Cat Han / Unsplash)
Step 3: See if you have enough fire extinguishers.
Unlike smoke detectors, residential sprinkler systems are triggered by heat from flames, not by smoke — so they only activate when a fire generates enough heat to activate them. This is ideal for when you’re asleep, but when you’re awake and nearby, you’ll need extinguishers on hand to prevent the fire from growing large and hot enough to trigger the sprinklers.
While fire extinguishers are not required for single and double occupancy residential homes, fire safety experts like Quick Response Fire Supply recommend that homeowners have fire extinguishers accessible throughout the home, especially in areas that pose a higher risk for fires. To be safe, keep an extinguisher near your kitchen, garage, fireplace, and next to any combustible compost heaps.
When set out to buy your extinguishers, pay attention to the types of fires that they are rated for:
Source: (FEMA)
If you find the array of fire extinguishers to be dizzying, keep in mind that homeowners typically just need extinguishers that can put out both common combustible fires (wood, paper, cloth, plastics, trash, etc.) and grease (or other combustible liquids like gasoline, solvents, etc.) fires.
While you can get a class K fire extinguisher for your kitchen and garage, you may want to stick with multi-purpose fire extinguishers rated as ABC fire extinguishers that can put out both common combustibles and grease fires. You can purchase an ABC-rated fire extinguisher at Home Depot for as little as $40 per extinguisher.
Fire extinguishers aren’t that tricky to use, but it’s easy to panic in the heat of a fire emergency, so take time to teach yourself and your family members where to find and how to use the extinguishers in your home before you need it.
FEMA has devised the simple mnemonic device, PASS, to help you remember house to use most extinguishers in an emergency:
Source: (FEMA)
Step 4: Assess your fire hazard habits regularly.
Cooking and electrical fires are the culprits behind many emergencies, and these are often accidental occurrences. However, a significant number of house fires are the result of negligence or poor fire safety habits.
Proper fire safety habits can mitigate the chances of negligence-caused fires. For example:
Smoking habits:
It’s best to confine smoking to the outdoors where there are fewer flammable objects and materials to catch fire. However, you should still keep an outdoor ashtray on hand rather than disposing of smoking materials in flammable foliage. If you do allow smoking indoors: keep large ashtrays available in areas where smoking is allowed; never empty ashtrays directly into garbage cans (unless you first thoroughly wet the contents first), and outlaw all smoking in bed to reduce the chances of falling asleep while smoking.
Never use frayed or damaged extension cords, even if you’ve repaired them with electrical tape (which may come loose, or may not properly insulate the exposed wires). Never modify or force a 3-pronged plug into a 2-prong outlet. Never overload power strips with outlet expanders or multi-outlet extension cords. Always use power strips with built-in overload protection.
Cooking:
Never leave cooking food unattended on your stovetop. Always keep flammable items away from your stove’s cooktop — especially when using gas stoves. This includes paper towels, kitchen towels, oven mitts and potholders, curtains, and even the sleeves of your clothing. Turn the handles of your cookware in over the stovetop, not hanging out into empty space where they can be bumped or spilled. And always keep an appropriate-sized lid nearby to smother flames should your cooking catch fire.
Source: (FEMA)
Step 5: Establish — and practice — your house fire escape plan.
Guarding against house fires isn’t just about protecting your personal property and belongings; it’s about keeping you and your family members safe. The best way to keep your family protected in a fire emergency is to establish a house fire escape plan — and then practice it regularly.
For example, if there’s a fire in the kitchen, you may be able to use your bedroom door, the hallway, and the front door to exit the house. However, if the fire is in the hallway, you’ll need to use the bedroom window as the exit.
Also identify a meeting place outside and well away from the house so that every family member can be accounted for — and you can notify firefighters of any members that may still be inside the house.
Source: (FEMA)
Discuss how to exit with your family
Knowing how to exit the house in the event of a fire is just as important as planning out where to exit. Teach all family members to check the temperature of doors and door knobs before opening any doors. Checking the doors determines if the path is safe and clear for escape, and closed doors keep fires from spreading.
It’s also wise for all family members to learn how to stop, drop, and roll to put out the flames should their clothing catch on fire during their escape.
For multi-level houses, such as those with a second story or a basement, you’ll likely need special equipment, such as a fire ladder, to escape. Every family member should know where the fire escape equipment is located and how to attach it to the window. Children should also practice climbing down fire escape ladders during your fire drills so that they are prepared to do so in case of an emergency.
Do dry runs
The NFPA recommends that families practice their fire escape plans at least twice a year. When family members are first learning the escape plan, everyone should be aware that the drill is happening, and the escape plan steps should be explained clearly and practiced until performed correctly.
Once your family is comfortable with your escape plans, it’s advisable to run a surprise drill at least once a year to ensure that everyone remembers the proper procedure at a moment’s notice.
Step 6: Conduct an annual appliance (and chimney) inspection.
Good home maintenance keeps your home value high while helping to prevent house fires, too. Both your major appliances, your fireplace, and your chimney should be checked annually to ensure that they don’t become fire hazards.
Fireplace and chimney
House fires caused by the fireplace itself are relatively rare, and are primarily caused by errant embers from a fireplace that is left open or has a damaged fireplace screen. You can purchase a fireplace screen for as low as $40 to $100.
Poorly maintained chimneys are the main cause of fireplace-related fires. The NFPA recommends that fireplaces, chimneys, and vents be inspected annually for creosote buildup, blockage, or damage.
However, if you notice any warning signs — such as excessive smoke, intense, hot smells, loud cracking or popping noises, or damage to your vents, chimney, or chimney cap — cease using the fireplace immediately and call in a chimney and fireplace professional.
Clothes dryer
Dryers seem so safe that many homeowners often let them run while they’re out of the home. But unattended and poorly maintained clothes dryers result in 2,900 clothes dryer house fires each year, according to FEMA.
Lint is the most common item to catch on fire, so it’s important to clean out your lint filter after each load of laundry. This will also reduce the amount of flammable lint buildup in your dryer vent and duct. Clogged vents and ducts can cause a dryer to malfunction, so you should clean out your vents and ducts at least once a year to remove buildup.
Dryer fires also happen when the belts that turn the drum break, leading the dryer’s heat source to overheat and catch fire. Dryers are only expected to last between 10 to 13 years, so if yours is nearing the end of its life, check that it’s functioning properly every time you use it.
Appliances are heavy energy users, and this can put stress on your electrical system. These electrical beasts also contain motors and mechanics inside them that can catch fire if they malfunction, break down, or overheat.
The easiest way to ensure that your appliances aren’t a fire hazard is to make sure that they are plugged directly into the wall outlets, not via a power strip or extension cord.
You should also access your appliance outlets every year to ensure that the power cord, the plug, and the outlet itself are not hot to the touch. If any of these components are hot, unplug the appliance immediately and call in an electrician or appliance repair professional.
GFCI outlets
Finally, be sure that appliances are plugged into appropriate outlets that will shut off should the appliance malfunction.
“You need to be mindful of your appliances by ensuring that your electrical outlets have a ground fault circuit interrupter, also known as a GFCIs. This is really important because when an appliance malfunctions, the GFCI breaks the circuit, preventing the appliance from catching on fire,” explains Fuller.
Many homebuyers rely on their home inspection report to note any potential fire hazards, but surprisingly whether or not your home has GFCI outlets in the appropriate places is not on the list of hazards that inspectors must check. While many inspectors will note whether or not you have GFCI outlets where appliances will be plugged in, some may not.
If you’re unsure whether your appliances are plugged into GFCI outlets, you may want to have a fire safety professional come in and check for you.
Source: (Clayton / Unsplash)
Step 7: Conduct a Home Fire Safety Inspection (or bring in a pro to do one for you).
That home inspection report you got when you purchased your house isn’t just a tool to negotiate a better price during escrow; it’s a vital report on the condition of your house. Home inspectors are required to note any safety issues — including potential fire hazards — such as faulty electrical wiring.
However, home inspectors are not fire safety inspectors, so, as noted above, they may not notate all potential fire hazards, such as a lack of GFCI outlets for appliances.
Since you cannot rely on your home inspection report to catch all fire safety hazards in your home, it’s essential that you either conduct one yourself or bring in a fire safety pro to complete an inspection for you.
Many government agencies offer detailed home fire safety checklists, including the NFPA, FEMA, and the Red Cross. These checklists help you assess potential fire hazards and instruct you on proper fire safety precautions.
If you’re not comfortable assessing your home’s fire safety on your own, you can bring in a professional to do one for you. Many community fire stations offer free fire safety inspections to residents that will also address other safety concerns, especially if there are children in the home.
Fire safety isn’t a one-time action — it’s a lifetime habit.
The one mistake homeowners make when assessing their home’s fire safety is that they treat it like a one-and-done task. It takes discipline and commitment to keep your smoke alarms operational, check your appliances annually, practice your escape plans and extinguisher usage regularly, and maintain good fire safety habits. If you find yourself slacking, remind yourself of the pain, loss, and devastation you’ll suffer in the event of a house fire.
“Most people don’t realize that while the fire certainly causes a lot of damage, it’s the smoke and it’s the water damage caused by trying to put out the fire that often creates the biggest problems. If that water damage isn’t properly repaired, it can lead to mold and mildew problems in the future,” explains Fuller.
“It’s a whole lot better to avoid a house fire than it is to manage one after the fact.”
When you’re selling any item, you usually want to sell it for the greatest profit possible. That happens when there’s a strong demand and a limited supply for that item. In the real estate market, that time is right now. If you’re thinking of selling your house this year, here are two reasons why now’s the time to list.
“Spring, the hottest time of year for homebuyers and sellers, has started early, according to economists. . . . ‘Home shopping season appears to already be in full swing!’”
And they aren’t the only ones saying buyers are already out in full force. That claim is backed up with data released last week by ShowingTime. The ShowingTime Showing Index tracks the average number of monthly buyer showings on active residential properties, which is a highly reliable leading indicator of current and future trends for buyer demand. The latest index reveals this December was the most active December in five years (see graph below):
As the data indicates, buyers are very active this winter. Last December saw even more showings than December of 2020, which was already a stronger-than-usual winter. And remember – you want to sell something when there’s a strong demand for that item. That time is now.
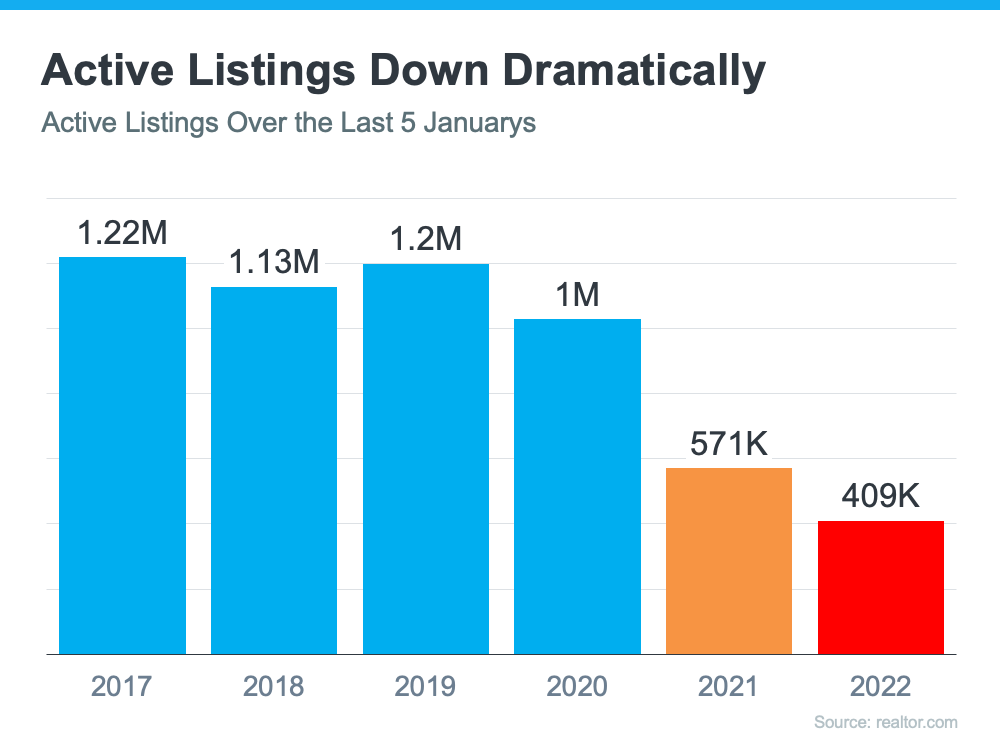
2. Housing Supply Is Extremely Low
Each month, realtor.com releases data on the number of active residential real estate listings (listings currently for sale). Their most recent report reveals the latest monthly number is the lowest we’ve seen in any January since 2017 (see graph below):
And don’t forget, the best time to sell an item is when there’s a limited supply of it available. This graph clearly shows how extremely low housing supply is today.
Even Though Supply Is at a Historic Low, Home Sales Are at a 15-Year High
According to the latest Existing Home Sales Report from the National Association of Realtors (NAR), existing-home sales totaled 6.12 million in 2021 – the highest annual level since 2006. This means the market is hot and homeowners are in a great place to sell now while sales are so strong.
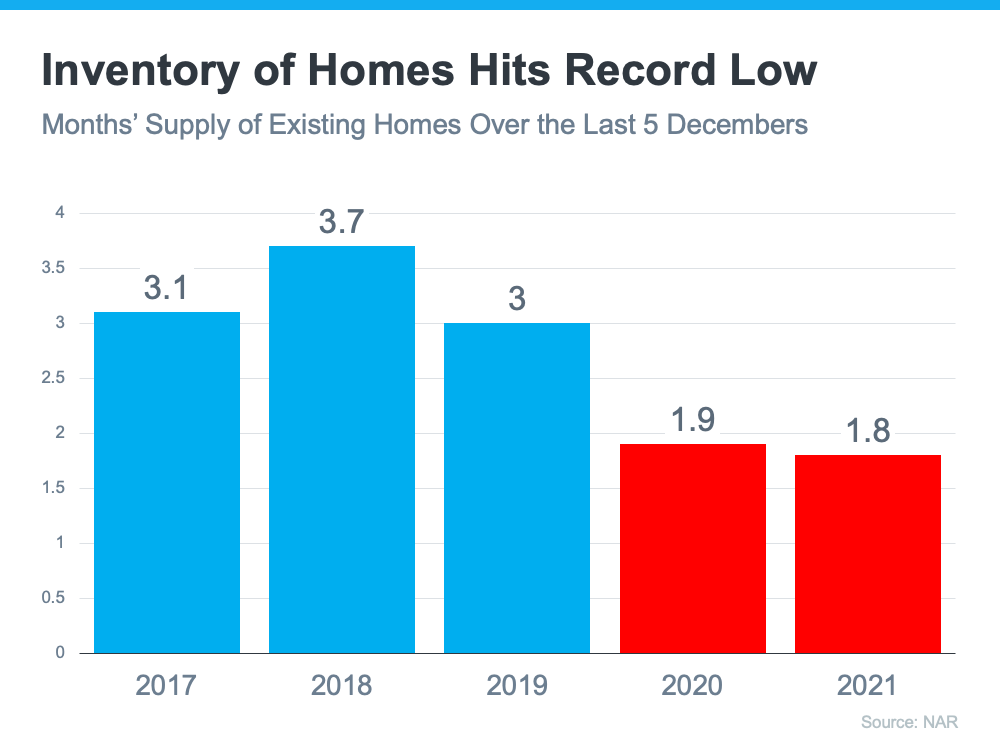
NAR also reports available listings by calculating the current months’ supply of inventory. They explain:
“Months’ supply refers to the number of months it would take for the current inventory of homes on the market to sell given the current sales pace.”
The current 1.8-months’ supply is the lowest ever reported. Here are the December numbers over the last five years (see graph below):
The ratio of buyers to sellers favors homeowners right now to a greater degree than at any other time in history. Buyer demand is high, and supply is low. That gives sellers like you an incredible opportunity.
Bottom Line
If you agree the best time to sell anything is when demand is high and supply is low, let’s connect to begin discussing the process of listing your house today.
“Kick Dust Mites in Your House to the Curb With These Quick Tips” Homelight.com | Published on Jun 28, 2021 | 4-5 min read
If you’ve been experiencing allergic reactions on a year-round basis, you may have a dust mite allergy. Symptoms often peak during hot, humid summers when people spend more time indoors, as well as at night when people are lying in bed.
Signs you might have a dust mite allergy include:
Sneezing
Coughing
Runny nose
Stuffy nose
Watery eyes
Itchy eyes
Itchy throat
Itchy skin
Chest pain
To alleviate your symptoms, we’ll teach you what dust mites are, where they hide, and how to evict them.
Source: (Alexandre Boucher / Unsplash)
Examining dust mites
Know your enemy. Before you can get rid of dust mites, it’s helpful to know what you’re dealing with and where to find the little buggers.
What dust mites are
Dust mites are microscopic, insect-like arthropods that are only 1/4 to 1/3 millimeters long. Under a microscope, they look like tiny white spiders. The males can live a month or more, while females can live up to 90 days.
Dust mites feed on flakes of dead skin shed by people and animals. They thrive in houses since each person sheds up to 1.5 grams of dead skin cells per day. That’s enough to feed up to one million dust mites!
What dust mites aren’t
Dust mites are not parasites. Unlike bedbugs, they don’t bite or sting. Nor do they burrow into your body.
However, they can cause skin rashes and other allergic reactions like sneezing and postnasal drip. Those reactions are typically the result of inhaling dust mites’ skin and fecal matter.
Where dust mites live
Dust mites are found everywhere around the world, although they favor hot, humid climates. Because dust mites absorb moisture from the air rather than drinking it, they cannot survive in arid regions.
Hundreds of thousands of dust mites may be living in your house — specifically, in your carpet, upholstered furniture, bedding, mattress, and stuffed animals. Anywhere dead skin cells accumulate, there’s potential to find dust mites. And because they burrow into cloth fibers, they even tag along when you move and travel. So prevalent are they that nearly four out of five homes in the U.S. exhibit detectable levels of dust mite allergens.
Dust mite allergies and other complications
Researchers identified two types of dust mite allergens, using data from a 2005-2006 National Health and Nutrition Examination Survey of almost 7,000 U.S. homes. The presence of pets influenced the level of indoor allergens — as did type, age, and location, age, gender, race, and socioeconomic status of residents.
Some people are more susceptible to physical reactions to dust mites in the house. A study by NIEHS-funded scientists uncovered a mucus-regulating gene that causes the lungs to produce too much mucus as a defense against pollutants and allergens, which results in airway obstruction.
Chronic, continued exposure to dust mites in the home can severely impact the health of people who have asthma or a sensitivity to allergens and dust mites, which cause an immune system response known as allergic rhinitis. Mites are one of the biggest triggers for those who suffer from allergies and asthma.
Source: (Diana Parkhouse / Unsplash)
Dust mite allergy causes and solutions
Don’t take it personally; the presence of dust mites doesn’t reflect on your housekeeping. Even in the cleanest of homes, it’s impossible to eliminate dust mites.
However, you can significantly reduce the number of dust mites in your house by taking steps to remove them and prevent them from coming back.
Humidity is a key factor in determining whether a house has a high concentration of dust mites, but it’s not the only one. Older homes and homes with a musty smell tend to have more dust mites since these homes are often poorly ventilated and trap moisture indoors.
By the way, that musty “old house” smell comes from mVOCs — microbial volatile organic compounds emitted by decaying biological growths, mold, bacteria, and biofilm. Both mVOCs and dust mites thrive in damp environments, so it’s common for homes to have both issues.
Solution
Use a humidity monitor, also known as a hygrometer, to keep your home’s humidity level between 40% and 55%. If the humidity level is too high, you can reduce it by:
Adequate ventilation reduces humidity levels in your home by removing moist air from the building.
Cause: Gravity
Gravity may seem like an unlikely cause, but dust mite allergens don’t remain airborne because they attach to heavy particles in the air. Gravity then forces them to quickly settle to the ground, where they make their homes in fabrics, pillows, bedding, and upholstered furniture. That’s why most exposure occurs when homeowners are sleeping or disturb the dust during activities such as making the bed.
Solution
Reduce places where dust mites can hide by removing some furniture, swapping some upholstered seating pieces for seats with hard surfaces, and trading drapes and curtains for blinds.
Here are some tips to combat dust mites:
Replace carpeting with hardwood floors.
Mop floors often. Use a vacuum with a high-efficiency filter or use a central vacuum system.
Dust with a damp cloth or a duster that traps dust instead of a feather duster that disperses dust.
Add a HEPA air purifier to capture dust mites before they have a chance to burrow into your fabrics. For just under $220, the Finn HEPA UV Air Purifier removes dust, pollen, mold, pet dander, and even light odors in small- to medium-size rooms.
Cause: Pets
Fluffy and Fido can suffer from dust mite allergies, too. They may also be contributors to the problem, thanks to those cushy pet beds and soft pet toys you generously buy for them. If you notice signs like excessive scratching or licking, eye rubbing, or difficulty breathing indoors, your favorite pooch or kitty could be suffering from a dust mite allergy.
Solution
Implement the same rigorous cleaning routine you established for the rest of the house and:
Wash their bedding and toys in hot water.
Use only synthetic materials for their bedding. Feathers, wool, and even cedar shavings can be a source of allergic dermatitis.
See your vet for severe cases of pet dust mite allergies.
Source: (HausPhotoMedia / Unsplash)
Prevent dust mites from returning
An ounce of prevention, as the old adage goes, is worth a pound of cure. Once you’ve cleaned your home, there are additional measures you can take to reduce the influx of future dust mites:
Dust regularly. Be sure to get all furniture crevices and tiny nooks and crannies.
Wash bedding weekly in hot water (130 degrees or hotter).
Keep the humidity below 50%.
Change your furnace filters regularly. Fresh filters also improve your furnace’s efficiency and potentially lower your energy bill.
Add an air filter to pull dust and other pollutants out of the air. The U.S. Department of Energy recommends a HEPA filter to remove “99.97% of dust, pollen, mold, bacteria, and any airborne particles with a size of 0.3 microns.” Look for a filter with a Minimum Efficiency Reporting Value of 11 or 12 and change it every three months.
Mitigating dust mite allergies is no easy task, but it’s worth the effort to reap the health benefits of a dust-mite-depopulated home. Whether or not you have a predisposition to react to dust mite allergens, you’ll sleep better at night knowing you have removed as many of those little pests as possible.
Header Image Source: (Diana Polekhina / Unsplash)
Thanks!
Please fill out the form below and we will be contacting you shortly with information about your home.