Buying a home isn’t about timing the market—it’s about timing your life. If this carousel hit, you’re not crazy… you’re just being thoughtful.
DM “GUIDE” for my Buyer’s Guide or book a strategy session when you’re ready 🏡
——-
Christine Almarines @christine_almarines
CA Real Estate Group | Caliber Real Estate
📱 714-476-4637 | DRE #01412944
Serving Buena Park, Cerritos, LA County, Orange County and all surrounding areas
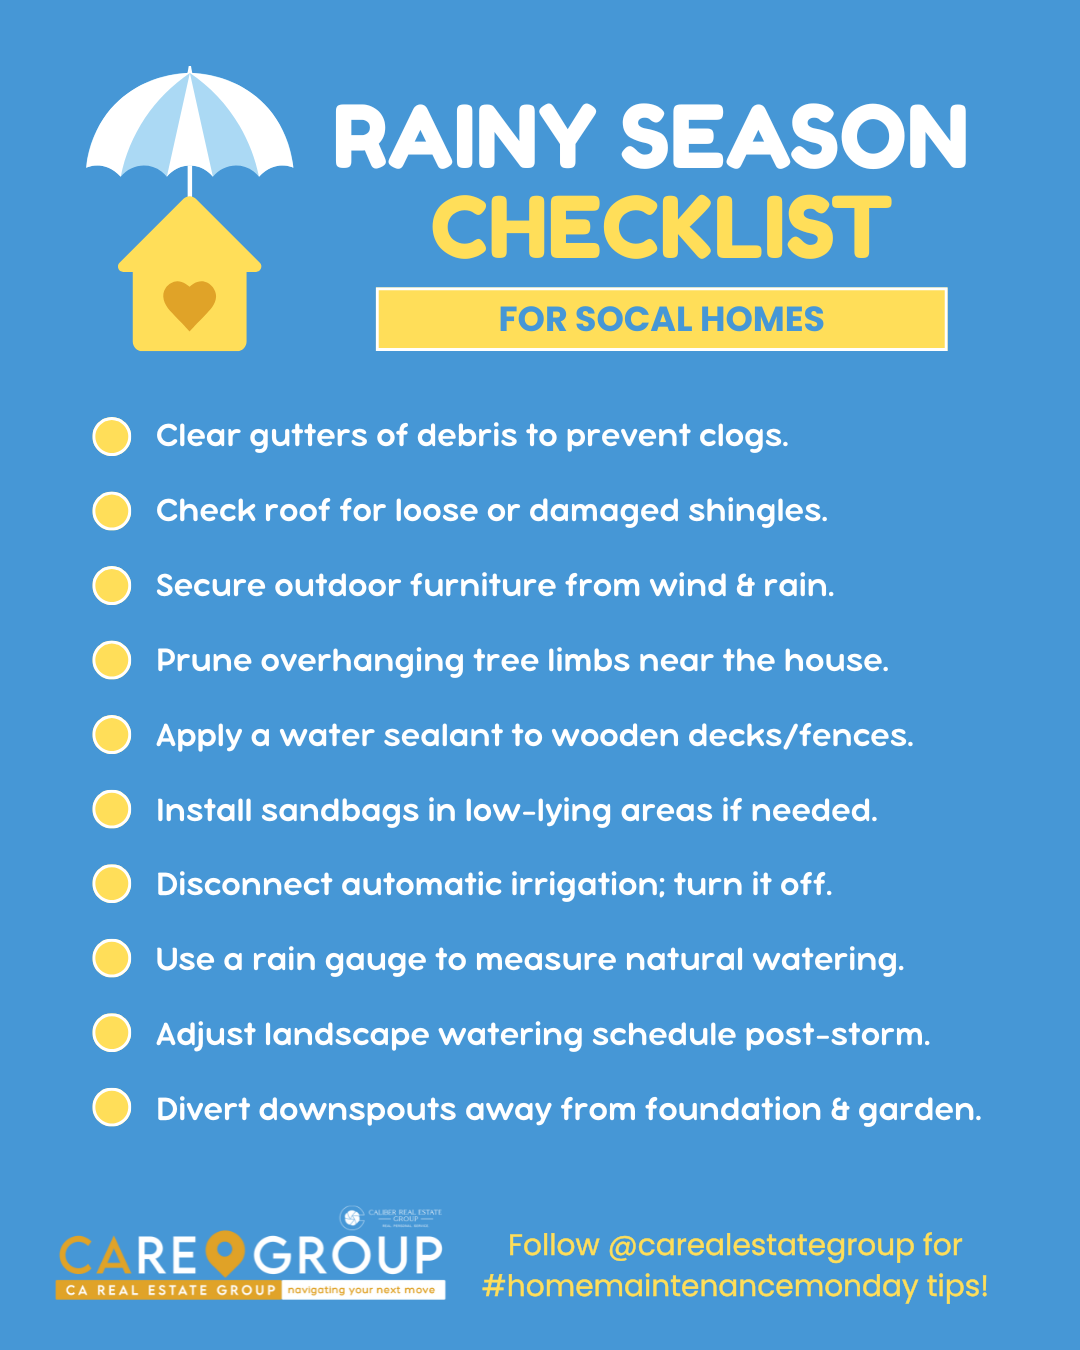
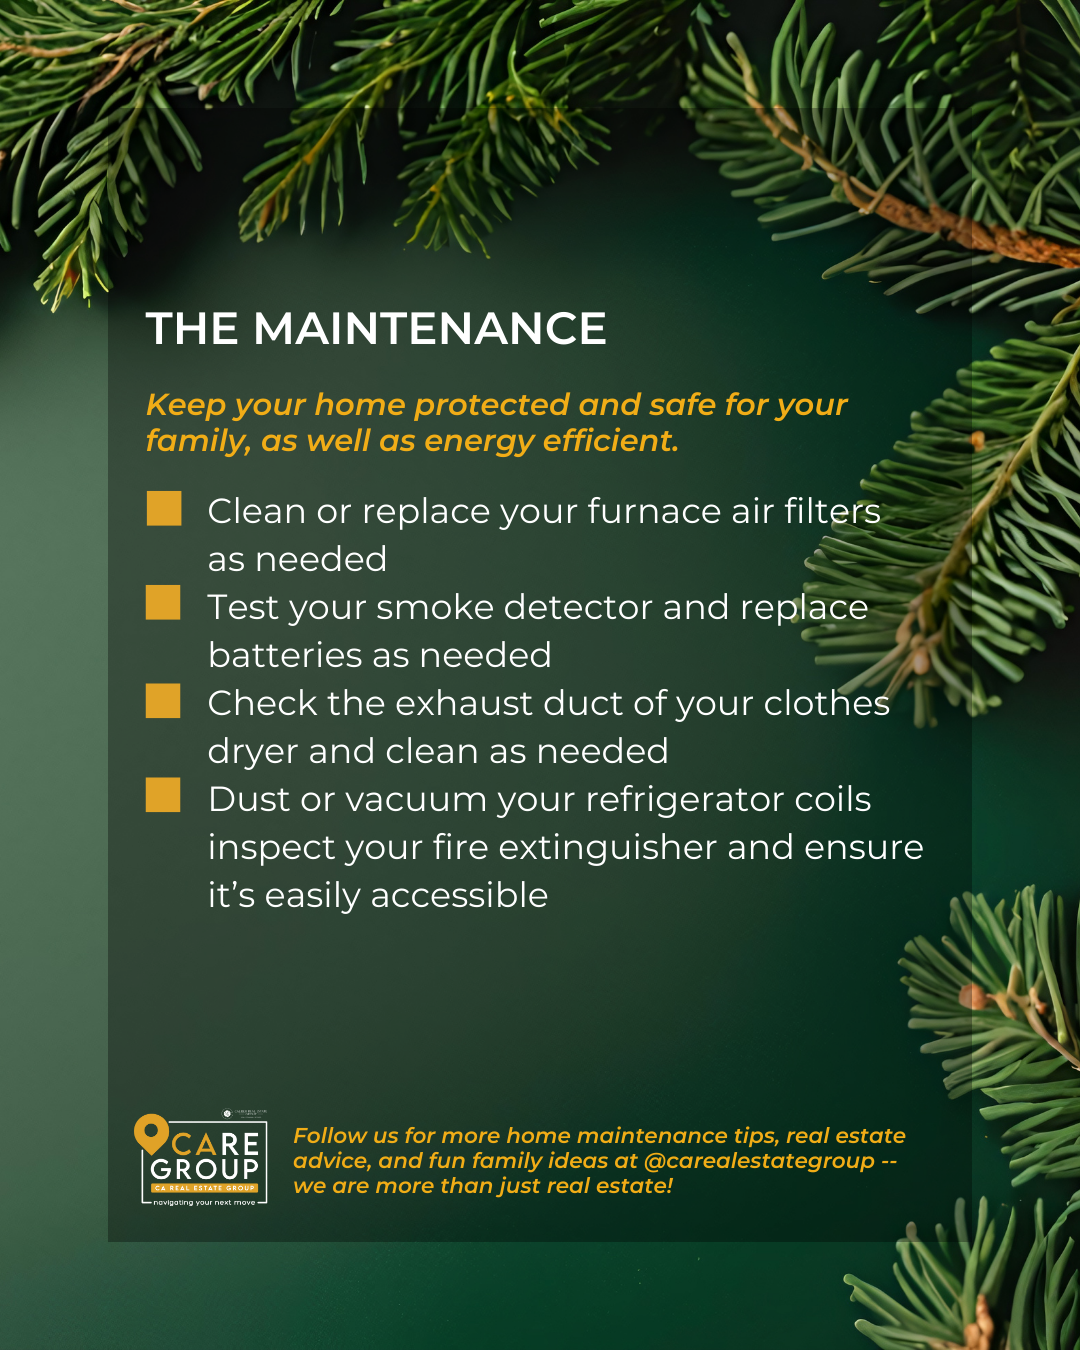
Home maintenance tasks aren’t going to be any easier at the start of a new year than they were during the holiday bustle of December. Still, homes must be maintained, even in January. Why? It’s always easier and cheaper to do home maintenance than to repair a home—sometimes to the tune of thousands of dollars.
Since we’re all about saving you time and money, every Monday, we’ll cover a home maintenance tasks that should be completed this month—plus tips for how to do them faster and easier, or with the help of a pro. So take a deep breath and dive into those chores. The good news? Many are inside chores, so you have no “It’s too cold!” excuses. (Source: Realtor.com)
Follow us @carealestategroup for more January Tasks and Shortcuts!
Christine Almarines @christine_almarines
CA Real Estate Group | Caliber Real Estate
📱 714-476-4637 | DRE #01412944
Anaid Bautista @anaidrealtor
📱 949-391-8266 | DRE #02179675
Letty Luna @lettylunarealestate
📱 562-879-4181 | DRE #02174000
Serving Buena Park, Cerritos, LA County, Orange County and all surrounding areas
Jan 1-Apr 30
Gray Whale Watching Season – Newport Beach & Dana Point
Experience gray whale season January–April 2026 with whale watching tours from Newport Beach and Dana Point. One of the best wildlife experiences in Orange County. (Peak viewing: January–March)
Jan 1-31
New Year, New You at Spa Pendry – Newport Beach, CA
Spa Pendry At Pendry
Reset and Renew in the New Year, New You at Spa Pendry in Newport Beach. Experience VOYA-powered purifying facials and ocean renewal body treatments.
Jan 7-9
AIMExpo 2026 – North America’s Premier Powersports Trade Show
Anaheim Convention Center
The AIMExpo (American International Motorcycle Expo) returns to the Anaheim Convention Center in 2026, bringing together the entire North American powersports industry under one roof. Explore the latest innovations in motorcycles, ATVs, side-by-sides, and electric power vehicles, plus cutting-edge gear, accessories, and aftermarket products. AIMExpo connects brands, distributors, dealers, media, and enthusiasts through hands-on demos, education sessions, and unmatched networking opportunities.
Jan 8
Class: Classic Handmade Pasta – Anaheim, CA
6:30 PM-7:30 PM
Hilton Garden Inn Anaheim Resort
In-Person Class: Classic Handmade Pasta, hosted at the Hilton Garden Inn Anaheim Resort. In this hands-on and approachable cooking class, guests will learn how to make fresh pasta dough from scratch, practice essential knife skills, and prepare an authentic Italian passata sauce—a versatile tomato sauce rooted in traditional Italian cooking. Designed for beginners.
Jan 8
Duran Duran – Anaheim, CA
7:30 PM-9:30 PM
Honda Center
Legendary new wave and rock icons Duran Duran take the stage at Honda Center for a major 2026 Orange County concert event. Fans can expect an electrifying show featuring decades of hits like Rio, Hungry Like the Wolf, Ordinary World, and new material performed with the band’s signature cinematic flair. A high-energy night perfect for longtime fans and new listeners alike.
Jan 9-10
Monica Vinader Trunk Show at Nordstrom Irvine Spectrum
Nordstrom Irvine Spectrum
Discover timeless jewelry with purpose at the Monica Vinader Trunk Show at Nordstrom Irvine Spectrum. This two-day event invites guests to explore exclusive 2026 pieces.
Jan 9
Italian Wines & Food Tasting – Costa Mesa, CA
5:00 PM-6:30 PM
The Hood Kitchen Space
Spend an evening in Costa Mesa savoring Italian wines and tapas-style bites at this intimate Italian Wines & Food Tasting hosted by Merenda Pizza. This pop-up experience showcases a curated selection of Italian wines paired with small plates in true aperitivo style. Guests will discover new favorite labels, learn about the stories behind each wine, and enjoy a relaxed, social atmosphere
Jan 9
Electric Feels: Indie Rock + Electronic Dance Party – Santa Ana, CA -18+ event
9:00 PM-11:00 PM
The Observatory
Dance the night away at Electric Feels, an electrifying indie rock and electronic dance party known for packed dance floors, high-energy DJs, and nonstop sing-along anthems. From indie favorites to electronic remixes, this late-night party brings together music lovers looking for a vibrant, feel-good night out. A perfect choice for a Friday night kickoff in Orange County.
Jan 10
SnowFest – Lake Forest, CA
10:30 AM-5:30 PM
Mount Pittsford
Slide into the new year at SnowFest, Lake Forest’s beloved winter celebration bringing real snow fun to Orange County. Families are invited to enjoy snowy play areas, winter games, and an exciting sled ride down Mount Pittsford—all without leaving SoCal. This annual event is perfect for kids, parents, and anyone looking to kick off January with a little winter magic.
Jan 10
Monster Energy SuperMotocross World Championship – Anaheim Opener 2026
3:30 PM-9:30 PM
Angel Stadium of Anaheim
Get ready for the most electrifying night in motorsports — the SuperMotocross World Championship roars into Angel Stadium of Anaheim on January 10, 2026, for the West Division 250SX Class Championship Opener! Witness the biggest names in Supercross battle it out under the lights, including five past champions:🏆 Jason Anderson • Eli Tomac • Chase Sexton • Cooper Webb • Jett Lawrence. They’ll be joined by fierce contenders like Hunter Lawrence, Ken Roczen, Dylan Ferrandis, Justin Cooper, Aaron Plessinger, Malcolm Stewart, and Justin Barcia — all hungry for the crown.
Jan 10
RPM: Paradise in OC – Irvine, CA
4:00 PM-9:00 PM
Flight Way Parking Structure
Kick off the year at RPM: Paradise in OC, the very first car show of 2026—an electric multi-level showcase blending car culture, community, and purpose. From elite show builds to street icons, drag machines, and crisp stance creations, this high-energy night sets the tone for the year. Expect live entertainment, competitions, vendors, and a vibrant gathering of enthusiasts ready to start the year in full throttle.
Jan 10
GOLDN – KPop & Pop Dance Party- Anahem
4:30 PM-9:30 PM
House of Blues Anaheim
Dance the night away at GOLDN – KPop & Pop Dance Party at House of Blues Anaheim on January 10, 2026 at 4:30 PM. High-energy music and fun for K-pop and pop fans.
Jan 10
The Dinner Detective: True Crime Murder Mystery Dinner Show –Anaheim
6:00 PM-9:15 PM
Embassy Suites Anaheim–Orange
Step into a night of suspense, laughter, and interactive intrigue with The Dinner Detective, North America’s largest comedy murder mystery dinner theatre show—now playing in Orange County.
Jan 11
Cars & Café x OC Car Culture-San Juan Capistrano
7:30 AM-10:00 AM
Cars & Café x OC Car Culture – SoCal Mini Club
Cars & Café x OC Car Culture is an early-morning automotive meetup hosted by the SoCal Mini Club, part of a series of community events that bring together car enthusiasts from across Southern California.
Jan 11
The Coast Vintage Market – Laguna Hills
8:00 AM-3:00 PM
The Laguna Hills Mall
The Coast Vintage Market is a curated vintage shopping experience bringing together some of Southern California’s best independent vintage sellers, collectors, and creatives.
Jan 11
The Shroud of Turin: An Immersive Experience – Garden Grove
9:00 AM-5:00 PM
Christ Cathedral
Inspired by large-scale immersive exhibitions like Van Gogh and Immersive King Tut, this 90-minute journey blends cutting-edge technology with scholarship and art to create a deeply moving, educational experience suitable for families, history lovers, and those seeking spiritual reflection.
Jan 11
Dr. Zahi Hawass-Archaeology: Recent Great Discoveries-Santa Ana
1:30 PM-3:30 PM
Norma Kershaw Auditorium- Bowers Museum
Join world-renowned archaeologist Dr. Zahi Hawass for a fascinating, insider journey into the most recent discoveries reshaping our understanding of ancient Egypt. Distinguished Lecture & Book Signing
Jan 1-31
New Year, New You at Spa Pendry – Newport Beach, CA
Spa Pendry At Pendry
Reset and Renew in the New Year, New You at Spa Pendry in Newport Beach. Experience VOYA-powered purifying facials and ocean renewal body treatments.
Jan 13
Hello Kitty Sherpa Bag Promo Pack – Anaheim, CA
7:00 PM-10:00 PM
Honda Center
The Anaheim Ducks bring kawaii energy to Honda Center with a special Hello Kitty Sherpa Bag Promo Night. Fans attending the January 13 game will have the chance to receive an exclusive Ducks x Hello Kitty sherpa crossbody bag—perfect for collectors, families, and Hello Kitty lovers of all ages. Enjoy a fun themed night of hockey, merch, and in-arena entertainment as the Ducks take on the Dallas Stars.
Jan 13-25
The Wiz – Broadway National Tour-Costa mesa
Segerstrom Hall
“The Wiz is cause for celebration!” — Chicago Tribune. The Tony® Award–winning musical that changed Broadway forever is back.
Jan 14
Remembering Rob Reiner with The Princess Bride – Santa Ana
5:00 PM-9:00 PM
The Frida Cinema
In celebration of the extraordinary legacy of Rob Reiner, The Frida Cinema presents special screenings of one of his most beloved films, The Princess Bride—a timeless fairy-tale adventure that continues to delight audiences of all ages.
Jan 14
Newport Beach Restaurant Week – VIP Opening Night Kick-Off Party
6:00 PM-8:00 PM
Porsche Newport Beach
Kick off Newport Beach Restaurant Week 2026 in style at this exclusive VIP Opening Night Kick-Off Party. Be among the first to sample curated signature bites from top Newport Beach restaurants.
Jan 15
Wine Class: Wine Mythbusters – Costa Mesa, CA
6:00 PM-8:00 PM
Argaux
Demystify wine at this fun and educational Wine Mythbusters class in Costa Mesa. Perfect for anyone who loves wine but wants to separate fact from fiction, this interactive tasting experience explores common wine misconceptions and helps you understand what really matters when it comes to flavor, aging, serving, and enjoyment. This hands-on class is ideal for beginner and intermediate wine lovers who want to learn while sipping and sharing laughs with fellow enthusiasts.
Jan 15
Masquerade Installation Gala – Costa Mesa
6:30 PM-9:30 PM
The Park Club
Attend the Masquerade Installation Gala at The Park Club in Costa Mesa. A formal evening celebrating AREAA leadership, elegance, and community.
Jan 15
In-Person Class: Authentic Handmade Dumplings – Anaheim, CA
6:30 PM-7:30 PM
The Viv Hotel, Anaheim – a Tribute Portfolio Hotel
Discover the flavor-packed world of dumplings at this Authentic Handmade Dumplings cooking class hosted at The Viv Hotel, Anaheim. In this hands-on yet relaxed experience, guests will learn how to craft juicy, plump dumplings filled with savory pork, vegetables, and classic seasonings like soy sauce and sesame oil. Designed for beginners
Jan 15
The Art of Restoration: A Luxury Mattress Sound Bath Experience – Brea, CA
7:00 PM-8:15 PM
Custom Comfort Mattress
Unwind and reset at The Art of Restoration: A Luxury Mattress Sound Bath Experience, a deeply restorative guided meditation hosted at Custom Comfort Mattress in Brea. Designed especially for beginners.
Jan 16
A Day at the Carnival Preschool Party -Laguna Niguel
10:00 AM-11:00 AM
Crown Valley Community Center
Bring your little ones under the big top for a joyful morning of carnival-themed fun at A Day at the Carnival Preschool Party! Ages 2.5–4 | Parent/Guardian Participation Required
Jan 16
Beautifica: An Immersive 360° Experience – Costa Mesa, CA
5:00 PM-9:00 PM
Orange Coast College Planetarium
Step inside a breathtaking sensory journey with Beautifica, a fully immersive 360° planetarium experience at the Orange Coast College Planetarium. This family-friendly show transports audiences through worlds both real and imagined—ranging from mind-blowing particle fields to euphoric, fantastical environments that defy description. Created by visionary composer James Hood in collaboration with world-class immersive animators, Beautifica blends music, motion, and visuals into a mesmerizing experience designed to uplift the spirit and ignite the imagination.
Jan 16
Berner – Santa Ana, CA
7:00 PM-11:00 PM
The Observatory
Bay Area rapper and entrepreneur Berner brings his signature West Coast sound to The Observatory for a high-energy night of hip-hop. Known for his prolific catalog, chart-topping releases, and collaborations across the genre, Berner delivers a live show packed with fan favorites and deep cuts.
Jan 17
Sip & Style: La Casa de Camilla Collection Launch- South Coast Plaza
10:00 AM-2:00 PM
Camilla Boutique-South Coast Plaza
Step into the world of CAMILLA and celebrate the launch of its newest collection, La Casa de Camilla, with an afternoon of style, champagne, and artistry
Jan 17
Earlybird Breakfast Burritos Grand Opening – Costa Mesa
10:30 AM-10:30 AM
Earlybird-The LAB Anti-Mall
Earlybird Breakfast Burritos is officially landing in Orange County! Join the celebration as Earlybird Breakfast Burritos hosts the grand opening of its first OC location at The LAB Anti-Mall in Costa Mesa.
Jan 17
Laguna Beach Murder Mystery: Solve the Case! (Self-Guided)
2:00 PM-8:00 PM
Start Point
Put your detective skills to the test in this self-guided outdoor murder mystery set in scenic Laguna Beach. Using your smartphone and the Questo app, you’ll follow clues, solve puzzles, and uncover hidden details as you explore the city on foot — all while working to solve the case.
Jan 17
Grower-Producer Champagne Tasting – Costa Mesa, CA
2:00 PM-8:00 PM
Hi-Time Wine Cellars
Celebrate the art of independent Champagne with this exclusive Grower-Producer Champagne Tasting at Hi-Time Wine Cellars in Costa Mesa. Known for curating one of Orange County’s most impressive Champagne selections, Hi-Time offers a guided tasting experience highlighting small, family-owned producers who craft Champagne from their own vineyards. A must-attend event for Champagne lovers, collectors, and anyone looking to explore the elegance and terroir-driven beauty of RM (Récoltant-Manipulant) Champagnes.
Jan 17-18
Monster Jam 2026 – Anaheim
Angel Stadium of Anaheim
Monster Jam roars back into Angel Stadium for an action-packed weekend of massive jumps, crazy stunts, racing, and fan-favorite freestyle battles. Experience the thunder of 12,000-pound trucks like Grave Digger, El Toro Loco, Megalodon, and more as world-class drivers compete for the Anaheim podium.
Jan 17
Ballaké Sissoko & Derek Gripper – Live at Irvine Barclay Theatre
8:00 PM-9:00 PM
Irvine Barclay Theatre
Experience a rare musical collaboration between two world-renowned virtuosos: Malian kora master Ballaké Sissoko and South African classical guitar icon Derek Gripper. Praised globally for their transcendent blend of West African tradition and contemporary classical expression, the duo returns to the Barclay stage for an unforgettable evening of sound, storytelling, and artistic mastery.
Jan 17
Gimme Gimme Disco – Santa Ana, CA-18+ event
8:00 PM-11:00 PM
Constellation Room at The Observatory
Get ready to dance all night at Gimme Gimme Disco, a high-energy disco dance party celebrating iconic disco hits, modern throwbacks, and nonstop feel-good vibes. Known for packed dance floors, glittery aesthetics, and crowd-favorite anthems, this 18+ party transforms the Constellation Room into a disco-fueled night out.
Jan 18
Bratty Winter Y2K Flea Market – Costa Mesa
11:00 AM-4:00 PM
Bratty Winter Flea Market
Get ready for a Y2K-inspired shopping day at the Bratty Winter Flea, hosted by Orange County Market. This high-energy flea market brings together local vendors, vintage vibes, and nostalgic fashion with a playful, Bratz-era twist.
Jan 18
Bollywood Afternoon Tea – Orange, CA
12:00 PM-1:00 PM
Chaiwale & Co
Sip, savor, and sway to the sounds of classic Bollywood at Bollywood Afternoon Tea, a weekly Desi chai tea service held in the heart of Old Towne Orange. This vibrant cultural experience blends traditional Indian tea service with pastries, biscuits, burritos, and cakes, all set to a soundtrack of beloved Bollywood classics. Whether you’re meeting friends, planning a unique date, or simply indulging in something different, this weekly afternoon tea offers a flavorful and festive escape.
Jan 1-31
New Year, New You at Spa Pendry – Newport Beach, CA
Spa Pendry At Pendry
Reset and Renew in the New Year, New You at Spa Pendry in Newport Beach. Experience VOYA-powered purifying facials and ocean renewal body treatments.
Jan 13-25
The Wiz – Broadway National Tour-Costa mesa
Segerstrom Hall
“The Wiz is cause for celebration!” — Chicago Tribune. The Tony® Award–winning musical that changed Broadway forever is back.
Jan 19
Wearable Blanket Giveaway – Anaheim, CA
7:00 PM-10:00 PM
Honda Center
Bundle up in team spirit! The Anaheim Ducks are hosting a Wearable Blanket Giveaway Night, where fans can score an exclusive Ducks-branded wearable blanket—perfect for cozy game nights and collectors alike. This special promo event brings high energy to Honda Center as the Ducks face the New York Rangers in an exciting mid-season matchup.
Jan 20
Flo’s V8 Cafe New Menu Launch Cars Land, Disney California Adventure Park – Anaheim
8:00 AM-9:00 PM
Cars Land – Disney California Adventure Park
Starting January 20, Flo’s V8 Cafe is revving things up with a fresh menu refresh in the heart of Cars Land. From new burgers and comfort classics to plant-based options and nostalgic shakes, these new bites are guaranteed to have guests saying “Kachow!”
Jan 21
Quarantine Cruise – Costa Mesa, CA
7:00 AM-9:00 AM
Quarantine Cruise @ SOCO & The OC Mix
The Quarantine Cruise returns to Costa Mesa with one of Orange County’s largest and most energetic community car gatherings. Thousands of enthusiasts roll in from across Southern California to showcase classics, exotics, muscle cars, hot rods, lowriders, and custom builds of every style. This high-visibility meetup blends O.C. car culture with a lively social atmosphere—perfect for photographers, collectors, families, and anyone who loves a good cruise morning.
Jan 22-24
NAMM Show 2026 — The Ultimate Music Industry Experience-Anaheim
Anaheim Convention Center
The NAMM Show 2026 returns to the Anaheim Convention Center — the global stage where music, sound, and event technology come together. Featuring 4,400+ brands, this is where groundbreaking instruments, gear, and innovations debut before they hit the world stage. Join artists, educators, manufacturers, and retailers for five days of inspiration and connection, including three full days of exhibits, live performances, panels, and networking events. From guitars to grand pianos, software to synths, NAMM is where the future of music begins.
Jan 22
Class: Classic Handmade Pasta – Anaheim, CA
6:30 PM-7:30 PM
Hilton Garden Inn Anaheim Resort
In-Person Class: Classic Handmade Pasta, hosted at the Hilton Garden Inn Anaheim Resort. In this hands-on and approachable cooking class, guests will learn how to make fresh pasta dough from scratch, practice essential knife skills, and prepare an authentic Italian passata sauce—a versatile tomato sauce rooted in traditional Italian cooking. Designed for beginners.
Jan 22
Frank Family Wine Dinner at Chart House – Dana Point
7:00 PM-10:00 PM
Chart House, Dana Point
Savor an evening of elevated dining and exceptional wines at the Frank Family Vineyards Wine Dinner, hosted at Chart House Dana Point. Enjoy a stunning oceanfront setting as you indulge in a five-course menu expertly paired with hand-selected wines from Frank Family Vineyards — a Napa Valley favorite known for its rich, expressive varietals.
Jan 22
McCormick & Schmick’s + Orin Swift Wine Dinner – Anaheim
7:00 PM-10:00 PM
McCormick & Schmick’s Grille
Savor an unforgettable evening of fine dining and exceptional wines at the McCormick & Schmick’s + Orin Swift Wine Dinner in Anaheim. This exclusive five-course tasting experience pairs signature coastal cuisine with bold, expressive wines from acclaimed California winery Orin Swift — creating the perfect harmony of flavor and craftsmanship.
Jan 22
Blade Runner – Live in Concert – Costa Mesa
8:00 PM-10:00 PM
Renée and Henry Segerstrom Concert Hall
Experience cinema like never before with Blade Runner (Final Cut)—presented live at Renée and Henry Segerstrom Concert Hall.
Jan 23-Feb 23
Lunar New Year 2026 – Disney California Adventure Park, Anaheim, CA
Disney California Adventure Park
Celebrate the Year of the Horse during a vibrant 31-day Lunar New Year festival at Disney California Adventure Park. This beloved seasonal event honors Chinese, Korean, and Vietnamese cultures through festive entertainment, themed décor, specialty food marketplaces, character experiences, and magical Disney touches throughout Paradise Gardens. Perfect for families, food lovers, and Disney fans who want to enjoy one of the park’s most colorful celebrations of the year.
Jan 23
BurnDown: LSD and the Search for God + More – The Observatory-Santa Ana-All-ages
3:30 PM-11:30 PM
The Observatory 3503 S. Harbor Blvd Santa Ana, CA 92704
Experience an immersive afternoon of heavy, atmospheric, and emotionally charged music at BurnDown, a stacked multi-band showcase at The Observatory. Headlined by LSD and the Search for God, this genre-spanning lineup blends shoegaze, alternative, rock, and metal for a raw, high-energy live music experience. Perfect for fans of layered soundscapes, underground scenes, and discovering emerging artists in an intimate venue setting.
Jan 23
PHILIP SAYCE – The Ultimate Blues-Rock Guitar Deity – in Laguna Beach!
8:00 PM-10:00 PM
Experience an electrifying night of blues-rock mastery as Philip Sayce takes the stage at the Laguna Beach Cultural Arts Center. Renowned for his searing guitar tone, virtuosic technique, and soul-driven performances, Sayce delivers a high-octane live show that blends classic blues roots with modern rock intensity.
Jan 24-25
Amigo SoCal World Guitar Show – Costa Mesa
OC Fair & Event Center
One of the largest consumer guitar shows on the West Coast returns to Costa Mesa for a two-day buy/sell/trade extravaganza featuring vintage guitars, amps, pedals, audio gear, drums, rare finds, and top collectors. This is the 247th show in a 42-year series by Amigo Guitar Shows — co-sponsored by Vintage Guitar Magazin
Jan 24
Pints & Pistons Classic Car Meet San Clemente — Cars, Brews & Coastal Vibes
11:00 AM-12:00 PM
Judge Brewing Co
Rev your engines and raise a pint! The Pints & Pistons Classic Car Meet brings together vintage rides, local brews, and laid-back beach-town energy. Cruise by for classic cars, live music, and craft beer tastings in a relaxed coastal setting.
Jan 24
Monster Energy SuperMotocross World Championship – Anaheim Opener 2026 (Copy)
3:30 PM-9:30 PM
Angel Stadium of Anaheim
Get ready for the most electrifying night in motorsports — the SuperMotocross World Championship roars into Angel Stadium of Anaheim on January 24, 2026, for the West Division 250SX Class- Round 3 — all hungry for the crown.
Jan 24
Handmade Bao Buns Cooking Class in Anaheim
5:00 PM-7:00 PM
1441 S Manchester Ave, Anaheim, CA 92802
Learn the art of crafting fluffy, pillowy Handmade Bao Buns from scratch in this fun, hands-on cooking class in Orange County. Perfect for beginners and food lovers alike!
Jan 24
The Dinner Detective: True Crime Murder Mystery Dinner Show –Anaheim
6:00 PM-7:00 PM
Embassy Suites Anaheim–Orange
Step into a night of suspense, laughter, and interactive intrigue with The Dinner Detective, North America’s largest comedy murder mystery dinner theatre show—now playing in Orange County.
Jan 24
Chelo: El Adiós de Una Grande – Anaheim, CA
7:00 PM-10:00 PM
Honda Center
An unforgettable tribute to legendary singer Chelo arrives at Honda Center this January. El Adiós de Una Grande brings together an incredible lineup of renowned artists honoring Chelo’s enduring musical legacy. This special evening features performances by Juan Valentín, Beatriz Adriana, Graciela Beltrán, Mercedes Castro, Chayito Valdez Hija, and Yesenia Flores, celebrating regional Mexican music with emotion, power, and cultural pride. A must-see event for fans of música regional, iconic ballads, and live Latin performances.
Jan 24
Legends: Keola Beamer & Henry Kapono – Irvine
8:00 PM-10:00 PM
Irvine Barclay Theatre
Experience an unforgettable evening of Hawaiian music with Keola Beamer and Henry Kapono, two of the most influential artists in contemporary island music.
Jan 24
24K Magic! – The World’s #1 Tribute to Bruno Mars – Newport Beach
8:00 PM-9:30 PM
The Lido Theater
See 24K Magic, the world’s #1 Bruno Mars tribute band, live at The Lido Theater in Newport Beach. Tight choreography & signature showmanship. Intimate, historic Newport Beach venue. Perfect for date night or a night out with friends
Jan 25
Exotics & Espresso — Orange County
9:00 AM-11:00 AM
O’Gara Coach South OC
Get your caffeine fix with a side of horsepower at Exotics & Espresso, Orange County’s premier supercar gathering. Held at O’Gara Coach South OC, this Sunday morning event brings together an ever-changing lineup of Lamborghinis, Ferraris, McLarens, Bugattis, Bentleys, and Aston Martins — all gleaming under the Irvine sun. Whether you’re a collector, enthusiast, or just love beautiful machines, this community-driven event offers a stylish mix of luxury performance cars and artisan coffee. Each week features a fresh showcase of high-end exotics, themed displays, and opportunities to connect with fellow auto lovers in an elegant yet relaxed atmosphere.
Jan 25
Bollywood Afternoon Tea – Orange, CA
12:00 PM-1:00 PM
Chaiwale & Co
Sip, savor, and sway to the sounds of classic Bollywood at Bollywood Afternoon Tea, a weekly Desi chai tea service held in the heart of Old Towne Orange. This vibrant cultural experience blends traditional Indian tea service with pastries, biscuits, burritos, and cakes, all set to a soundtrack of beloved Bollywood classics. Whether you’re meeting friends, planning a unique date, or simply indulging in something different, this weekly afternoon tea offers a flavorful and festive escape.
Jan 25-26
Newport Beach Restaurant Week 2026
Newport Beach Restaurant Week returns January 15–25, 2026, celebrating the city’s reputation as Orange County’s premier dining destination, 14 delicious days!!
Jan 1-31
New Year, New You at Spa Pendry – Newport Beach, CA
Spa Pendry At Pendry
Reset and Renew in the New Year, New You at Spa Pendry in Newport Beach. Experience VOYA-powered purifying facials and ocean renewal body treatments.
Jan 23-Feb 23
Lunar New Year 2026 – Disney California Adventure Park, Anaheim, CA
Disney California Adventure Park
Celebrate the Year of the Horse during a vibrant 31-day Lunar New Year festival at Disney California Adventure Park. This beloved seasonal event honors Chinese, Korean, and Vietnamese cultures through festive entertainment, themed décor, specialty food marketplaces, character experiences, and magical Disney touches throughout Paradise Gardens. Perfect for families, food lovers, and Disney fans who want to enjoy one of the park’s most colorful celebrations of the year.
Jan 25-26
Newport Beach Restaurant Week 2026
Newport Beach Restaurant Week returns January 15–25, 2026, celebrating the city’s reputation as Orange County’s premier dining destination, 14 delicious days!!
Jan 26
Jim Butcher Celebrates Twelve Months – Huntington Beach, CA
7:00 PM-8:00 PM
Barnes & Noble
Meet #1 New York Times bestselling author Jim Butcher at Barnes & Noble Huntington Beach for an evening of discussion and book signing celebrating Twelve Months, the latest installment in The Dresden Files. Known for his wildly popular fantasy series including The Dresden Files, Codex Alera, and The Cinder Spires, Butcher will share insights into his work, discuss the new release, and sign copies for fans. A must-attend event for fantasy readers and longtime Dresden fans.
Jan 29-Feb 1
Disneyland® Half Marathon Weekend 2026 – “Celebrate Happy!”
Disneyland® Resort
Get ready to “Celebrate Happy” during the 2026 Disneyland® Half Marathon Weekend, presented by Honda, as part of the Disneyland® Resort’s 70th Anniversary Celebration! This magical run Disney® event brings together runners of all ages and skill levels for a weekend of fun, fitness, and Disney magic.
Jan 29
Spring Mountain Vineyard: Multi-Decade Tasting – Newport Beach
6:00 PM-8:30 PM
Pendry Newport Beach
Experience an extraordinary evening of Napa Valley heritage with Spring Mountain Vineyard’s Multi-Decade Tasting, hosted at Pendry Newport Beach. Rare opportunity to taste four decades of estate Cabernet Sauvignon
Jan 29
Taste of San Juan – San Juan Capistrano, CA
6:00 PM-9:00 PM
San Juan Hills Golf Club – The Limo Barn at Reata Park
Kick off the celebrations for Fiesta de las Golondrinas at Taste of San Juan, an evening dedicated to the flavors, music, and community spirit of San Juan Capistrano. Hosted at The Limo Barn at Reata Park, this popular culinary event brings together many of the city’s standout restaurants under one roof, offering guests delicious tasting portions of their signature dishes. Live music adds to the festive atmosphere, making it a perfect night out for food lovers and locals alike.
Jan 29
Catch of the Day: Save The Brave Benefit Dinner – Huntington Beach, CA
6:30 PM-9:00 PM
Calico Fish House
Join the community for an inspiring evening at Catch of the Day, a seafood benefit dinner supporting Save The Brave, a nonprofit dedicated to helping veterans heal from PTSD and suicidal thoughts through Offshore Saltwater Therapy Fishing Trips. Hosted at Calico Fish House along Pacific Coast Highway, this meaningful night combines exceptional coastal cuisine with heartfelt tributes, keynote speakers, and a shared mission to restore hope for those who have served.
Jan 29
In-Person Class: Authentic Handmade Dumplings – Anaheim, CA
6:30 PM-7:30 PM
The Viv Hotel, Anaheim – a Tribute Portfolio Hotel
Discover the flavor-packed world of dumplings at this Authentic Handmade Dumplings cooking class hosted at The Viv Hotel, Anaheim. In this hands-on yet relaxed experience, guests will learn how to craft juicy, plump dumplings filled with savory pork, vegetables, and classic seasonings like soy sauce and sesame oil. Designed for beginners
Jan 30
Friday Night Munchies – Santa Ana Night Market
6:00 PM-10:00 PM
Santa Ana Night Market
Friday Night Munchies is a weekly Santa Ana night market bringing together food trucks, local eateries, and vendors from across the region. Expect a diverse menu of global eats, sweet treats, savory bites, and community vibes. Pet-friendly (on leash), family-focused, and lively—this is a staple weekly gathering in the OC food scene.
Jan 30
Sweeney Todd – La Mirada
8:00 PM-9:30 PM
La Mirada Theatre for the Performing Arts
Experience the darkly delicious brilliance of Stephen Sondheim’s Sweeney Todd—a Tony Award–winning masterpiece of love, murder, and revenge set in the shadowy streets of 19th-century London.
Jan 31-Feb 1
Knott’s PEANUTS™ Celebration – Buena Park
Knott’s Berry Farm
Celebrate PEANUTS™ at Knott’s Berry Farm. Enjoy live shows, character meet-and-greets, themed food, and family fun in Orange County.
Jan 31
Waves of Wellness – Fitness Event – Huntington Beach
9:00 AM-12:30 PM
Ocean Lawn at Paséa Hotel & Spa
Ignite your New Year’s fitness goals with Waves of Wellness, the signature coastal wellness event hosted at Paséa Hotel & Spa. Set on the oceanfront lawn.
Jan 31
Public Wetlands Walking Tour at Bolsa Chica – Huntington Beach
10:00 AM-12:00 PM
Bolsa Chica Conservancy
One of the best nature experiences in Huntington Beach. Learn about local & migratory bird species. Explore restored wetland habitats. Free to attend (reservation required),
Jan 31
California Comic Book Convention-Orange
12:00 PM-5:00 PM
Hotel Fera
California Comic Convention returns to Orange County for its 18th annual edition, bringing together collectors, artists, and comic enthusiasts for a weekend dedicated to vintage comics and original comic book art.
Jan 31
Tanzanite African Acrobats – Irvine
1:00 PM-6:30 PM
Irvine Barclay Theatre
Prepare to be dazzled! The internationally acclaimed Tanzanite African Acrobats bring an electrifying performance to Irvine, blending breathtaking athleticism with rich East African culture Showtimes: 1:00 PM & 5:00 PM.
Jan 31-Feb 1
Monster Jam 2026 – Anaheim
Angel Stadium of Anaheim
Monster Jam roars back into Angel Stadium for an action-packed weekend of massive jumps, crazy stunts, racing, and fan-favorite freestyle battles. Experience the thunder of 12,000-pound trucks like Grave Digger, El Toro Loco, Megalodon, and more as world-class drivers compete for the Anaheim podium.
Jan 31
Intro to the Art of Sushi – Anaheim, CA
5:00 PM-6:00 PM
Hilton Garden Inn Anaheim Resort
Learn the fundamentals of sushi-making at the In-Person Class: Intro to the Art of Sushi, hosted at the Hilton Garden Inn Anaheim Resort. This hands-on culinary experience introduces participants to essential sushi techniques, ingredients, and rolling methods in a relaxed, beginner-friendly setting.
Jan 31
Bingo Loco: The World’s Craziest Bingo Party – Costa Mesa -21+ Event
5:00 PM-10:00 PM
Time Nightclub
Bingo Loco is crashing into Costa Mesa with a full-blown party experience that’s loud, wild, and completely unhinged—in the best way possible.
Jan 31
Candlelight Newport Beach: 90s Unplugged
7:15 PM-8:15 PM
The Lido Theater
Relive the raw emotion and iconic sound of the 1990s in an intimate candlelit setting at Newport Beach’s historic The Lido Theater.
Rent in SoCal is doing the absolute most 😅
Most renters assume buying is way out of reach…but they’ve never actually looked at their numbers.
You don’t need 20% down.
Buying isn’t always more than rent.
And clarity changes everything.
Contact our team today to help you get CLARITY.
———
Christine Almarines @christine_almarines
📱 714-476-4637 | DRE #01412944
Anaid Bautista @anaidrealtor
📱 949-391-8266 | DRE #02179675
Letty Luna @lettylunarealestate
📱 562-879-4181 | DRE #02174000
Serving Buena Park, Cerritos, LA County, Orange County and all surrounding areas
CA Real Estate Group | Caliber Real Estate
Oosouji is the Japanese tradition of end-of-year cleaning that literally means “great cleansing,” and has its roots in Shinto beliefs. The Oosouji became a means of purifying one’s environment to welcome the New Year and the kami (Shinto spirits or deities). The ritual also symbolizes the end of bad experiences, regrets and failures of the past year, paving the way for a new beginning.
Oosouji is much more than a routine house-cleaning. It’s an exhaustive cleaning of the entire house, where every nook and cranny is carefully treated. From windows to baseboards, from the underside of furniture to the back of appliances, nothing is left to chance. Japanese families take this task very seriously, and it’s common to see all members actively participating in the housework.
The process also involves the sorting and elimination of unnecessary or cumbersome items, reflecting the Japanese concept of “mottainai,” which expresses regret at waste. This step creates a more uncluttered and serene space, ready to welcome in the New Year. In the offices, old papers are discarded and files reorganized. As for the students, they tidy up their desks, taking part in the collective purification effort.
Here practical advice for integrating this spirit of deep cleaning into your end-of-year routine:
Don’t hesitate to involve all family members in this process, as the Japanese traditionally do. This can be an excellent opportunity to prepare together for New Year’s Day in Japan (their biggest holiday), creating an atmosphere conducive to celebration and renewal.
Although Oosouji is deeply rooted in Japanese culture, its principles can be adapted and appreciated in other cultural contexts. The idea of an annual cleansing as a means of purification and renewal can be universally appealing. It offers an opportunity for reflection and refocusing, while creating a clean and orderly environment for the year ahead.
In an international context, Oosouji can be seen as a practice of mindfulness and gratitude towards one’s living space. It can be combined with other end-of-year traditions, such as the festival of seven herbs (Nanakusa no sekku), to create a meaningful personal or family ritual. The key is to capture the spirit of Oosouji: a moment of pause to clean up, tidy up, and prepare mentally and physically for a fresh start.
By adopting certain aspects of Oosouji, we can not only improve our physical environment, but also cultivate an attitude of respect and gratitude towards our living space. This practice can help us to leave behind negative energies, as the Japanese symbolically do, and welcome the New Year with a renewed spirit and harmonious environment.
Orange County is ringing in the New Year in laidback OC style with theme park fireworks at Disneyland/Knott’s Berry Farm, lively parties at clubs and rooftop bars in Anaheim/Costa Mesa, family fun at Winter Fest OC or First Night Fullerton, and memorable dinners in a cozy igloo. OC offers everything from high-energy nights to cozy, memorable experiences across various venues and cities.
As a bonus, we’ve tacked on a few events that are still going on, some even through the new year!
We wish everyone a Happy New Year and we look forward to connecting with you in 2026!
![]()
ANAHEIM
BUENA PARK
COSTA MESA
HUNTINGTON BEACH
FULLERTON
LA HABRA
ORANGE
SANTA ANA
IRVINE
LAGUNA BEACH
LAGUNA NIGUEL
NEWPORT BEACH
NEWPORT COAST
If you’ve been watching the real estate market and wondering whether now is the right time to buy, sell, or simply sit tight, November’s housing data offers some valuable insight. The Cerritos real estate market continues to show movement, but with clear signs that strategy, pricing, and condition matter more than ever.
Let’s break down what’s happening and what it means for homeowners and buyers alike.
Single detached homes in Cerritos remain in demand, especially for properties that are well-maintained and priced appropriately. In November, the market recorded:
18 active listings
15 pending sales
4 homes on hold
9 homes sold
The average list price for active single-family homes was $1,342,685, while the average sold price came in at $1,286,667. This gap between list and sold prices signals a more balanced market, buyers are active, but they are negotiating.
Homes spent an average of 27 days on the market, which is still relatively fast and shows that desirable properties are not sitting long. Sellers who understand current buyer expectations are being rewarded, while those who overprice or skip necessary preparation may see longer market times.
Attached homes, condos and townhouses tell a slightly different story. In November, Cerritos saw:
9 active listings
8 pending sales
4 sold homes
The average active list price in this category was $720,449, while the average sold price dropped to $604,750. That difference highlights a key trend: buyers in this segment are price-sensitive and highly selective.
Attached homes averaged 48 days on the market, nearly double the time of single-family homes. This doesn’t mean demand isn’t there, it simply means buyers are weighing options carefully, comparing condition, HOA fees, and long-term value before making a move.
For sellers, this underscores the importance of realistic pricing and presentation. For buyers, it may present opportunities to negotiate more favorable terms.
One of the most important things to understand about the Cerritos market is that not all homes perform the same. Two properties with similar square footage can sell at very different prices depending on:
Condition and upgrades
Lot size and layout
Proximity to schools and amenities
Overall neighborhood appeal
Market averages are helpful, but they don’t tell the full story. Your home’s value or the value of a home you’re considering depends on hyper-local factors that require a closer look.
That’s why a custom Equity Potential Insight Comparison is so important. It shows how your specific property stacks up against current competition and recent sales, giving you clarity instead of guesswork.

The Cerritos housing market isn’t slowing, it’s normalizing. Buyers are informed. Sellers need to be prepared. And success depends on having a clear plan.
If you’re selling, the right pricing and strategy can help you maximize your equity without unnecessary time on market. If you’re buying, understanding market leverage can save you thousands and help you compete confidently.

With constant changes in interest rates, inventory levels, and buyer behavior, navigating real estate decisions requires more than online estimates or headlines. It requires local expertise and thoughtful strategy.

I’m Christine Almarines, Team Lead of the CA Real Estate Group, where we put care into every transaction. If you’d like a personalized review of your home’s equity potential or want to talk through your next move in Cerritos, I’d be happy to help. Smart decisions start with good information and the right guide.
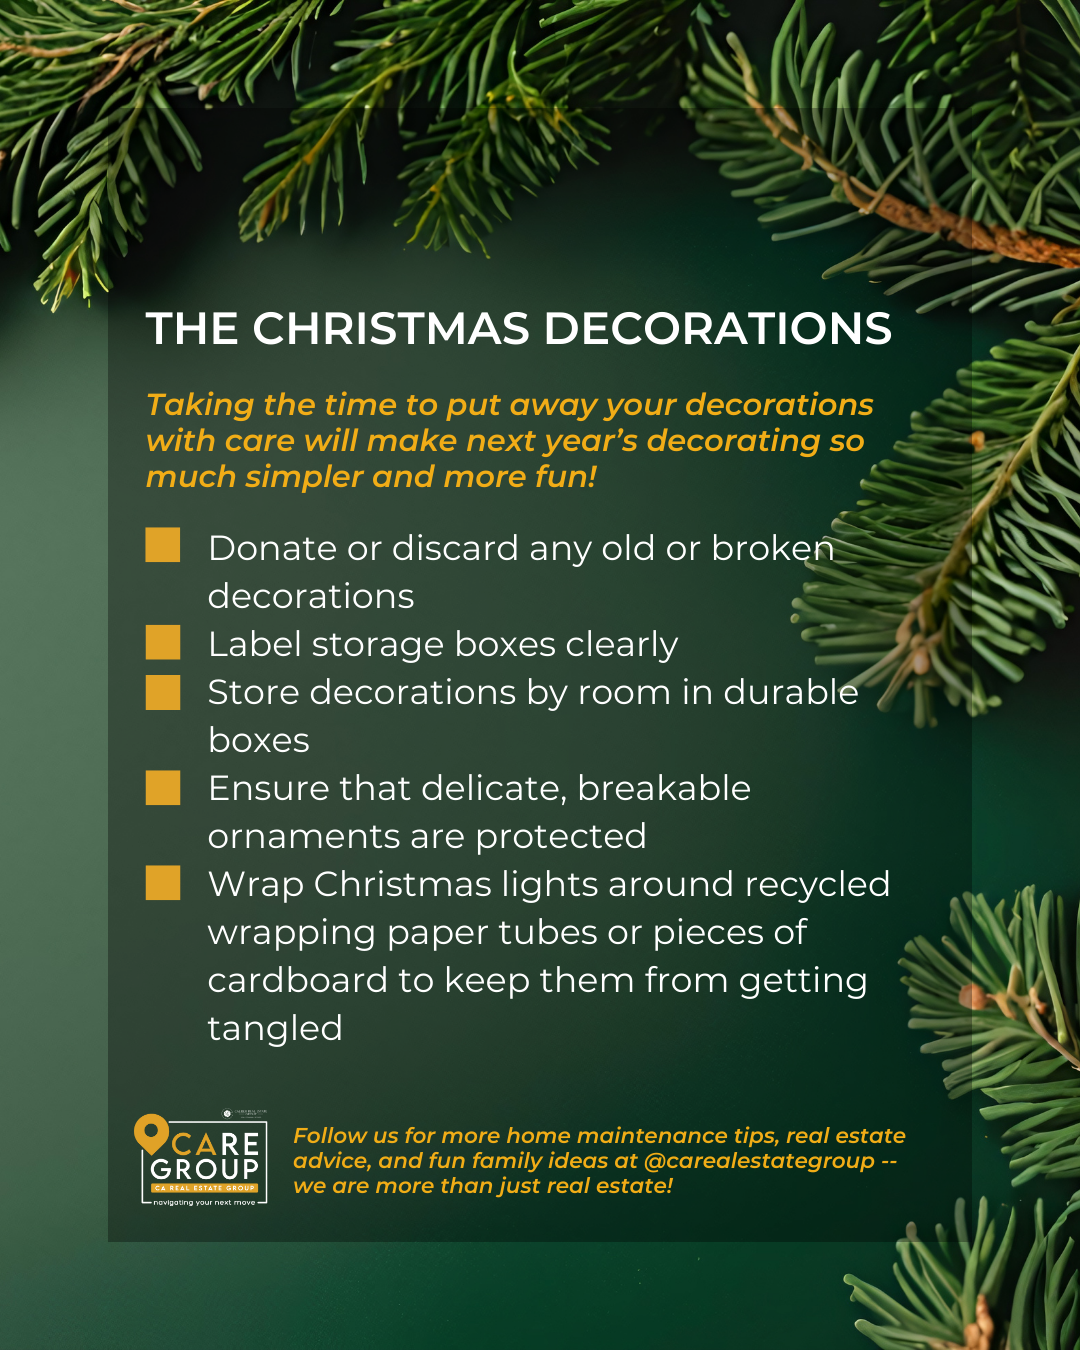
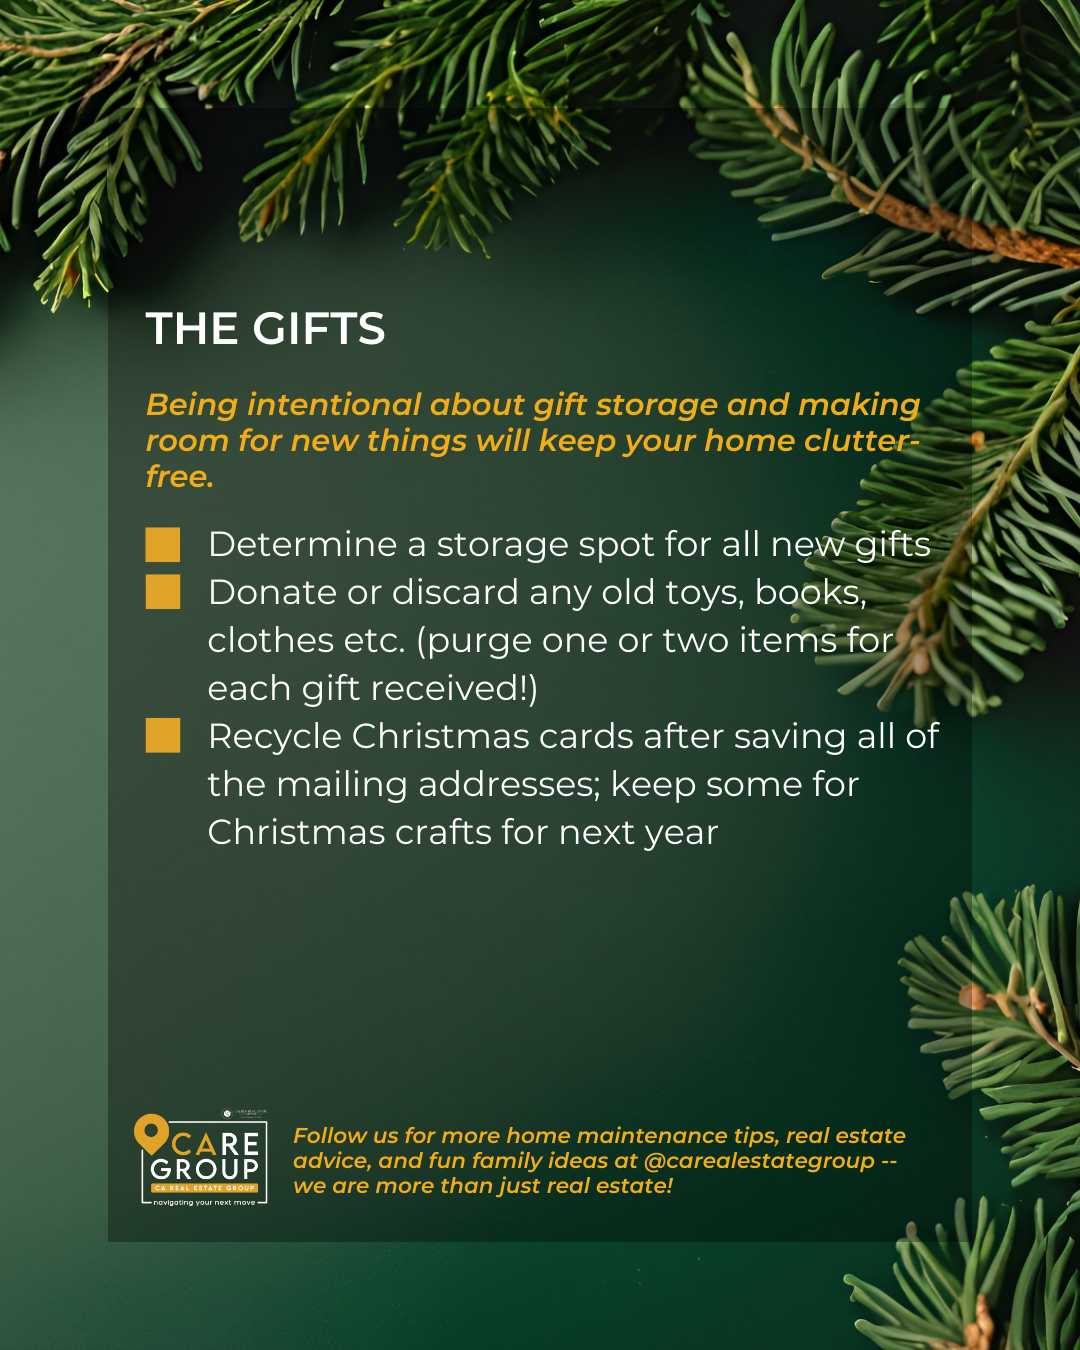
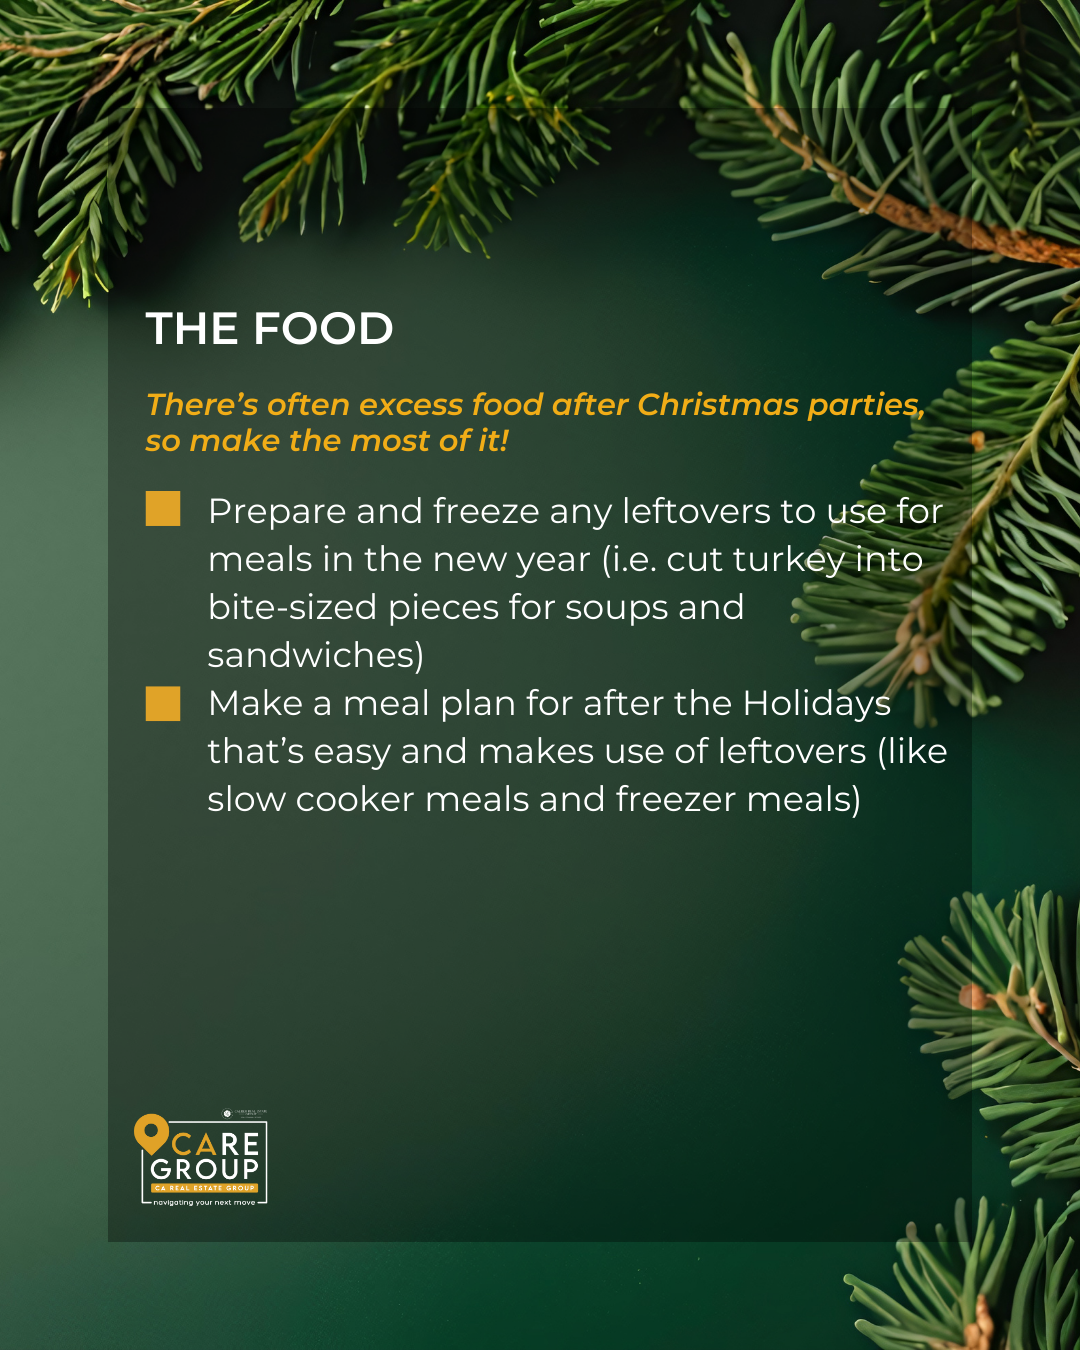
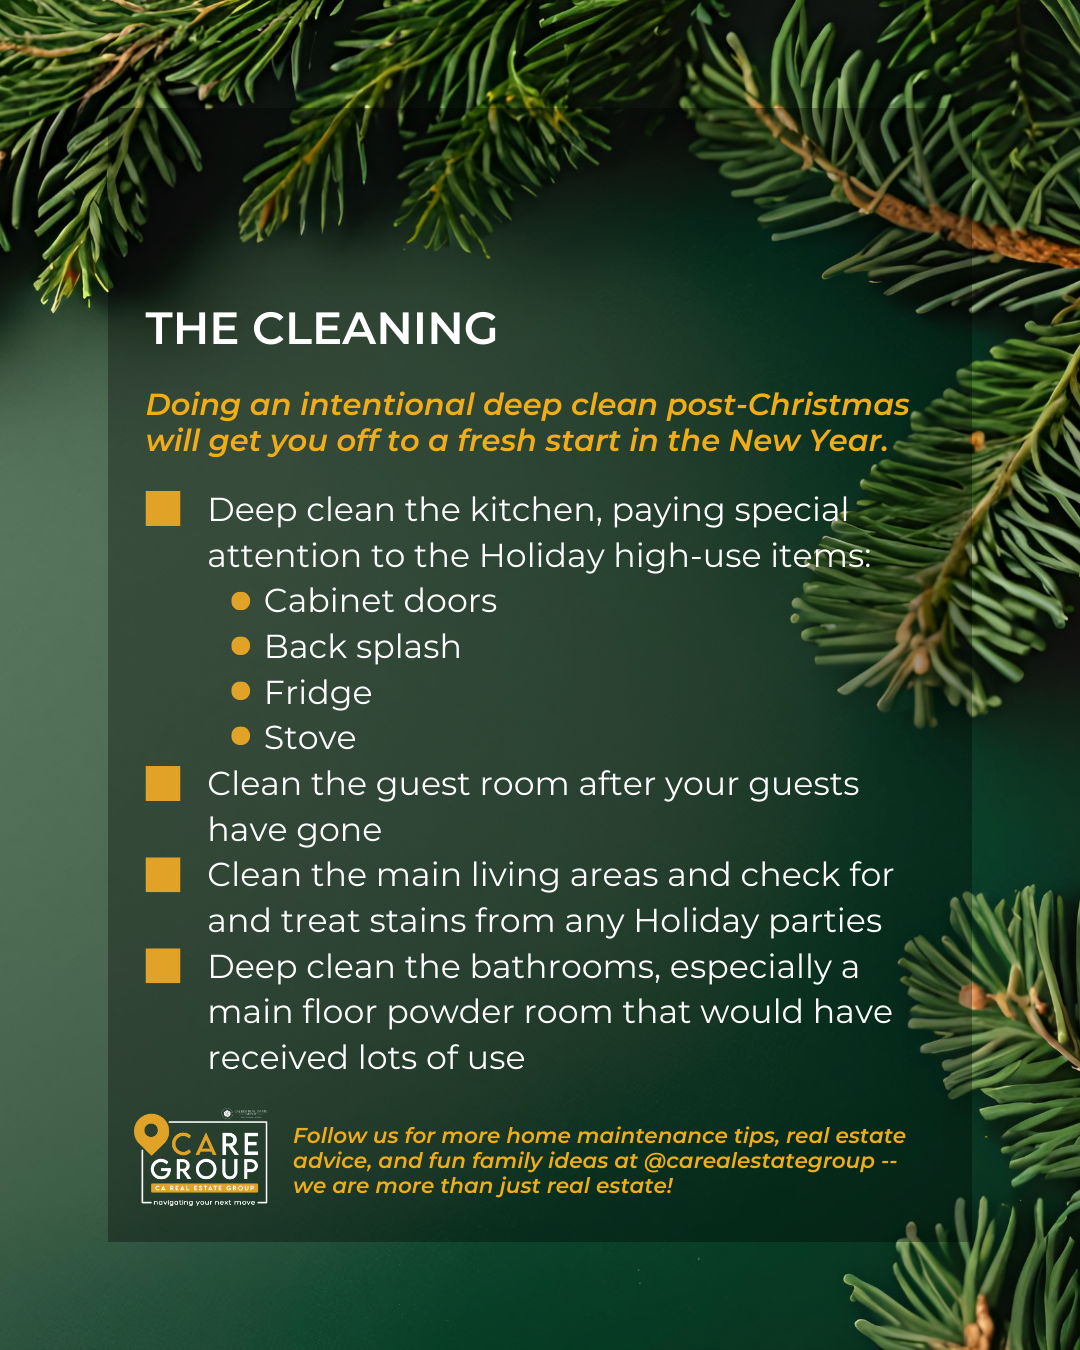
Christmastime can be a little chaotic, a little messy, and the addition of new toys and other gifts might make your home feel extra cluttered.
Having a concrete post-holiday cleaning and organizing strategy BEFORE THE HOLIDAYS can help make the holidays feel less messy and more relaxing! If you love and are motivated by checklists, this one’s for you!
Follow us for more home maintenance tips, real estate advice, and fun family ideas at @carealestategroup — we are more than just real estate!
———–
CA Real Estate Group | Caliber Real Estate
Christine Almarines @christine_almarines,📱 714-476-4637, DRE #01412944
Anaid Bautista @anaidrealtor,📱 949-391-8266, DRE #02179675
Letty Luna @lettylunarealestate,📱 562-879-4181, DRE #02174000
Serving Buena Park, Cerritos, LA County, Orange County and all surrounding areas
If you’ve been wondering what’s really happening in the local housing market, November delivered some pretty interesting data. Whether you’re a homeowner, a future buyer, or just keeping tabs on the market, these numbers give us a clear snapshot of what direction Buena Park is heading.
I’m Christine Almarines with the CA Real Estate Group, and here’s what you need to know.

As of this recording, Buena Park’s single detached homes continue to move at a steady and competitive pace. November closed with 25 active listings, 20 pending sales, 7 homes on hold, and 20 homes sold. That’s a healthy level of activity for this time of year and shows that serious buyers are still in the market despite seasonal slowdowns and shifting interest rates.
One surprising data point? The average list price for active single-family homes came in at $1,025,312, while the average sold price landed at $1,025,780, yes, slightly above list price. This tells us two things: well-priced homes are still drawing strong demand, and buyers are willing to compete for the right home, even in a market that’s adjusting.
These homes spent an average of 36 days on the market, which is longer than the lightning-fast sales we saw in previous years, but still solid. It indicates a market that’s stabilizing rather than slowing to a halt.
Now let’s talk condos, townhomes, and attached properties, an important segment for buyers looking for affordability or a lower-maintenance lifestyle.
In November, Buena Park recorded 15 active attached home listings, 10 pending sales, 2 on hold, and 4 closed sales. The average active list price was $803,300, while the average sold price came in at $777,500. This shows a slight gap between asking and selling prices, which isn’t unusual in this category. Attached homes also averaged 48 days on the market, suggesting these properties may require a little more patience from both sellers and buyers.
Still, the demand is present. Pending sales remain strong, showing that buyers are shopping but they’re more selective, and pricing accuracy is crucial.
Buena Park isn’t a one-size fits all market. With multiple zip codes, the numbers can vary significantly depending on the neighborhood, property condition, upgrades, lot size, and overall desirability of the area. A home that looks similar on paper may hold a very different value depending on its exact location.
That’s why data alone doesn’t tell the whole story. Your home’s true value can only be understood with a personalized comparison, one that considers real-time competition, micro market trends, and the unique features of your property.
With constant shifts in interest rates, buyer demand, and inventory, navigating the market requires more than watching headlines. It takes a strategy. Whether you’re planning to sell and want to maximize your equity, or you’re looking to buy and want to avoid overpaying, experience matters.
I’m Christine Almarines, Team Lead of the CA Real Estate Group, where we put care into every transaction. If you’d like a specific Equity Potential Insight Comparison (Home Value Report) of your Buena Park home, message me anytime. Your next move should be intentional and I’d be honored to guide you through it.
Please fill out the form below and we will be contacting you shortly
with information about your home.