Credit: Janna Allbritton for Yellow Prairie Interiors
The color of your front door is incredibly important if you want to nail your home’s curb appeal. In fact, surveys show that certain front door colors can help sell your home for top dollar. But even if you’re not planning on hitting the market any time soon, brushing on a fresh hue can give your entire home an instant facelift, allowing you to add personality and impact to your exterior with very little time (or money) spent.
Need a boost of color confidence before you hit the paint aisle? Below, we’re rounding up nine stunning bits of exterior inspiration, along with the paint colors that will help you get the look. From vibrant orange and retro teal to coastal blue, these front doors certainly know how to make an entrance.
01 of 09 | Espalier by Sherwin-Williams
Credit: Natasha Habermann
To help her charming Cape Cod-style home feel even more timeless, designer Natasha Habermann turned to a rich emerald green to contrast the crisp white siding. The shade, Espalier by Sherwin-Williams, is saturated and luxe while still feeling traditional enough to live in harmony with the home’s classic architecture.
02 of 09 | Heritage Red by Benjamin Moore
Credit: Thomas Kuoh for Studio Munroe
Few color combos are as classic as red, white, and blue, making the trio a go-to exterior palette for designers and homeowners alike. Here, designer Emilie Munroe of Studio Munroe chose Benjamin Moore’s Heritage Red for a finishing touch that feels both timeless and energetic.
03 of 09 | Oceanic Teal by Benjamin Moore
Credit: Nathan Schroder for Maestri Studio
When the exterior of your home has bold accents—be it fanciful architecture or whimsical finishes—it’s important to choose a color that has enough gusto to hold its own.
In this funky mid-century exterior scene by Maestri Studio, bold black and white accents are paired with a retro-inspired teal shade for an entrance that screams, “Fun happens here.” For a similar look, try Oceanic Teal by Benjamin Moore.
04 of 09 | Off-Black by Farrow & Ball
Credit: Sandra Cavallo for Old Silver Shed
A black front door is the equivalent of a great pair of Levi’s jeans—it looks good on just about anybody (or in this case, any house).
For the exterior of her coastal shingle-style home in Cape Cod, creator Sandra Cavallo of Old Silver Shed opted for a rich and dynamic hue, Farrow & Ball’s Off-Black, to offset the home’s decidedly sunny (and summery) outlook.
05 of 09 | Bluebelle by Benjamin Moore
Credit: Hector Manuel Sanchez, Design by Lauren Conner Interiors
You may assume coastal-inspired shades like pale blue are reserved for beachfront properties, but we have good news: They can work just as well in a landlocked cul-de-sac.
Case in point? This elegant baby blue on a home by Lauren Conner Interiors, which sits pretty alongside more rustic details, like red brick steps. While this color is a custom blend, you can score a similar look using a shade like Bluebelle from Benjamin Moore.
06 of 09 | Invigorate by Sherwin-Williams
Credit: Suzy Broome
Sometimes, the most unexpected hues end up being the most memorable. When creator Suzy Broome was on the hunt for a shade that could stand up against the patterned tile leading up to her entryway, she turned to a punchy shade of orange to amp up the style quotient.
To mimic this personality-packed look, try Invigorate by Sherwin-Williams.
07 of 09 | Inchyra Blue by Farrow & Ball
Credit: Eden House Co.
When working with an exterior that boasts warm-colored materials, like brick, you’ll want to choose a front door color that complements (and cools down) the overall scheme.
Credit: Janna Allbritton for Yellow Prairie Interiors
Green is a popular front door color, thanks in large part to its versatility and ability to blend in with the surrounding landscaping.
For a shade that’s less expected and more vibrant, swap traditional forest green for a preppier pick, like Arugula by Sherwin-Williams, seen here on a home by Janna Allbritton of Yellow Prairie Interiors.
09 of 09 | Firecracker by Behr
Credit: Gloria McMahon for The Long Awaited Home
If the exterior of your home is natural wood, you’ve pretty much hit the jackpot—you can pick basically any shade for your front door color and it’ll look good.
To bring a bit of spice to her 1800s New England colonial, creator Gloria McMahon of The Long Awaited Home opted for a brick red, Behr’s Firecracker, which boasts just enough vibrancy to keep the exterior feeling very of this century.
No bored kids will be left behind this summer when you make your way through this big list of fun kids summer activities.
Keeping kids entertained and engaged throughout the summer takes a bit of creativity. Don’t worry though, we have you covered! Check out these 101 fun summer activities for kids that are guaranteed to stave off boredom and keep them excited about what’s going to happen every day. When the first day of school rolls around and their teacher asks, “What did you do this summer?,” they’ll have a lot to say!
Whether you’re entertaining very active toddler or a low-key tween, this mondo list of fun ideas for summer will come in handy for all ages and types of kids. Got a sitter or nanny helping you out this year? Make sure to share these fun summer activities and ideas with them too.
Key takeaways
Having a list of kids summer ideas and activities is key for staving off boredom.
Make sure you have age-appropriate activities for everyone.
Choose from sporty to educational activities with our comprehensive list.
Have a game night with charades, Pictionary and bingo.
Have a water balloon toss — or fight!
Crafty things to do with kids in summer
Fill one of these blank books with stories and illustrations.
Create salad spinner art by placing circles of paper inside a cheap salad spinner, squirt water-based acrylic or tempera paints on top, cover and spin away.
Make a sidewalk chalk mural.
Have an outdoor painting party using huge canvases or cardboard.
Paint with ice by freezing ice cube trays with washable tempera paint.
Mark off all the local parks on a map — then visit them, take pictures and vote for your favorite.
Take in a fireworks exhibit.
Collaborate with other kids in the neighborhood to do a “chalk walk” — have all the neighbors vote on the best sidewalk chalk obstacle courses or other creative chalk masterpieces.
Let kids paint each other with washable tempera paint and then wash it off in a sprinkler run.
Set up a bike wash and raise money for a local charity.
Plan a picnic at the park and invite friends and neighbors.
Decorate bikes and have a neighborhood Fourth of July parade.
Make paper boats and race them in a kiddie pool using straws to propel them.
It’s hard to let go of a 3% mortgage rate. There’s no question about it. It’s the main reason why so many homeowners have delayed their move in recent years. But here’s something to consider.
While your low rate might be ideal, it doesn’t make up being too cramped, having a staircase your knees can’t handle anymore, or being 1,000 miles from your family. And those real-life needs are pushing more sellers off the fence despite today’s rates.
Data shows the share of homeowners with a mortgage rate below 3% is dropping as more people move. And, as a result, the share of homeowners taking on a mortgage rate above 6% is rising, too (see graph below):
The Biggest Reasons People Are Moving Right Now
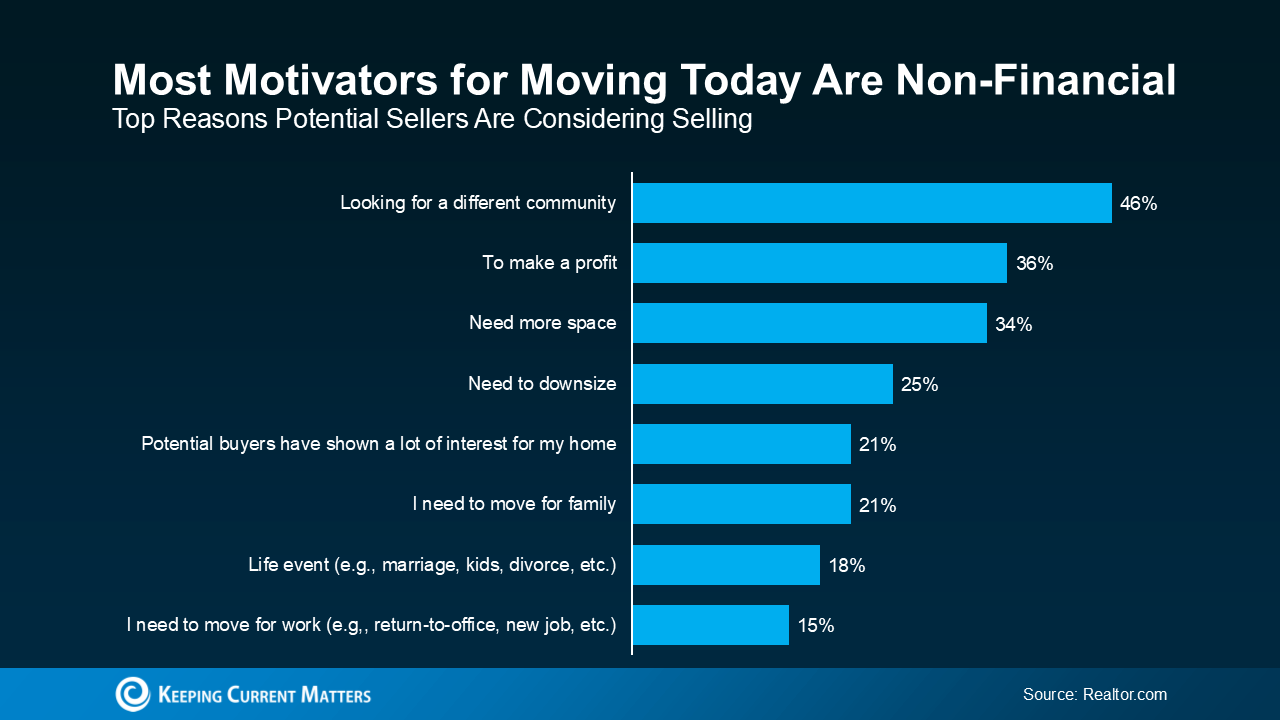
Why are some homeowners willing to take on a higher rate?A survey from Realtor.com helps shed light on that. It shows79% of homeowners considering selling today are doing it out of necessity. And that same survey says most of the necessary reasons people are moving are non-financial in nature (see graph below):
Do any of these reasons resonate for you, too?
You Need More Space: Whether it’s a new baby, children needing their own rooms, or having your parents move in so it’s easier to take care of them, outgrowing your space can happen fast.
You Need Less Space: The kids are out of the house now and you’re craving a life that’s a little simpler. Downsizing can be a major relief: fewer rooms to clean, less to maintain, and lower utility bills, too.
You Want to Be Closer to Family: Whether it’s to help with grandchildren or care for aging parents, sometimes the pull of being near loved ones outweighs the math.
A Relationship in Your Life Has Changed: Divorce, separation, or moving in together after a marriage or new partnership – all can create the need for a fresh start and a new place to call home.
Your Job Is Taking You Somewhere New: If you finally landed your dream job or your partner’s company is relocating, you may need to move too.
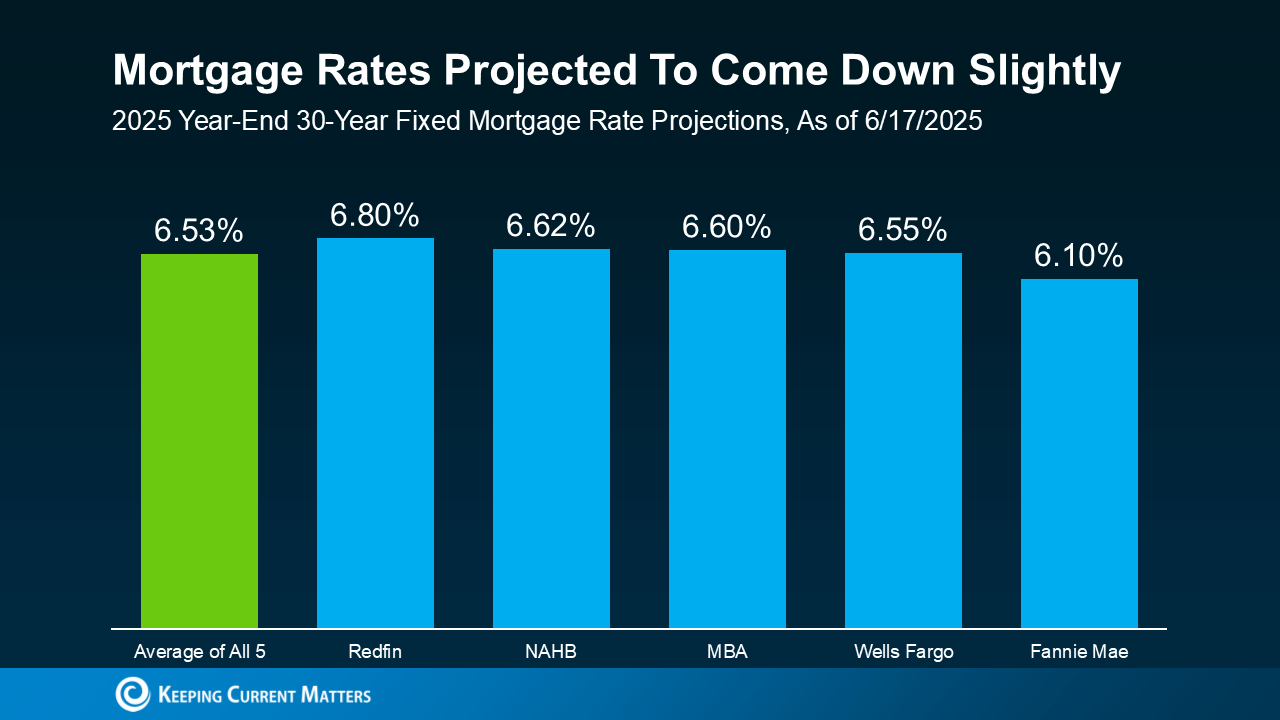
What About Mortgage Rates?
Yes, experts expect mortgage rates to ease, but slowly. The latest projections show only modest declines this year – not the 3% you may be hoping for (see graph below):
So, while waiting for a big drop in rates might sound strategic, it could just mean more time feeling stuck in a space that no longer fits. And for many, that waiting game has already gone on long enough.
According to Realtor.com, nearly 2 in 3 potential sellers have been thinking about moving for over a year. If you’re one of them, maybe it’s time to ask:
How much longer are you willing to press pause on your life?
Bottom Line
Maybe your current house fit your life five years ago. But that “for now” house you bought in 2020? It just can’t deliver on what you need in 2025. And that’s not just okay, it’s normal.
Mortgage rates are part of the equation, for sure. But the bigger question is:
What kind of home do you need to support the life you’re living now?
Talk to CARE Group about what’s changed, and what kind of move would actually take your life forward.
Let’s connect and plan your next steps. Call or text us! 🙂
Keeping Current Matters | May 28, 2025
A few years ago, homes were flying off the shelves and getting multiple offers well over their asking price. It felt like you could name your price and still have buyers lined up at the door.
But today’s housing market is different. Buyers are getting more selective now that inventory has grown. Homes are sitting a little longer. And more sellers are having to cut their prices.
So, how do you still come out on top? It all starts with one thing, pricing your house right from the start. Today, that matters more than ever – and it can make or break your sale.
There’s a Real Price Disconnect Between Buyers and Sellers
A recent survey from Realtor.com shows 81% of home sellers believe they’ll get their asking price or more. But the actual sales data shows there’s a growing gap between what sellers expect and what buyers are actually willing to pay.
In fact, an annual report from the National Association of Realtors (NAR) shows 44% of recently sold homes went for less than the asking price. And 1 in 3 sellers had to cut their price at least once before the home sold. It’s a sign that expectations may be a little out of step with today’s reality.
Check out the graph below. It uses data from Redfin to show that asking prices (blue line) are higher than actual sales prices (green line) by a wider and wider margin:
This tells you something important: not all buyers are willing to pay what many sellers are asking. That doesn’t mean you can’t sell for a great price – but it does mean you need to start with a price that reflects what people are willing to pay in today’s market.
What Happens When You Overprice Your House?
Pricing your house high initially may seem like a smart move, so you have more room to negotiate. But the reality is, an overpriced home can sit on the market and turn buyers away.
Buyers are smart. And when they see a house that’s been sitting for a while, they start to wonder what’s wrong with it. That can lead to fewer showings, less interest, and eventually, a price cut to re-ignite attention. As Realtor.comexplains:
“By getting the right price early on, you can increase the odds buyers will be interested in the home. In turn, this decreases the chances the home will sit on the market for a lengthier timeline, also reducing the odds you’ll need to lower the listing price.”
The longer a house sits, the harder it can be to sell.
You Still Have a Great Opportunity – If You Price Your House Right
To avoid making this mistake, it’s important to lean on an agent who knows what’s happening locally when you set your asking price.
Your agent will look at recent local sales, buyer trends, and inventory levels to find that pricing sweet spot for your neighborhood – because it’s going to be different based on where you live.
And here’s something else to keep in mind, home prices have climbed more than 57% over the past five years. So, even if you price a bit below the number you had your sights set on, you’ll likely still be in a great position profit-wise.
With a local real estate agent’s help, you’ll attract more attention, avoid seeing your house sit on the market too long, and maximize your chances of getting a strong offer.
In today’s market, the right price works. As Mike Simonsen, Founder of Altos Research, explains:
“. . . the best properties, well priced are selling quickly in most of the country.”
Bottom Line
The market has changed, but your opportunity to sell hasn’t. You just need the right pricing plan. Talk to CA Real Estate Group to go over what’s happening with prices in your area and determine what price would help your house sell quickly and for top dollar.
If you’re a homeowner, chances are you’ve built up a lot of wealth – just by living in your house and watching its value grow over time. And that equity? It’s something that could help change your child’s life.
Since affordability is still a challenge, a lot of first-time buyers are struggling to buy a home in today’s market. Even if they have a stable job and a solid plan, buying can still feel out of reach. But that’s where your equity could make all the difference.
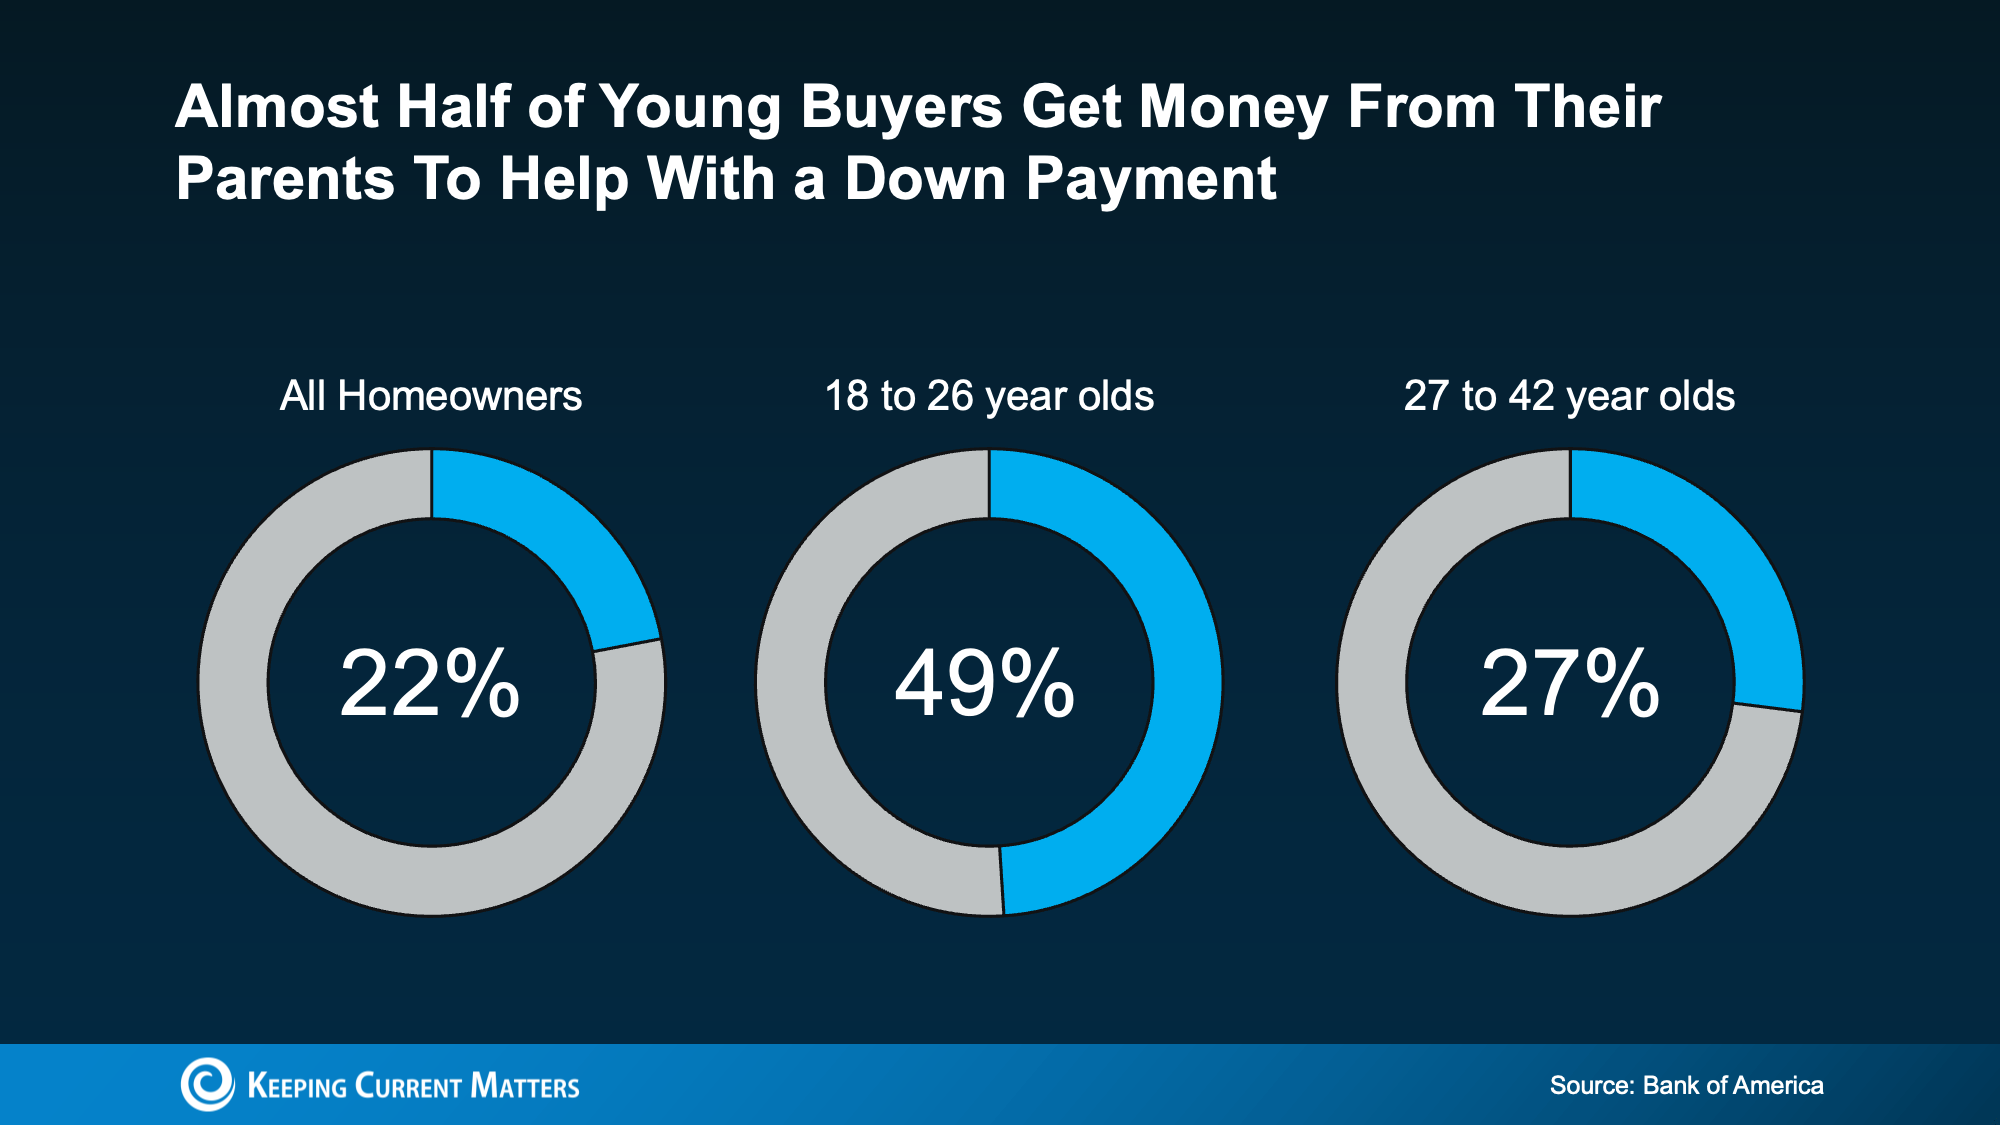
To give you an idea, the average homeowner with a mortgage has $311,000 worth of equity, according to Cotality (formerly CoreLogic). That’s significant. And some parents are using a portion of their equity to help their children become homeowners, too.
According to Bank of America, 49% of buyers between 18 and 26 got money from their parents to use toward their down payment (see chart below):
Even though the data doesn’t specify how many parents used their equity, the wealth they’ve built through homeownership may have helped make it possible – especially given how much equity the average homeowner has today.
While what’s right for each person’s specific situation will vary on a case-by-case basis, that’s a powerful legacy to pass on. It helps those younger people buy a home, build equity of their own, and begin the next chapter of their life with a little less financial stress and a lot more stability. And for those parents? It’s a way to turn what they’ve built into something deeply meaningful.
This isn’t just about money. For many homeowners, it’s about being the reason their child gets to say, “we got the house.” And giving them the kind of head start they might’ve only dreamed of at their age. And here’s the part that really sticks. Compare the Market says:
“Of those who did receive monetary aid from parents and grandparents to buy a house, 45% of Americans said they would not have been able to purchase a house without financial support from parents and grandparents.”
Bottom Line
Your equity could be the thing that makes homeownership possible for your children when they might not be able to do it on their own. So, here’s the question.
If helping your kids buy a home was more feasible than you thought, would you want to explore that option?
If you want to learn more or find out the best way to make it happen, talk to @carealestategroup and they’ll get you in touch with a lender and a financial advisor you can trust.
Let’s connect and plan your next steps. Call or text us! 🙂
Here’s an informational tidbit you probably don’t want to hear: As temperatures drop, many rodents will be attracted to your home for the same reasons you are: They’re seeking a warm, cozy shelter with food. And they’re not just creepy—left unchecked, these pests can wreak havoc on your health and home.
“Although they may be small in size, rodents can cause big problems for homeowners once inside. Known to spread more than 35 diseases worldwide, rodents are considered one of the most dangerous public health pests in America,” says Jim Fredericks, chief entomologist for the National Pest Management Association. “In addition to the health threats they pose, rodents are capable of causing significant property damage.”
For example, if they get behind the walls of your home, they can chew through materials like plastic, wood, and drywall. They’re also capable of chewing through wiring, increasing the risk of electrical fire.
While rodents pose a threat year-round, Fredericks says mice and rats invade an estimated 21 million U.S. homes each winter. To keep them from running rampant on your property, put these tips into practice.
Eliminate access points around the house
Mice can squeeze through openings as small as the size of a dime, and their rat cousins can fit through holes the size of a quarter, experts say. This means even the tiniest cracks and crevices should be sealed, including cracks and holes inside and outside the home.
“It’s critical to eliminate access points by inserting door sweeps, repairing damaged window and door screens, sealing exterior cracks, and replacing loose mortar,” says Fredericks. “Any gap under a door that is larger than a quarter-inch can permit mice to enter and should be closed by repairing thresholds or installing door sweeps.”
Openings to chimneys should be regularly inspected, including the damper, which should always be closed when not in use, says Kevin Busch, vice president of operations at Mr. Handyman.
“Inspect and repair holes in your gutters, roof, fascia, siding, and foundation,” Busch says.
The best materials to use for sealing cracks and holes in your home’s exterior? Busch says expanding foam insulation, caulking, metal screening, or even a small piece of sheet metal will work great.
Inspect all packaging before bringing it into the home
With the ongoing coronavirus pandemic, more people are relying on online ordering for groceries, household supplies, and meal delivery. This cardboard packaging can be enticing to rodents searching for food and, as gross as it sounds, give them a free ride into your home.
“If packages with food are left outside for extended periods of time, they can attract mice and rats who can easily chew through cardboard boxing,” says Fredericks. “Be sure to promptly bring any deliveries inside and inspect packages for signs of rodent damage, or even an infestation inside the box itself.”
Properly store food and dispose of garbage
Critters are always looking for their next meal. Experts suggest storing food in airtight containers, disposing of garbage regularly, and using a sealed trash receptacle to prevent hungry rodents from getting into your food waste.
“Sealing up food and properly storing it is important because the odors attract unwanted animals,” says Craig Gjelsten, vice president of operations for Rainbow International. “Mice, rats, and other pests are attracted to rotting food and animal waste products.”
Keep attics, basements, and crawl spaces ventilated and dry
Eliminating any sources of moisture—including repairing leaking pipes and clogged drains—can help keep rodents at bay.
“Just like humans, rodents need water in order to survive,” says Fredericks. “In general, it’s a good idea to eliminate sources of moisture inside your home by keeping attics and basements well-ventilated while also repairing any leaking pipes or clogged drains.”
Keep outdoor spaces clear and clean
To keep unwanted critters from entering your home, be sure to do regular landscaping and yard maintenance.
“Trim back trees so animals can’t climb onto the roof,” says Josh Sevick, president of The Ground Guys, which specializes in lawn care and landscaping.
Sevick also says to remove debris around your home and to keep firewood at least 20 feet from your house.
Safeguard your electrical system
Rodents have been known to chew throughstructural components like drywall, insulation, lumber, and electrical wiring. While all these threats are worth addressing, ignoring damage to your electrical system can be the most critical because it can lead to unnecessary fires, personal injuries, and property damage.
“While finding evidence of damaged wiring can be extremely difficult, if rodents are present in your home or business, you’ll have a few chewed wires,” says Josh McCormick, vice president of operations for Mr. Electric.
He says to pay attention to red flags like rodent droppings, skeletons, or noises of scurrying or banging in your walls. Evidence of rodent activity could also include loose pieces of insulation, damaged wires, or holes in walls.
“If you suspect or discover a rodent problem, contact a licensed pest control professional immediately,” says Fredericks.
Keeping Current Matters | Apr 30, 2025
For a long time, the housing market was all sunshine for sellers. Homes were flying off the shelves, and buyers had to compete like crazy. But lately, things are starting to shift. Some areas are still super competitive for buyers, while others are seeing more homes sit on the market, giving buyers a bit more breathing room.
In other words, it’s a tale of two markets, and knowing which one you’re in makes a huge difference when you move.
What Is a Buyer’s Market vs. a Seller’s Market?
In a buyer’s market, there are a lot of homes for sale, and not as many people buying. With fewer buyers competing for these homes, that means they generally sit on the market longer, they might not sell for as much as they would in a seller’s market, and buyers have more room to negotiate.
On the flip side, in a seller’s market, there aren’t enough homes for sale for the number of buyers who are trying to purchase them. Homes sell faster, sellers often get multiple offers, and prices shoot higher because buyers are willing to pay more to win the home.
The Market Is Starting To Balance Out
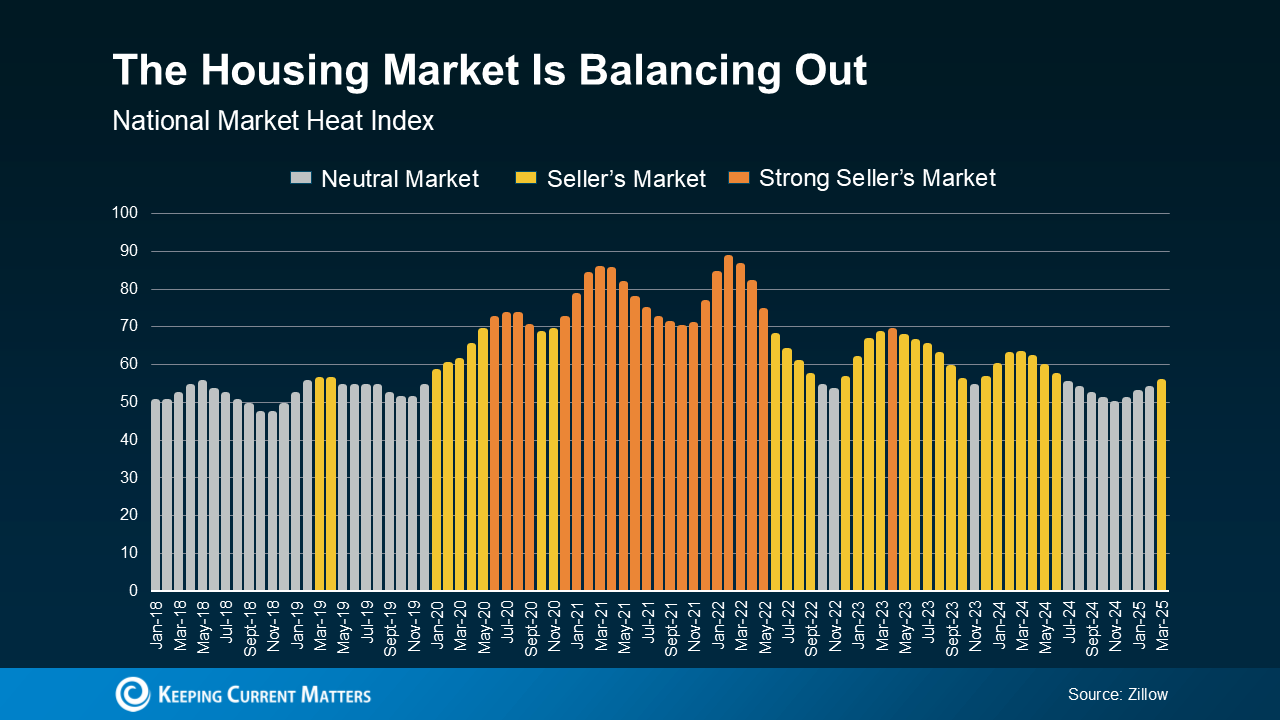
For years, almost every market in the country was a strong seller’s market. That made it tough for buyers – especially first-timers. But now, things are shifting. According to Zillow, the national housing market is balancing out (see graph below):
The index used in this graph measures whether the national housing market is more of a seller’s market, buyer’s market, or neutral market – basically, whether it favors buyers, sellers, or if it’s not really swinging either way. Each month, the market is measured between 0 and 100. The closer to 100, the bigger the advantage sellers have.
The orange bars in the middle of the graph show the years when sellers had their strongest advantage, from 2020 to early 2022. But, as time has gone on, the market has become more balanced. It shifted from a strong seller’s market to a less intense one. And lately, it’s been neutral more than anything else (that’s the gray bars on the right side of the graph). That means buyers are gaining some negotiating power again.
In a more balanced or neutral market, homes tend to stay on the market a little longer, bidding wars are less common, and sellers may need to make more concessions – like price reductions or helping with closing costs. That shift gives today’s buyers more opportunities and less competition than a couple of years ago.
Why Are Things Changing?
Inventory plays a big role. When there are more homes for sale, buyers have more options – and that cools down home price growth. As data from Realtor.com shows, the supply of available homes for sale isn’t growing at the same rate everywhere (see graph below):
This graph shows how inventory has changed compared to last year (blue bars) and compared to 2017–2019 (red bars) in different regions of the country.
The South and West regions of the U.S. have seen big jumps in housing inventory in the past year (that’s the blue on the right). Both are almost back to pre-pandemic levels. That’s why more buyer’s markets are popping up there.
But in the Northeast and Midwest, inventory is still very low compared to pre-pandemic (that’s why those red bars are so big). That means those areas are more likely to stay seller’s markets for now.
What This Means for You
Every local market is different. Even if the national headlines say one thing, your town (or even your neighborhood) could be telling a totally different story.
Knowing which type of market you’re in helps you make smarter decisions for your move. That’s why working with a local real estate agent is so important right now.
As Zillow says:
“Agents are experts on their local markets and can craft buying or selling strategies tailored to local market conditions.”
Agents understand the unique trends in your area and can help you make the best choices, whether you’re buying or selling. With their expert strategies, you can move no matter which way the market is leaning, because they know how to navigate various levels of buyer competition, how to find hidden gems locally, how to price a house right, how to negotiate based on who has more leverage, and more.
Bottom Line
If you’re ready to make a move, or even just thinking about it, connect with a local real estate agent. They’d love to help you understand your local market and create a game plan that works for you.
What’s one thing you’re curious about when it comes to the market in your area?
Let’s connect and plan your next steps. Find out if we’re the right real estate team for you!
Lake Mission Viejo now has seating with a view outside the fences (of course, if you live in MV and have access to the lake, then go there!). You’ll find this seating on the side of the lake along Olympiad. You can literally park your car right there at the curb and enjoy the seating and view.
You can picnic near pretty much ANY playground at a picnic table or by setting up a picnic blanket:
:max_bytes(150000):strip_icc():format(webp)/charming-front-door-colors-9369ba2f1c1e4587a2ba04b6c1e12cb6.jpg)
:max_bytes(150000):strip_icc():format(webp)/porch-paint-color-ideas-PhotocoNatashaHabermann-b16964b2067a4291b5f0115d2283ecbf.jpg)
:max_bytes(150000):strip_icc():format(webp)/porch-paint-color-ideas-PhotobyThomasKuohforStudioMunroe-b745d264406845e598b1f2d97eeb66f4.png)
:max_bytes(150000):strip_icc():format(webp)/porch-paint-color-ideas-PhotobyNathanSchroderforMaestriStudio-482728fa985f445e9bb3aa079fd829b8.jpg)
:max_bytes(150000):strip_icc():format(webp)/porch-paint-color-ideas-PhotocoSandraCavalloforOldSilverShed-a47d1415e12345009993065d4d656294.jpeg)
:max_bytes(150000):strip_icc():format(webp)/porch-paint-color-ideas-PhotobyHectorManuelSanchezDesignbyLaurenConnerInteriors-e1976a10ee8146adbacbeccad73119a2.png)
:max_bytes(150000):strip_icc():format(webp)/porch-paint-color-ideas-PhotocoSuzyBroome-075f1ea945a8499998410bb75dacab7f.jpg)
:max_bytes(150000):strip_icc():format(webp)/porch-paint-color-ideas-PhotocoEdenHouseCo.-4b6782a5757d430a8253606b1cda559e.jpg)
:max_bytes(150000):strip_icc():format(webp)/porch-paint-color-ideas-PhotobyJannaAllbrittonforYellowPrairieINteriors-46afd812f856445dbf9a58f6c344fa8a.jpg)
:max_bytes(150000):strip_icc():format(webp)/porch-paint-color-ideas-PhotobyGloriaMcMahon-156a2249b8fe48a3ad9b09a0646ee5e1.jpeg)