If you have a fruit fly infestation, take a look here! We love following @theboardhousewifepdx and she says that she’s tried a lot of fruit fly traps in her time, but this is the most effective method. EVER.
If there was ever a downside to summer, it would be Mosquito Bites! If you’re not sure how to control the mosquito population in your yard, below are helpful tips to protect your family and home from mosquitoes.
Tip: Get rid of standing water in your outdoor spaces. Standing water may be in your child’s plastic toys, areas underneath downspouts, plant saucers, or dog bowls. Other areas may include traps, gutters, and flat roofs.
Toss: Remove excess grass, leaves, firewood, and grass-clippings from your yard.
Turn: Turn over larger yard items that could hold water, like children’s portable sandboxes, plastic toys, or birdbaths.
Remove Tarps: If tarps stretched over firewood piles, boats, or sports equipment aren’t taut, they may be holding water that you should remove.
Take Care: Take care of home maintenance needs that can lead to standing water. This includes cleaning out gutters, making sure downspouts are adequately attached, keeping your grass cut low, and check irrigation systems for leaks.
Team Up: Despite taking all precautions in your own home, talking to neighbors is a crucial component to mosquito and tick control. Homes with little space between lots can mean that mosquitoes breed at a neighbor’s house and affect your property.
Treat: Utilize a mosquito elimination barrier treatment around your home and yard.
HOW TO CONTROL THE MOSQUITO POPULATION
Implementing the 7 T’s of mosquito control is essential to protect you and your family from bites and diseases. However, there are other things you can do that can help you eliminate mosquitoes from your yard. For example, using a barrier treatment reduces the need for using DEET-based bug repellent on the body. Mosquito Squad’s barrier treatment eliminates up to 90% of the mosquitoes and ticks on a property. Applied by our professional applicator, the Barrier Protection Treatment continues to work for up to 21 days. Our team will remind you in advance of upcoming services and leave you a notice that we’ve visited. Our service is automatic, so you don’t need to be home during the application. The best part is that your children and pets only need to wait 30 minutes before returning to the yard!
A few simple steps will keep your gas grill in top condition. Follow this grill maintenance checklist all year long for safer, cleaner grilling. For charcoal grill maintenance tips, click here.
When the Season begins
When the Season Ends
Realtor.com | Jun 1, 2022
In between barbecues and beach days, you still need to stay on top of maintenance around the home. Otherwise you might find yourself with big problems down the line—and big repair costs. If you want to know what the SIX SUMMER MAINTENANCE TASKS THAT COULD SAVE YOU CASH are, click on the video below!
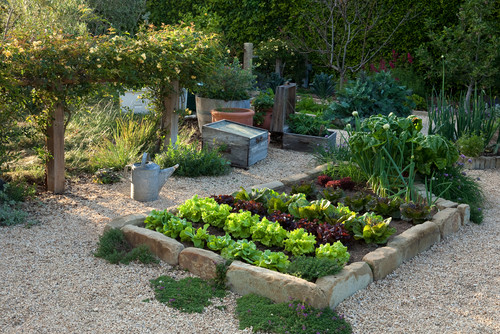
During the dark days of the COVID-19 pandemic, growing plants and vegetables felt both soothing and life-affirming. It’s no wonder many people became first-time gardeners. But now that life is getting somewhat back to normal, tending those plants may have fallen by the wayside. If your garden looks like it needs some TLC this year, there’s still hope!
“Don’t be discouraged if your garden doesn’t look great right now,” says Erin Schanen, Troy-Bilt garden expert, master garden volunteer, and creator of The Impatient Gardener blog and YouTube channel. In many cases, she says, your neglected plants can be nursed back to health—but it won’t happen overnight.
If you’re game to revive your feeble flora into a thriving garden once more, read on. Here are some of the vital steps you should take.
Clear out your flower beds
Out with the old, and then in with the new, say garden experts.
“Before planting new flowers, shrubs, or vegetables, it’s important to first clear out any fall and winter debris that made its way in,” says Bailey Carson, home expert at Angi, the home improvement recommendation site.
“Clear out leaves, needles, pine cones, and weeds, in addition to any other unwanted rubbish like acorns, twigs, and moldy mulch,” adds Carson. It’s important to start off your spring garden with a clean slate—even if you have just a container garden.
And don’t forget weeds, says Schanen. The longer you wait to tackle them, the bigger the job will be, so don’t delay.
“Dig them out with a soil knife, trowel, or garden fork so you remove the roots as well, and shake off any soil,” Schanen says.
Re-edge the area
Edging sounds more difficult than it is, but it can make a huge difference in a garden.
“Few things can make a garden come together better than a fresh, tidy edge,” says Schanen. “If you used some kind of edging material, make sure it’s well-weeded and level. If you used stones or bricks, this might mean removing them, tidying up, and replacing them.”
Carson says edging can also help to define the division between your landscape and your lawn.
“To clean up last year’s edging, a pair of edging shears might be all you need. Once this is cleaned up, you’ll be amazed at the difference,” says Carson.
After you’ve cleaned up the place through edging, you can have a better view of what else needs to be done.
“For shrubs and trees, check for and prune away any dead leaves and broken branches or limbs. Then take some time to cut back your perennials to help promote fresh spring growth,” says Carson.
Carson says to examine your garden carefully for damage from critters. If you spot any, she says to consider building a barrier or adding some plants to your garden that are known to deter animals, such as those labeled “deer-resistant.”
“If you’re refreshing a container or window garden, this is the time to add some new plants and seeds. Strawberries, tomatoes, radishes, and hot peppers thrive in containers, but don’t be afraid to try other fruits, vegetables, herbs, and smaller-breed plants as well,” says Carson.
Fertilize your plants
Carson suggests applying an organic granular fertilizer to any landscape plants that survived the winter and to new ones you’ve added.
“To keep the foliage safe, be sure to sprinkle the fertilizer around the base of your plants, rather than directly on them. After that, spread a preemergent weed-control product throughout the beds to stop any weed seeds from germinating,” says Carson.
Schanen says heavy feeders like clematis and hydrangea will benefit from a dose of slow-release fertilizer. As a bonus, it will feed your soil. She recommends organic fertilizers, because there is less risk of overfertilizing and burning tender new growth.
“Apply the appropriate amount as directed on the package around the dripline of the plant you’re feeding. If you started with good soil, most perennials and shrubs won’t need much in the way of fertilizer,” says Schanen.
Make sure to water in any fertilizer or amendments, she warns. Annuals need fertilizing to keep producing blooms all season, and should be fed regularly once they start putting on growth.
Add new mulch
The final step in refreshing a garden is to apply a fresh layer of organic mulch, says Carson. Mulch smothers weeds, protects and improves the structure of soil, and improves hydration, she says.
New mulch can help flower beds look cleaned up and refreshed, Carson says. But she advises that the layer should be no thicker than 2 to 3 inches, and it should be added gradually to prevent crushing plants.
“Organic mulches that will break down and feed the soil are best for plants,” says Schanen. “This can be compost, pine straw, broken-down and shredded leaves from the previous fall, bark mulch, or even arborist chips, which are the shredded bits of branches and foliage created by arborists when trees are removed.”
A couple inches of mulch in a wide circle around the tree is plenty.
“And remember to remove weeds before mulching. Any weeds left under mulch will quickly rebound and ruin the fresh look you worked hard to achieve,” says Schanen.
🛠 Projects that add the most value at resale are the favorites of fix-it-and-flip-it professionals—and they should be high on a homeowner’s list, too. While these upgrades will not recoup all of their cost, some will come close.
🏠 The National Association of Realtors (NAR) cites wood flooring (new or refinished), kitchen renovations (new countertops and state-of-the-art appliances), upgraded bathrooms, and basement or attic conversions as projects with some of the highest return on investment, often recouping 80% or more of their cost at resale. Certain exterior work—including roofing, siding, doors, windows, refurbished decks, and energy upgrades—also delivers a lot of bang for the buck at resale.
Hidden Costs of iBuying
Think of them as digital house flippers who scour mountains of data for typically off-market homes.
iBuying Explained
Known as iBuyers, these platforms buy houses for cash online. If the algorithms align well, homeowners who’ve submitted an online form will receive instant offers from interested iBuyers. The entire process usually takes place with no person-to-person contact. After buying the house sight-unseen (except for photos), iBuyers quickly resell, usually to other investors.
Transaction Fees
While iBuying may sound convenient, it has financial downsides. Industry experts say transaction fees can be significantly higher than in traditional home sales. Expect fee rates of around 7% of the home price, but be prepared for fee rates as high as 13%. Additionally, iBuyers most often make offers below market value.
Trust an Expert
You may think iBuyers can save you time and money. But an experienced real estate professional will work to get the best offer for your property and will be there to help find your next home.
Realtor.com® nailed it when they said the U.S. housing market was in for another whirlwind year. Its 2022 housing forecast predicted continued increases in housing prices, rent and mortgage rates in “a mixed bag of housing affordability challenges and opportunities.”
We’ve heard a lot about rising housing prices over the past few years, but rents are projected to increase at a pace of 7.1% compared to 6.6% for home sale prices. The report even goes so far as to say that buying a starter home would be cheaper than renting in some of the country’s largest metropolitan areas.
Choosing whether to rent or buy is a huge decision in any market. Fear of making “the wrong decision” intensifies as the market tightens. Still, you may be surprised to find that you can afford to buy after looking at your financial picture.
Consider these advantages of buying over renting.
Homeownership Is an Investment
At the end of a lease, you’ll walk away with nothing. At the end of a mortgage, you’ll own property with equity.
Stable Payments
Rent payments can rise with every new lease you sign. A fixed-rate mortgage offers stability.
Creative Freedom
A rental property is not yours to change as you please. But when you buy a house, you have the freedom to turn it into your dream home.
When deciding to buy or rent, carefully examine your budget, and think about your lifestyle and goals. If you’re considering buying but are apprehensive about the current market, a real estate professional can help you understand what’s happening in your community.
It’s no secret real estate values increased during the pandemic, with an unprecedented number of homes selling in bidding wars. Due to material shortages, delivery delays and cost increases, new home construction has struggled to keep up with the demand for housing. Lumber prices tripled from pre-pandemic levels, and these costs are often passed along to home buyers.
Although single-family housing starts have decreased, the number of homes under construction is actually up because houses aren’t getting finished. Besides a shortage of building materials, construction – like other industries – has experienced major labor shortages, a considerable hurdle to completing projects.
Despite current construction woes, experts predict home builders will overcome supply shortages this year, enabling them to speed up construction to meet ongoing demands for new housing. More inventory should help keep prices in check and curb last year’s sizable increases in home values.
Analysts are hoping that a gradual tapering down in housing starts may provide some relief, allowing builders to catch up with the backlog of demand.
Routine maintenance can be just as important after you’ve accepted an offer as it is before listing your home. To keep your house well-maintained throughout the transition, Realtor.com® recommends tending to these six areas.
Carefully maintain the yard and walkways. Clean out flower beds and keep the yard tidy and free from leaves and downed tree limbs.
Keep your gutters cleared to prevent water damage. Check the roof before the inspection.
Service your HVAC system. Check your furnace, clean out ductwork and replace filters.
Keep critters out by covering any holes and vents.
Wash your windows no matter what time of year it is.
Keep up with the current season. Decorations for long-passed holidays and other telltale signs that nobody’s home can be a nuisance to your neighbors.
OK, squint a little. See that? That’s the finish line, just ahead of you! After all the anxiety, hard work and waiting, you’ve almost made it to closing day. Don’t end up disappointed about a deal gone wrong because you skipped a few steps.
As annoying as it is, complete all promised repairs. No, you won’t be able to enjoy them, but they can make or break your sale. Plan to have everything finished and in working order at least one week before closing. This will allow time for any last-minute adjustments. Save receipts and invoices, and take before-and-after photos of repaired or improved items.
When flying through those closing documents, slow down when you get to the settlement statement. Check all of these numbers carefully to make sure they match what you were expecting to receive from the sale.
We’re continuing in our Weekly Series of “The 7 Most Painfully Expensive Home Repairs to Avoid.”
Today, we’re covering “Termite Damage.”
The average homeowner spent a total of $4,832 on routine and emergency home repairs in 2019. However, some of the most expensive home repairs have the ability to wipe out your entire yearly maintenance savings and then some.
On top of being pricey, major problems like pest infections and structural instability can make your home difficult to market and sell, not to mention tank your property value. With this guide, real estate experts identify the worst home repairs for your wallet and offer expert insights into preventive maintenance and early detection.
Termite damage ($3,000)
If they can find it, termites love to eat the wood in a house. Often, homeowners only discover signs of termite damage after these destructive little pests have weakened the wood in their home to a significant extent. Mitigating this damage can cost a lot of money, so catching termite activity early is key.
Estimated cost to repair:
According to pest control specialist Orkin, $3,000 is the average amount people spend to mitigate termite damage.
Key prevention tactics: If you have the ability to avoid contact between wooden parts of your home and the ground, you can reduce your termite risk. Special layers and meshes exist to make it hard for termites to access the home. Moving mulch away from your foundation is also a good idea — you don’t want to create a “red carpet” for termites to waltz into your abode so easily.
Who to call for help:
Who to call for help: Call CA Real Estate Group at (714) 476-4637 for our preferred termite and pest control experts to evaluate the situation. Sites with reviews like HomeAdvisor have information on your local pest control specialists; you can usually get a termite inspection from the company with the best reputation and then use their services for mitigation if needed.
We’re continuing in our Weekly Series of “The 7 Most Painfully Expensive Home Repairs to Avoid.”
Today, we’re covering “Electrical Rewiring.”
The average homeowner spent a total of $4,832 on routine and emergency home repairs in 2019. However, some of the most expensive home repairs have the ability to wipe out your entire yearly maintenance savings and then some.
On top of being pricey, major problems like pest infections and structural instability can make your home difficult to market and sell, not to mention tank your property value. With this guide, real estate experts identify the worst home repairs for your wallet and offer expert insights into preventive maintenance and early detection.
Electrical rewiring ($4,000-$12,000)
An older home’s electrical system easily can become overtaxed, causing fires and injury. In some cases a partial retrofit will suffice to make a house safe to live in. However, a number of old homes still have knob and tube wiring or aluminum wiring, both of which are fire hazards. If your house needs a full rewiring, the cost will be substantially higher.
Estimated cost to repair:
1,000-1,500 square foot home: $1,000-$6,000
2,000-2,500 square foot home: $4,000-$10,000
3,000 square foot home: $6,000-$12,000
(Source: Thumbtack, which tracks estimates from the millions of homeowners who use the site)
Warning signs: If your breakers blow frequently, you see any visible damage to your wires, or notice a burning scent in the home, call an electrician to investigate the problem. An electrical inspection can determine whether old, outdated modes of wiring the house have put you in danger.
Key prevention tactics:
“In older homes, we’re finding that we need to have an electrician come out to cover lines to the water heater, so it isn’t a bare wire going from the water heater to the wall,” Harrison shares. While this won’t solve all the issues with old wiring, covering bare wires is key to reducing your fire risk, and a more thorough electrical inspection can help you find other concerning areas.
You should also install GFCI (ground fault circuit interrupter) outlets in the bathroom, kitchen, and anywhere outlets may come in contact with liquid. GFCI outlets interrupt an abnormal current flow to reduce the chance of electric shock.
Who to call for help: Call CA Real Estate Group at (714) 476-4637 for our preferred electricians to evaluate the situation, or check out Better Business Bureau’s Electricians Near Me portal helps you identify local electricians with proper credentials and positive ratings from past clients.
Thanks!
Please fill out the form below and we will be contacting you shortly with information about your home.


 ©2022 The Personal Marketing Company. All rights reserved. Reproductions in any form, in part or in whole, are prohibited without written permission. If your property is currently listed for sale or lease, this is not intended as a solicitation of that listing. The material in this publication is for your information only and not intended to be used in lieu of seeking additional consumer or professional advice. All trademarked names or quotations are registered trademarks of their respective owners.