If you’re someone who loves the challenges of DIY home projects, you may be thinking about choosing a fixer-upper for your next home. The property might look outdated now, but you can make it your dream home with the right plan.
Build Your Dream Team
First things first — getting the right people on your side can make all the difference. From your real estate agent to a seasoned contractor and a home inspector with a sharp eye, your team will help uncover any hidden issues so you can avoid surprise costs. Their combined knowledge and skills can assist you in creating your future home.
Start with the Essentials
It’s tempting to rush right into choosing paint colors, fixtures and flooring, but you’ll thank yourself later for prioritizing the home’s structure and interior systems first. Inspecting the foundation, roof, electrical, plumbing, and HVAC may seem tedious, but those are the essentials that will keep your house safe and sound for years to come.
Get Smart About Financing
Need help funding the transformation? Renovation loans let you combine a mortgage with repair costs. This can be a sensible option for homes needing more than a little bit of polish.
Strategize Every Move
Map out your vision in detail, including your must-haves, nice-to-haves, budget, and timeline. Also, recognize that living in a construction zone is not for everyone. If you can stay elsewhere during major work, you’ll likely keep your project — and your peace of mind — in check.
Embrace the Chaos
Renovations rarely go exactly as planned, but staying flexible, communicative and proactive makes a huge difference. Keep your vision in sight, expect hiccups along the way and celebrate the progress.
Bedroom Color Schemes
The right colors in your bedroom could be the secret to sweet dreams. Consider painting with one of these calming hues, then layer decor in complementary colors to turn your space into a serene haven of restful sleep. For added depth, be sure to include various textures, patterns and other design elements that appeal to you.
Blissful Blues
Sky blue, periwinkle, robin’s egg, navy, and pastel blue help create a sense of serenity and can soothe nerves.
Peaceful Pinks
Soft shades like pale pink, pastel pink, salmon, or cherry blossom create a warm, soothing atmosphere.
Grounding Greens
Shades of emerald, sage, moss, sea green, and pistachio encourage recharging and help you feel more connected to nature.
Nurturing Neutrals
Tones of beige, gray, ivory, taupe, and white create a feeling of cleanliness, quiet and comfort.
Creative Storage Spaces
Consider these unique ways to organize your home when storage space is limited.
Look at decor as a disguise. Portable, stylish clothing racks can make space for your clothes while displaying your personal style. Vintage trunks and baskets serve as decoration and storage. In the kitchen, use a pegboard or hooks to display your pots and pans.
Functional couches and ottomans offer extra storage compartments hidden in plain sight. Swap out pedestal tables with cabinetry to add more space for stowing miscellaneous items.
Add narrow rolling racks and shelves in small spaces, such as between the refrigerator and counter in your kitchen or within small areas in bathrooms or closets. Use the hidden space behind doors to hang flat items like ironing boards. Make use of wasted space by installing small shelves above doorways or hanging racks from the garage ceiling.
With a bit of imagination, small spaces can be transformed with clever storage solutions. Bottom line — get creative to best use the space you have!
Cool Tips for Cleaning Your AC Coils
Regularly cleaning the outdoor condenser coils will keep your air conditioning unit running efficiently and prevent future problems. Here are the steps to doing it right.
Turn off power to the unit.
Locate the thin metal “fins” covering the coils. If they’re dented or bent, use an AC fin tool to straighten them.
Once the fins are straight, use a vacuum to carefully remove any debris.
Coat the entire surface of the fins with a foaming AC coil cleaner. Use a stiff brush or the scrubber on the cleaner’s cap to remove buildup located between the fins.
Thoroughly rinse the surface with a hose to eliminate any remaining dirt.
Recipe: Blue Cheese & Pear Salad
Ingredients
¼ cup apple cider vinegar
1 tsp. Dijon mustard
1½ Tbsp. maple syrup
¼ cup extra virgin olive oil
2 Tbsp. finely chopped shallots
2 large pears
8 cups spring lettuce mix
½ cup walnut pieces
¼ cup dried cranberries
¼ cup Blue cheese crumbles
Directions
In a small bowl, whisk together vinegar, mustard and maple syrup. Set aside. Heat oil in a skillet over medium-high. Add shallots and cook for 3 minutes or until softened. Reduce heat to low and slowly add vinegar mixture. Simmer for 2 minutes, whisking frequently. Season with salt and pepper to taste. Set aside to cool.
Core pears and cut into ¼-inch slices. In a large bowl, toss spring mix with pears, walnuts and half of cooled dressing. Sprinkle cranberries and Blue cheese on top, and serve with remaining dressing.
Credit: Janna Allbritton for Yellow Prairie Interiors
The color of your front door is incredibly important if you want to nail your home’s curb appeal. In fact, surveys show that certain front door colors can help sell your home for top dollar. But even if you’re not planning on hitting the market any time soon, brushing on a fresh hue can give your entire home an instant facelift, allowing you to add personality and impact to your exterior with very little time (or money) spent.
Need a boost of color confidence before you hit the paint aisle? Below, we’re rounding up nine stunning bits of exterior inspiration, along with the paint colors that will help you get the look. From vibrant orange and retro teal to coastal blue, these front doors certainly know how to make an entrance.
01 of 09 | Espalier by Sherwin-Williams
Credit: Natasha Habermann
To help her charming Cape Cod-style home feel even more timeless, designer Natasha Habermann turned to a rich emerald green to contrast the crisp white siding. The shade, Espalier by Sherwin-Williams, is saturated and luxe while still feeling traditional enough to live in harmony with the home’s classic architecture.
02 of 09 | Heritage Red by Benjamin Moore
Credit: Thomas Kuoh for Studio Munroe
Few color combos are as classic as red, white, and blue, making the trio a go-to exterior palette for designers and homeowners alike. Here, designer Emilie Munroe of Studio Munroe chose Benjamin Moore’s Heritage Red for a finishing touch that feels both timeless and energetic.
03 of 09 | Oceanic Teal by Benjamin Moore
Credit: Nathan Schroder for Maestri Studio
When the exterior of your home has bold accents—be it fanciful architecture or whimsical finishes—it’s important to choose a color that has enough gusto to hold its own.
In this funky mid-century exterior scene by Maestri Studio, bold black and white accents are paired with a retro-inspired teal shade for an entrance that screams, “Fun happens here.” For a similar look, try Oceanic Teal by Benjamin Moore.
04 of 09 | Off-Black by Farrow & Ball
Credit: Sandra Cavallo for Old Silver Shed
A black front door is the equivalent of a great pair of Levi’s jeans—it looks good on just about anybody (or in this case, any house).
For the exterior of her coastal shingle-style home in Cape Cod, creator Sandra Cavallo of Old Silver Shed opted for a rich and dynamic hue, Farrow & Ball’s Off-Black, to offset the home’s decidedly sunny (and summery) outlook.
05 of 09 | Bluebelle by Benjamin Moore
Credit: Hector Manuel Sanchez, Design by Lauren Conner Interiors
You may assume coastal-inspired shades like pale blue are reserved for beachfront properties, but we have good news: They can work just as well in a landlocked cul-de-sac.
Case in point? This elegant baby blue on a home by Lauren Conner Interiors, which sits pretty alongside more rustic details, like red brick steps. While this color is a custom blend, you can score a similar look using a shade like Bluebelle from Benjamin Moore.
06 of 09 | Invigorate by Sherwin-Williams
Credit: Suzy Broome
Sometimes, the most unexpected hues end up being the most memorable. When creator Suzy Broome was on the hunt for a shade that could stand up against the patterned tile leading up to her entryway, she turned to a punchy shade of orange to amp up the style quotient.
To mimic this personality-packed look, try Invigorate by Sherwin-Williams.
07 of 09 | Inchyra Blue by Farrow & Ball
Credit: Eden House Co.
When working with an exterior that boasts warm-colored materials, like brick, you’ll want to choose a front door color that complements (and cools down) the overall scheme.
Credit: Janna Allbritton for Yellow Prairie Interiors
Green is a popular front door color, thanks in large part to its versatility and ability to blend in with the surrounding landscaping.
For a shade that’s less expected and more vibrant, swap traditional forest green for a preppier pick, like Arugula by Sherwin-Williams, seen here on a home by Janna Allbritton of Yellow Prairie Interiors.
09 of 09 | Firecracker by Behr
Credit: Gloria McMahon for The Long Awaited Home
If the exterior of your home is natural wood, you’ve pretty much hit the jackpot—you can pick basically any shade for your front door color and it’ll look good.
To bring a bit of spice to her 1800s New England colonial, creator Gloria McMahon of The Long Awaited Home opted for a brick red, Behr’s Firecracker, which boasts just enough vibrancy to keep the exterior feeling very of this century.
Here’s an informational tidbit you probably don’t want to hear: As temperatures drop, many rodents will be attracted to your home for the same reasons you are: They’re seeking a warm, cozy shelter with food. And they’re not just creepy—left unchecked, these pests can wreak havoc on your health and home.
“Although they may be small in size, rodents can cause big problems for homeowners once inside. Known to spread more than 35 diseases worldwide, rodents are considered one of the most dangerous public health pests in America,” says Jim Fredericks, chief entomologist for the National Pest Management Association. “In addition to the health threats they pose, rodents are capable of causing significant property damage.”
For example, if they get behind the walls of your home, they can chew through materials like plastic, wood, and drywall. They’re also capable of chewing through wiring, increasing the risk of electrical fire.
While rodents pose a threat year-round, Fredericks says mice and rats invade an estimated 21 million U.S. homes each winter. To keep them from running rampant on your property, put these tips into practice.
Eliminate access points around the house
Mice can squeeze through openings as small as the size of a dime, and their rat cousins can fit through holes the size of a quarter, experts say. This means even the tiniest cracks and crevices should be sealed, including cracks and holes inside and outside the home.
“It’s critical to eliminate access points by inserting door sweeps, repairing damaged window and door screens, sealing exterior cracks, and replacing loose mortar,” says Fredericks. “Any gap under a door that is larger than a quarter-inch can permit mice to enter and should be closed by repairing thresholds or installing door sweeps.”
Openings to chimneys should be regularly inspected, including the damper, which should always be closed when not in use, says Kevin Busch, vice president of operations at Mr. Handyman.
“Inspect and repair holes in your gutters, roof, fascia, siding, and foundation,” Busch says.
The best materials to use for sealing cracks and holes in your home’s exterior? Busch says expanding foam insulation, caulking, metal screening, or even a small piece of sheet metal will work great.
Inspect all packaging before bringing it into the home
With the ongoing coronavirus pandemic, more people are relying on online ordering for groceries, household supplies, and meal delivery. This cardboard packaging can be enticing to rodents searching for food and, as gross as it sounds, give them a free ride into your home.
“If packages with food are left outside for extended periods of time, they can attract mice and rats who can easily chew through cardboard boxing,” says Fredericks. “Be sure to promptly bring any deliveries inside and inspect packages for signs of rodent damage, or even an infestation inside the box itself.”
Properly store food and dispose of garbage
Critters are always looking for their next meal. Experts suggest storing food in airtight containers, disposing of garbage regularly, and using a sealed trash receptacle to prevent hungry rodents from getting into your food waste.
“Sealing up food and properly storing it is important because the odors attract unwanted animals,” says Craig Gjelsten, vice president of operations for Rainbow International. “Mice, rats, and other pests are attracted to rotting food and animal waste products.”
Keep attics, basements, and crawl spaces ventilated and dry
Eliminating any sources of moisture—including repairing leaking pipes and clogged drains—can help keep rodents at bay.
“Just like humans, rodents need water in order to survive,” says Fredericks. “In general, it’s a good idea to eliminate sources of moisture inside your home by keeping attics and basements well-ventilated while also repairing any leaking pipes or clogged drains.”
Keep outdoor spaces clear and clean
To keep unwanted critters from entering your home, be sure to do regular landscaping and yard maintenance.
“Trim back trees so animals can’t climb onto the roof,” says Josh Sevick, president of The Ground Guys, which specializes in lawn care and landscaping.
Sevick also says to remove debris around your home and to keep firewood at least 20 feet from your house.
Safeguard your electrical system
Rodents have been known to chew throughstructural components like drywall, insulation, lumber, and electrical wiring. While all these threats are worth addressing, ignoring damage to your electrical system can be the most critical because it can lead to unnecessary fires, personal injuries, and property damage.
“While finding evidence of damaged wiring can be extremely difficult, if rodents are present in your home or business, you’ll have a few chewed wires,” says Josh McCormick, vice president of operations for Mr. Electric.
He says to pay attention to red flags like rodent droppings, skeletons, or noises of scurrying or banging in your walls. Evidence of rodent activity could also include loose pieces of insulation, damaged wires, or holes in walls.
“If you suspect or discover a rodent problem, contact a licensed pest control professional immediately,” says Fredericks.
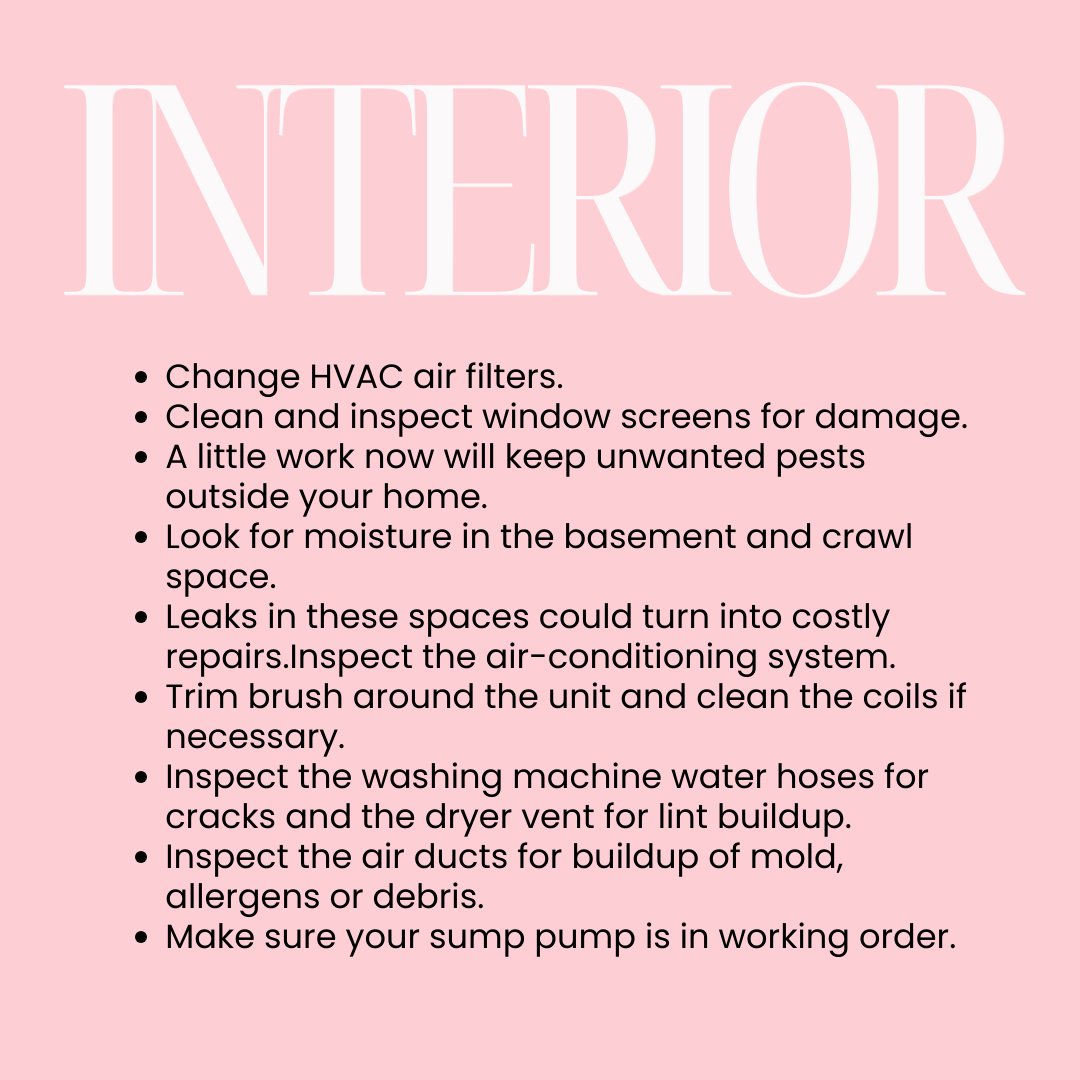
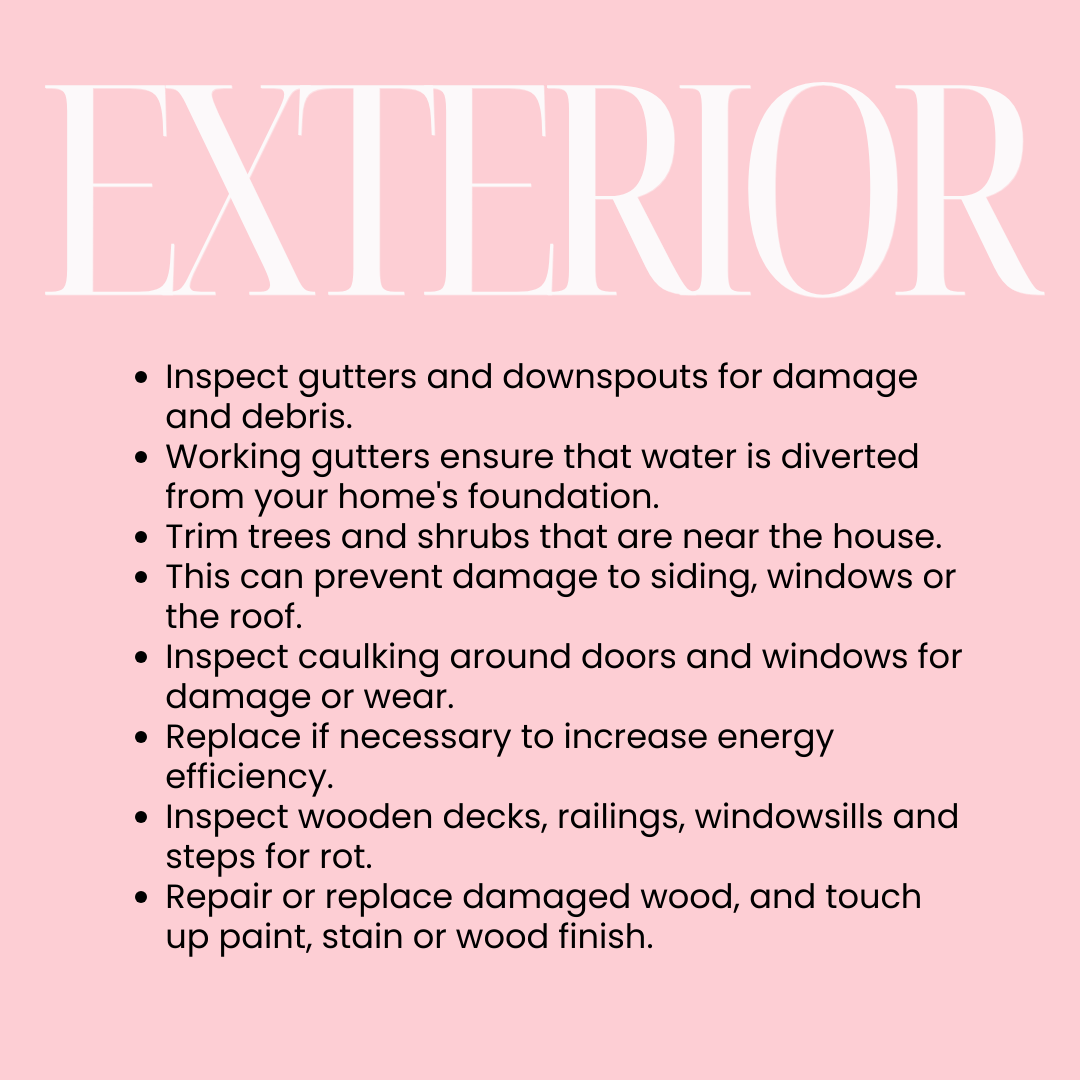
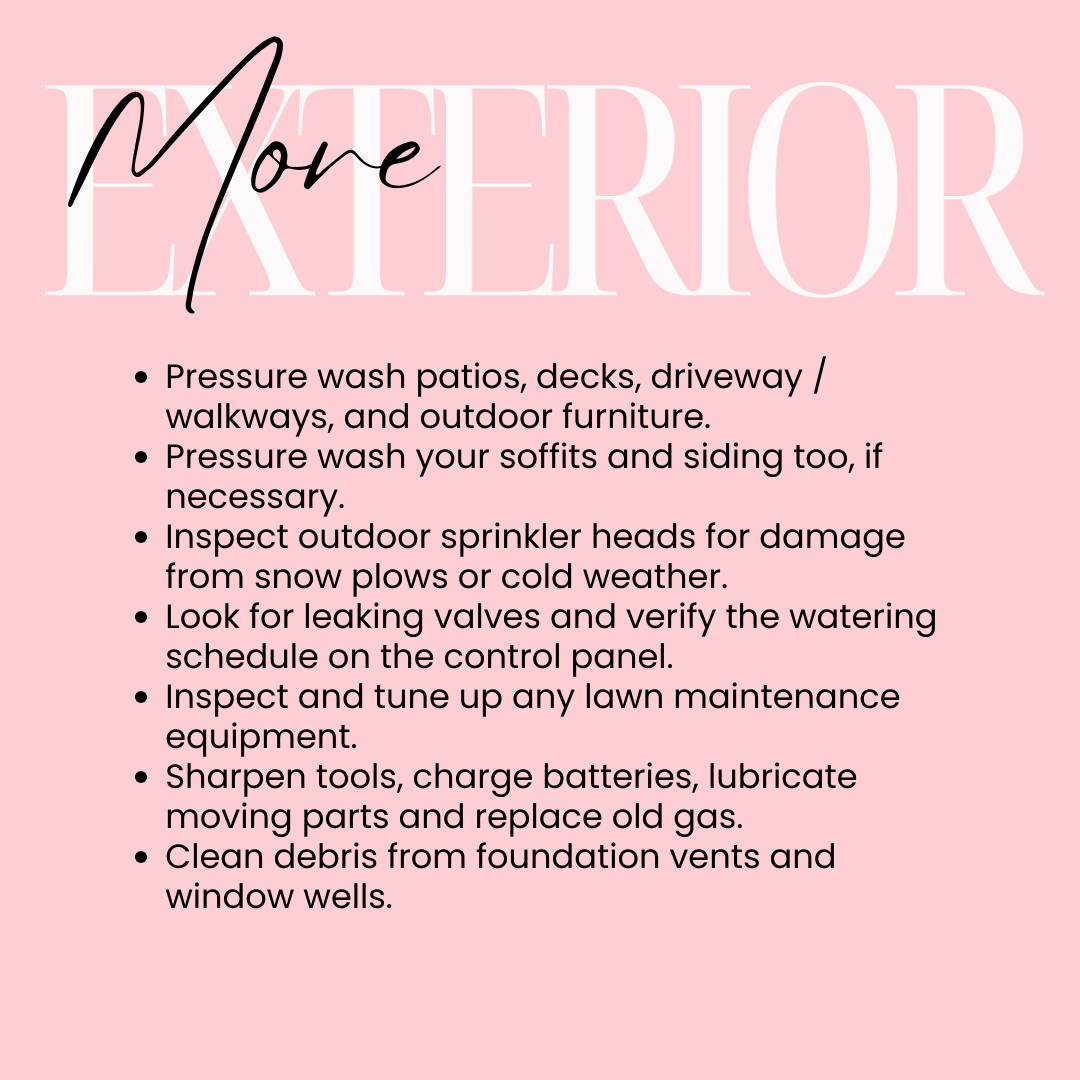
Springtime is upon us and the milder days of spring are a perfect time to do a thorough spring cleaning and perform home maintenance. After a long winter, it is a good idea to spend time on preventive measures to help maintain your home and property throughout the year. Tasks such as cleaning out your gutters, checking for dead trees and branches and cleaning and inspecting home mechanical and plumbing systems, such as heating and air conditioning equipment, can help make spring a season of safety.
Cleaning and maintenance of your home should be done inside and out. Although the tasks are different, checking to see if all the elements of your home are in good working order can help keep your family safe and your maintenance expenses lower over the long run. And if a task is overwhelming and you want to leave it up to the pros, call us for referrals!
EnergySage | Updated Sep 5, 2024
One of the biggest benefits of going solar is that it’s pretty much a “set it and forget it” way to power your home with renewable energy. But for solar homeowners, depending on where you live, you’ll still need to clean your solar panels once or twice a year to ensure you’re getting the maximum energy benefit from your solar investment. Cleaning your solar panels is a relatively simple process though, and you can easily do it yourself or hire a professional service to take care of it for you.
Cleaning your solar energy system helps maximize your panels’ efficiency by allowing them to absorb the most sunlight possible. When dust or other particles cover your panels, it means they won’t be able to produce as much power — and ultimately that means you’ll lose some of the financial benefits of going solar. That’s why it’s important to keep up your solar panel maintenance, and clean them about every six months if you live in a dry or dusty environment.
In this article, we’ll answer some of the most common questions that solar panel system owners have about solar panel maintenance and how to clean them safely.
Key takeaways
Solar panels usually only need to be cleaned once or twice a year, or even less if it rains a lot where you live.
Cleaning your solar energy system helps maximize your panel efficiency by allowing it to absorb the most sunlight possible.
You can clean your solar panels yourself, or hire a professional cleaning service to do it for you.
Solar panels don’t require any special cleaning equipment and can be cleaned with basic tools you probably already have at home like a garden hose, rag, and dish soap.
Your solar panels need to be exposed to sunlight to produce power. If they get dirty or build up layers of grime and dust over time, those pollutants and particles will prevent your panels from absorbing as much sunlight as possible, which is known as soiling. In certain areas of the U.S., the energy lost from soiling each year is as high as 7%, according to the National Renewable Energy Laboratory (NREL).
But there’s good news, too. Solar panel cleaning is often unnecessary unless you live somewhere with high amounts of smog, dust, dirt, grime, or sand blowing around. In most areas of the country, occasional rain is typically enough to naturally and safely keep your solar panels clean and free of debris that could lower their energy production.
But a good clean every once in a while can always help maximize your panel’s photovoltaic (PV) production no matter where you live. So if you need or want to clean your solar panels, here are the smartest and most efficient ways to get your panels washed off and producing the maximum amount of energy possible.
Just like washing your car, you can DIY solar panel upkeep, but there are also professional solar panel cleaners to make it easier. For a small fee, your original solar installer may even do it for you. If you have a rooftop system, enlisting a cleaning service might be a good idea, if only for safety precautions, as professionals will have more experience using high ladders to reach your roof, for example.
A professional solar panel cleaning company may not necessarily do a significantly better job than you can, but they’re likely better equipped to clean and maintain rooftop units safely and already have all of the necessary equipment. Plus, professional solar panel cleaning will usually only cost you around $150-$300, or $15-$30 per panel.
Professional cleaning may not be worth the cost for ground mount units, because you can safely and effectively clean your panels with a water hose, some dish soap, and a soft rag without having to climb onto your roof.
Types of professional cleaning
Various types of professional cleaning companies can help you. For example, robotics companies use semi-autonomous machines to clean without as much direct personal work involved. Some maintenance companies also use soapless brushes and sponges to clean panels to avoid potentially harmful residues. Other high-tech cleaning processes are currently being developed, including waterless vibration and nanoparticle coatings.
Does your solar lease cover panel maintenance?
Solar lease agreements will often include a maintenance clause, but keep in mind that it can sometimes be hard to wrangle the company to come perform any maintenance once they’ve installed your system.
If you own your solar panels, some companies will perform regular maintenance on their panels, including washing services, while others will repair damages the customer reports. You’ll need to read the print of your agreement to figure out whether cleaning services are included. It’s important to remember that solar panels generally require little maintenance, and spraying them down with a hose occasionally can usually take care of most of the dust and debris.
Here’s our EnergySage step-by-step guide on the best ways to clean your solar panels:
Shut off your solar panel system – this ensures your safety and that your equipment won’t get damaged.
Use a soft brush to clean the surface of your dirty solar panels to remove debris like dirt and dust. Never use a rough or coarse brush as it could damage your panels.
When cleaning your panels with water, use a standard garden hose and soapy water. You don’t need to purchase any particular cleaning solution to clean your panels; regular dish soap will work perfectly. Avoid any strong cleaning agents like bleach that could damage your panels. You should also avoid using any type of high-pressure hose that you might use for things like power washing your house, as they can create cracks or otherwise damage your system.
Use lukewarm water when cleaning your panels as very hot or cold water could also damage your panels.
After you’ve finished the cleaning process, check your panels’ energy output so you can see how much more efficient they are after cleaning.
What should you use to clean your solar panels?
When cleaning your solar panels, the most important consideration to remember is that scratching or damaging the glass in any way will reduce a panel’s energy production – much more than any removable soot or dust build up will. The smartest way to clean your solar panels is to approach the process the same way you would clean your car. Dish soap and clean water applied with a soft sponge or cloth is the safest and easiest cleaning method. It may also be helpful to use a squeegee to remove dirty water. Remember: Avoid damaging or scratching the glass at all costs.
On rare occasions, oily stains can appear on your panels. You might find these if you live near a common truck route or an airport, and they can be tackled with a bit of isopropyl alcohol and a rag. You may be tempted to use strong cleaning detergents like bleach as a fix, but they can leave streaks, damage the glass, and impact the efficiency of the panel, so avoid using them.
How often should you clean your solar panels?
You should clean your solar panels about every six months. Of course, the frequency of solar panel cleaning depends primarily on where you live. For example, if you live somewhere where it rains a lot, you may need to clean your panels less often than if you live somewhere dry and dusty where debris builds up more quickly.
In desert climates, including the U.S. Southwest, more regular cleaning is needed due to the large amount of dust and sand that can affect a solar energy system’s output.
Areas near highways, factories, and airports tend to be more polluted, so solar panels should be cleaned more frequently to avoid residue buildup from pollutants that could result from heavy traffic and machinery nearby.
Solar panels should be frequently cleaned in heavily wooded areas to prevent obstructions like overgrown vegetation and bird droppings.
Should you remove snow from your solar panels?
In the winter, snow on solar panels generally doesn’t need to be removed – it will typically slide off on its own. Most panel installations are tilted at an angle, and snow will naturally slide off as it melts. If snow persists on your panels, you can invest in tools like a solar panel snow rake, which makes it easy for homeowners to remove snow covering on solar panels safely.
But it’s important to keep in mind that you shouldn’t use a standard broom, shovel, or any other non-specialized tool to remove snow from panels; they can scratch the panel glass which will lower your solar power production.
These maintenance steps will prevent most refrigerator breakdowns.
1/8
Family Handyman
Clean the Refrigerator Condenser Coils
Cleaning the condensor coils is a very common refrigerator repair. Condenser coils are located on the back of the fridge or across the bottom. These coils cool and condense the refrigerant. When the coils are clogged with dirt and dust, they can’t efficiently release heat. The result is your compressor works harder and longer than it was designed to, using more energy and shortening the life of your fridge.
Clean the coils with a coil cleaning brush and vacuum. A coil cleaning brush does a thorough job and will easily pay for itself. The refrigerator coil brush is bendable to fit in tight areas. They can be used for cleaning your dehumidifier and air conditioner coils too.
You can eliminate more than 70 percent of refrigerator repair and service calls with this simple cleaning step.Do it twice a year or more often if you have shedding pets. Their fur clogs up the coils fast.
Unsnap the grille at the bottom of the refrigerator to access the coils. If your coils are located on the back, you’ll have to roll the fridge out to get at them.
Clean the coils with a special refrigerator coil cleaning brush to loosen the dirt and dust. Vacuum the coils as you brush. Be careful not to bend the fan blades. A gentle brushing will do the job.
Some refrigerators have the coils on the back of the unit. Brush and vacuum these coils in the same manner as coils found under a refrigerator.
CAUTION:
Always unplug your fridge before working on it!
2/8
Family Handyman
Clean the Refrigerator Condenser Fan
If the coils are located on the bottom of the fridge like ours, clean the condenser fan and the area around it. Fridges with coils on the back don’t have a fan. The fan circulates air across the coils to help cool them. At times, paper, dirt, dust and even mice can get sucked into the fan and bring it to a complete stop.
Yours could be in a different area, but it’s always next to the compressor. Most refrigerators will have a diagram on the back or folded up under the front grille showing the location of the major parts. While you’re under there, wipe out the drip pan, a flat pan that collects water from the defrost cycle and allows it to evaporate.
Remove the lower back cover
Access the condenser fan by rolling the fridge away from the wall and removing the lower back cover with a screwdriver. Replace the cover when you’re finished. It’s essential for good air circulation.
Brush and vacuum the fan
Clean the fan blades with the brush and vacuum so air can move freely across them. Also clean the shaft by vacuuming the crease where the blade meets the motor. Don’t lubricate the shaft; oil will attract dirt and cause problems.
3/8
Wipe Down the Refrigerator Door Gasket
Prevent an expensive refrigerator gasket repair bill and cut down air leaks by keeping your door gasket clean. Syrup, jelly or any other sticky stuff dripping down the front sides of your refrigerator can dry and glue the gasket to the frame. The next time you open the door, your gasket can tear. Keep it clean and you’ll get a nice, tight seal, keeping the cool air where it belongs, in the fridge.
To prevent wear, lubricate the door handle side of the gasket by sprinkling baby powder on a cloth and wiping it down once a month.
Clean the door gasket
Wipe the door gasket regularly with warm water and a sponge. Don’t use detergent—it can damage the gasket.
4/8
Clear the Freezer Vents
These little vents on frost-free fridges allow air to circulate in the freezer. Don’t block them or let crumbs or twist ties get sucked in around the evaporator fan or clog the drain tube. To help save energy, keep your freezer about three-quarters full to retain cold air. But don’t pack it any fuller because the air needs to circulate.
Keep the freezer vents unobstructed
Clear food packages away from the vent openings and clean the air return so crumbs and twist ties don’t clog them.
5/8
Set the Fridge Temperature Controls to the Middle Settings
This step won’t necessarily prevent a refrigerator repair, but it’ll extend the life of your fridge by allowing it to run more efficiently, which reduces your electric bill. Your fridge has at least two temperature controls (except on manual defrost types, which have one).
The one for the food compartment is a thermostat that turns the compressor on and off. The second, for the freezer, is just an air baffle. The baffle lets cold air from the freezer sink into the food compartment. Closing the baffle makes the freezer colder.
Adjust the temperature controls
Set the temperature controls to the middle settings. Make any adjustments according to a refrigerator thermometer. The optimum setting for your fridge is between 38 and 42 degrees F; the freezer, between 0 and 10 degrees.
6/8
Claire Krieger/Family Handyman
Three Ways to Get the Smell Out
Charcoal briquettes absorb the odor just like a filter in a range hood.
Crumpled newspaper. The ink absorbs the odor.
Baking soda is the old standby. Leave an open box in the fridge and replace it every three months for continuous deodorizing.
7/8
Family Handyman
Clear and Clean the Drip Openings
Drip openings allow water that has melted from the defrost cycle to flow down to a pan located by the compressor, where it evaporates. Check your owner’s manual for the location on your fridge. On cycle-defrost fridges, a channel directs the water to a tube in the food compartment.
On frost-free refrigerators, look for a small cap under the crisper drawers that covers a hole, or an opening in the back of the freezer or refrigerator. If the drain opening clogs, water will build up under the crisper drawers and eventually leak out onto the floor.
Locate the drip cup
Find the drip opening on your fridge.
Close up of the drip tube opening
Locate the drip opening and wipe it out, being careful not to press any debris down into the hole. Suck out crumbs with a vacuum.
8/8
Troubleshooting Refrigerator Repair
Service specialists will be the first to admit: A ton of their callers don’t require refrigerator repair service at all. The solutions are so easy they don’t even require a toolbox. Before you pick up the phone, check the following list. It just might save you money and a bit of embarrassment.
Got power?
Check the circuit breaker or fuse box to be sure power’s coming to the outlet.
Is the cord plugged in tight? Wiggle it around a little. A worn receptacle could let the plug fall out just enough for the connection to fail.
Plug a light or any other electrical device into the outlet to see if it works. If it doesn’t, you’ve got an electrical problem, not a refrigerator problem.
Check for a loose, worn or frayed power cord. Rodents often chew through a wire. Sometimes cords loosen when the fridge is moved.
What if you have power but poor cooling?
Make sure the thermostat is turned on and set right. On some models the dial is easily bumped, shutting the fridge down. Or kids could have messed with it.
Your fridge is running all the time but the food’s still warm.
Vacuum the coils. Dirty coils can eventually cause the overload protector on the compressor to shut the fridge down. It’ll automatically come back on when the compressor cools, but by then your food is usually warm.
Is the condenser fan jammed? (This applies only to fridges with the coils on the bottom.) Remove any obstacles and clean it thoroughly. Unplug the fridge and turn it a few times and see if it comes on. If it’s still not working, you’ll have to replace it.
Is the light turning off when the door’s closed? That little light bulb can raise the temperature in the fridge substantially. To check it, close the door and use a butter knife to pull the gasket slightly away from the frame. If light shines out, the switch is bad or slightly out of alignment. Until you fix the switch, loosen the light bulb so it goes out.
Look for ice buildup (frost-free fridges only) bulging on the inside walls or the floor of the freezer. Manually defrost the freezer by unplugging it. It’s only a temporary fix, so call for service.
Heavy rainfall is more than just a temporary inconvenience; it can lead to a range of issues for homeowners. Whether you live in a region with unpredictable weather patterns, experience frequent storms, or only have the occasional downpour, it’s essential for homeowners to stay vigilant. After any major downpour, checking for damage around your property is crucial. Ignoring small issues now could result in bigger, more expensive problems down the road.
From the roof to the foundation, several key areas of your home may be affected by heavy rain, and knowing what to look for can save you a lot of trouble later.
1. Soil Erosion
When heavy rain hits, the water can wash away the top layer of soil, particularly in areas around your yard with poor drainage. Soil erosion can weaken the foundation of your home by destabilizing the ground around it. Over time, this can lead to shifting or settling, which may cause cracks in your foundation or driveways.
To combat soil erosion, it’s important to direct water away from your home’s foundation. Landscaping with plants that have deep roots can help hold soil in place. Adding mulch or gravel in areas where water tends to flow can also reduce erosion by slowing the water’s movement.
2. Roof Damage
Beyond simple leaks, heavy rainfall can cause more structural damage to your roof. Prolonged exposure to rain can weaken your roof’s materials, making it less effective at protecting your home. Where weather conditions can be harsh, it’s not uncommon for homeowners to face roof damage after storms. Wind and rain can tear off shingles, expose the underlayment, or cause cracks and dents in the roofing materials.
After a storm, it’s a good idea to have a professional inspect your roof for signs of damage. Contacting an experienced roofing company can ensure you catch any problems early on. Even if your roof looks intact, there could be underlying issues that require expert attention. A proper inspection helps to extend the life of your roof and protect your home from further damage.
3. Foundation Cracks
Your home’s foundation plays a crucial role in maintaining its structural integrity. Unfortunately, heavy rainfall can put significant pressure on the foundation, especially if water is allowed to pool around the base of your home. Over time, this can lead to cracks, which create entry points for water. If moisture seeps into your basement or crawl space, it can cause mold growth, wood rot, and even structural damage.
Preventing foundation issues involves ensuring proper drainage around your home. After a storm, walk around the perimeter of your house and check for any signs of water pooling near the foundation. If you notice any small cracks, it’s important to seal them immediately to prevent further water damage. Larger cracks may require professional attention to ensure the safety and stability of your home.
4. Drainage Problems
Heavy rain can also expose issues with your home’s drainage system. Proper drainage is essential for directing water away from your home and preventing it from pooling in areas where it can cause damage. However, during a storm, drainage systems can become overwhelmed, leading to standing water around your property.
Standing water can be problematic for a number of reasons. It can erode the soil, weaken your foundation, and even flood your basement. It’s important to inspect your drainage system regularly to ensure it’s functioning properly. If you notice that water is not draining as it should, consider having a professional evaluate your gutters, downspouts, and landscaping to improve water flow.
5. Basement Flooding
Basements are particularly vulnerable to flooding during heavy rainstorms. If your basement isn’t properly waterproofed, water can easily find its way through cracks in the walls or floors. Even a small amount of water can cause significant damage to your basement, including mold growth, ruined belongings, and structural issues. This can be especially problematic if your basement is finished or used as a living space.
To prevent basement flooding, check for any cracks or weak points in the foundation and ensure your sump pump is in good working order. Installing a waterproof membrane on your basement walls can also help keep water out. Regular maintenance of your drainage system and gutters will further reduce the risk of basement flooding after heavy rain.
6. Gutter Overflow
Gutters play a critical role in channeling rainwater away from your home. However, during heavy rainfall, gutters can become overwhelmed, especially if they’re clogged with leaves, twigs, or other debris. When gutters overflow, water cascades down the sides of your home, potentially damaging your siding, windows, and even your foundation. The excess water can pool around your home, increasing the risk of foundation cracks or basement flooding.
To prevent gutter overflow, it’s essential to clean your gutters regularly. Removing any debris allows water to flow freely through the system. Installing gutter guards can also help by blocking large debris from entering the gutters in the first place. After heavy rain, check for any areas where the gutters may have overflowed or detached from the house. Making these checks part of your routine maintenance will ensure your gutters continue to function properly and protect your home from water damage.
7. Mold Growth
Excess moisture is a breeding ground for mold, and after heavy rain, your home is at risk of developing this unwanted guest. Mold can grow in areas that remain damp for extended periods, such as basements, attics, and inside walls. While mold may start off as a small, unnoticeable patch, it can quickly spread and cause significant health problems, especially for those with respiratory issues.
Preventing mold growth involves ensuring your home is properly ventilated and free from excess moisture. Dehumidifiers can be used in damp areas, while ensuring windows and doors are properly sealed will prevent water from getting in. After heavy rainfall, it’s crucial to inspect areas where water may have pooled or seeped in. Any damp areas should be dried immediately, and if mold is already present, it’s best to consult a professional to safely remove it. Mold can be stubborn and difficult to eliminate, so acting quickly is key to keeping your home safe and healthy.
In conclusion, heavy rain can cause a variety of problems for homeowners, affecting everything from the roof to outdoor structures. Identifying potential issues early on and taking preventative steps can save you from costly repairs and ensure your home stays safe and secure. Regular inspections and maintenance, particularly after significant storms, are crucial to protecting your investment.
There’s rain in the forecast for later this week! Now is a great time to take a few simple steps to prepare your home and yard for rainy weather.
Here are a few simple steps you can take to get ready for the rainy season:
Pick up around your yard. Rain can carry trash, pet waste, yard debris or exposed household hazardous waste from your yard and other storage areas, such as the side of the house, into our storm drain system. To keep pollutants from entering our waterways, sweep up any trash or debris on hard surfaces like patios or driveways and place it in a covered trash bin. Rake up yard debris and place it in a covered trash or green waste bin. Store Household Hazardous Waste (HHW) indoors or under cover, in closed and labeled containers. You can dispose of HHW for free at any of Orange County’s four recycling centers.
Repair leaking vehicles. Rain can wash oil and other fluids from leaky vehicles into our storm drains. Now is a great time to get your vehicle serviced to prevent leaking fluids from polluting our waterways. If vehicle maintenance isn’t an option at the moment, place drip pans under leaking vehicles to help protect our beaches and waterways. Recycle used oil by taking it to service stations and other recycling centers.
Run your irrigation system and check for runoff. The start of the rainy season is a great time to make sure your irrigation system is doing its job by only giving your yard the water it needs to stay healthy. If you have a zone-based automated or manual irrigation system, try running each zone. Using a stopwatch or timer, monitor each zone for signs of runoff and note the time when runoff occurs. If you see runoff, try the following actions:
For runoff caused by sprinklers…
Align your sprinklers to only water vegetated areas. Your yard doesn’t benefit when sprinklers spray onto sidewalks or other areas that don’t need water. In addition to creating runoff, poorly aligned sprinklers can damage outdoor structures like fences. Adjusting any misaligned sprinklers and properly aiming sprinkler heads to water only vegetated areas can prevent runoff, reduce repairs, and keep your yard healthy.
Repair sprinkler heads and leaks. Broken or leaky sprinklers can waste thousands of gallons of water per month and cause runoff. Immediately repairing sprinklers and fixing leaks prevents runoff from entering our waterways, reduce water bills, and helps keep our ocean clean.
Reduce runoff by adjusting your watering schedule…
Cycle and soak – Shorter water cycles are good for your yard. Running multiple, shorter cycles with an hour or more break in between allows water to soak into soil and nourish your plants instead of running off as waste.
Change the days – Watering too many days in a row may prevent your yard from absorbing water. Adding more time between your watering days can enable your yard to absorb the water it needs while preventing runoff. Be sure to check with your local water district, HOA, or city for guidance regarding watering days in your area.
Water at sunrise – Watering early in the morning prevents water from being lost to wind or evaporation.
Helpful tips: For more accurate results, run your system on a day not too soon after a recent watering. Since watering needs change throughout the year, check your system for runoff every three months to ensure your yard is getting the water it needs to stay healthy year-round.
Consider hand watering outdoor plants. During the rainy season, when your yard needs less water, hand watering plants may be a good alternative to other watering systems. Garden hoses with automatic shutoff nozzles can use less water than sprinkler irrigation systems. An easy alternative to sprinklers, hand watering ensures only those areas that need water get it. Be sure to replace any leaking garden hoses and repair any leaky connections to help prevent runoff and keep our waterways clean.
When hand watering or using a non-automated system, set a timer. Lawns quickly absorb the water they need to stay healthy. Setting a timer can help you remember to move or turn off your manual watering, to prevent overwatering and ensure your yard gets the amount of water it needs. Your local water district or city may have irrigation schedules to help determine the best water scheme for your yard.
Skip watering before, during, and after rain. Watering too soon before or after a forecasted rain event (48 hours is a good benchmark) may affect your yard’s ability to absorb water and cause runoff. To prevent your yard from receiving too much water, monitor the weather forecast during the rainy season and adjust your watering accordingly.
In addition, fertilizers and pesticides can be washed off your yard and into our storm drains during rain events. Apply fertilizers and pesticides only when it is not windy and never when rain is in the 48-hour forecast. Limit pesticide use by using nonchemical methods, integrated pest management, or least-toxic pesticides whenever possible.
Here are additional resources to help you prepare for the rainy season in OC:
Looking for guidance on how much water your yard needs? In addition to running your system to check for runoff, you can find watering guidelines and customizable calculators from bewaterwise.com and the Municipal Water District of Orange County.
Wondering how to monitor your yard’s watering needs? Moisture meters feature easy-to-read dials to indicate if soil is dry, moist, or wet. You can find moisture meters and soil moisture sensors at home improvement stores and irrigation supply stores. Rebates may also be available.
For more ways to prevent overwatering and runoff, check out our Landscape Improvement and Capture Water pages for additional modifications you can make to your landscape to protect our local waterways and ocean.
Will a Porch Increase My Home Value?
The simple answer is: yes, a porch can increase your home value. But not just any porch — the space must be well-designed, functional, and attractive.
Here are two great resources to consult on how to transform your porch into a warm and inviting entry way to your home sweet home!
30 Cozy And Beautiful Small Front Porch Ideas You Will Love
The Creatives Hour | Sep 3, 2024
A small front porch, despite its limited space, can significantly enhance the curb appeal and functionality of a home. These porches are typically compact entry areas or seating spots, making creative use of the available square footage. Design strategies for these spaces often focus on optimizing usability while maintaining aesthetic charm, from selecting appropriate furnishings to choosing the right color schemes.
Incorporating thoughtful details into a small front porch can transform it into a welcoming and stylish entrance. Whether it’s through the clever use of vertical gardening, multipurpose furniture, or vibrant accents, each choice is crucial in maximizing both the practicality and attractiveness of the area. These design ideas not only elevate the porch itself but also contribute to the overall ambiance of the home’s exterior.
56+ Aesthetic Small Front Porch Decor Ideas (2025) Doctor Explains | Nov 9, 2024
Creating a beautiful front porch is one of my favorite ways to make a welcoming first impression. A well-designed porch not only enhances your home’s curb appeal but also sets the tone for the rest of your home. Whether you love bold colors, elegant decor, or a rustic feel, there’s something special about each design that can inspire you to create your dream front porch.


 ©2025 The Personal Marketing Company. All rights reserved. Reproductions in any form, in part or in whole, are prohibited without written permission. If your property is currently listed for sale or lease, this is not intended as a solicitation of that listing. The material in this publication is for your information only and not intended to be used in lieu of seeking additional consumer or professional advice. All trademarked names or quotations are registered trademarks of their respective owners.
:max_bytes(150000):strip_icc():format(webp)/charming-front-door-colors-9369ba2f1c1e4587a2ba04b6c1e12cb6.jpg)
:max_bytes(150000):strip_icc():format(webp)/porch-paint-color-ideas-PhotocoNatashaHabermann-b16964b2067a4291b5f0115d2283ecbf.jpg)
:max_bytes(150000):strip_icc():format(webp)/porch-paint-color-ideas-PhotobyThomasKuohforStudioMunroe-b745d264406845e598b1f2d97eeb66f4.png)
:max_bytes(150000):strip_icc():format(webp)/porch-paint-color-ideas-PhotobyNathanSchroderforMaestriStudio-482728fa985f445e9bb3aa079fd829b8.jpg)
:max_bytes(150000):strip_icc():format(webp)/porch-paint-color-ideas-PhotocoSandraCavalloforOldSilverShed-a47d1415e12345009993065d4d656294.jpeg)
:max_bytes(150000):strip_icc():format(webp)/porch-paint-color-ideas-PhotobyHectorManuelSanchezDesignbyLaurenConnerInteriors-e1976a10ee8146adbacbeccad73119a2.png)
:max_bytes(150000):strip_icc():format(webp)/porch-paint-color-ideas-PhotocoSuzyBroome-075f1ea945a8499998410bb75dacab7f.jpg)
:max_bytes(150000):strip_icc():format(webp)/porch-paint-color-ideas-PhotocoEdenHouseCo.-4b6782a5757d430a8253606b1cda559e.jpg)
:max_bytes(150000):strip_icc():format(webp)/porch-paint-color-ideas-PhotobyJannaAllbrittonforYellowPrairieINteriors-46afd812f856445dbf9a58f6c344fa8a.jpg)
:max_bytes(150000):strip_icc():format(webp)/porch-paint-color-ideas-PhotobyGloriaMcMahon-156a2249b8fe48a3ad9b09a0646ee5e1.jpeg)