Maintaining a beautiful lawn in Southern California can be a challenging task due to the hot and dry climate, but with proper lawn care tips, it is possible to have a lush and healthy lawn all year round.
Here are some lawn care tips that can help you achieve a beautiful lawn in Southern California:
Choose the right grass type: Choosing the right type of grass is essential for maintaining a beautiful lawn in Southern California. Warm-season grasses such as Bermuda, St. Augustine, and Zoysia are well-suited to the region’s hot and dry climate.
Water deeply and infrequently: In Southern California, it is important to water your lawn deeply and infrequently rather than frequently and shallowly. Deep watering encourages roots to grow deeper, which helps the grass to withstand drought conditions. It is recommended to water the lawn two to three times a week during the hot summer months, depending on the grass type.
Mow regularly: Mowing your lawn regularly helps to keep it healthy and looking its best. The height of the grass should be adjusted according to the grass type. For example, Bermuda grass should be cut at a height of 1 to 1.5 inches, while St. Augustine grass should be cut at a height of 2 to 3 inches.
Fertilize regularly: Fertilizing your lawn regularly can help to promote healthy growth and improve its overall appearance. It is recommended to fertilize warm-season grasses during the spring and summer months, and cool-season grasses during the fall and winter months.
Control weeds: Weeds can be a nuisance in any lawn, but they can be particularly problematic in Southern California. It is important to control weeds as soon as they appear to prevent them from spreading. Hand weeding or using herbicides can be effective in controlling weeds.
Aerate the soil: Aeration is the process of creating small holes in the soil to allow air, water, and nutrients to penetrate the roots of the grass. Aeration is especially important in areas with heavy foot traffic or compacted soil. It is recommended to aerate your lawn at least once a year.
Use mulch: Mulching can help to conserve water and improve the overall health of your lawn. Mulch helps to retain moisture in the soil, which reduces the need for watering. It also helps to regulate soil temperature and provides nutrients to the soil as it breaks down.
We’ve been fantasizing about it for months, and finally warmer weather has arrived. We know: You just want to fire up the grill and start working on your tan—we do, too! But before you can kick back in your hammock (or in your pool on your giant patriotic bald eagle float, if that’s your thing), there are a few tasks you’ll need to tackle.
And you can bet they’re all outside.
“The old adage ‘April showers bring May flowers’ rings true and makes May prime time for landscaping and lawn care in most of the country,” says Missy Henriksen, vice president of public affairs for the National Association of Landscape Professionals.
But it goes beyond gardening and yard work. Now’s the last chance to take care of all that winter wear and tear and transform your home’s outdoor space into something worthy of the host with the most.
The good news? We’re here to make it as quick and easy on you as possible—with our handy checklist of home maintenance chores, you can knock them out and get back to that pool float ASAP. We’ve provided tips for doing each task faster and easier—or with the help of a pro.
Inspect patios and walkways
Task: Freezing temperatures can wreak havoc on hardscape surfaces made of loose (unmortared) brick, stone, and concrete paving materials. Check to see if frost heave and erosion have caused pavers to shift, rise, or sink. You’ll want to fix any unevenness for safety as well as aesthetic reasons.
Shortcuts: Repair hardscape surfaces using a wheelbarrow filled with playground sand and a sturdy trowel. Pry up displaced pavers, smooth and even out the bed with fresh sand, and replace the paver.
Call in the pros: This is a good job for a handyman. Expect to pay $30 to $60 an hour, depending on your location.
Feed your lawn
Task: After a wet spring, your lawn might be looking quite rich and lush. Since Mother Nature did the hard work, you can sit back and relax, right? Not so fast. Grass loves nutrients, so now’s the time to add high-nitrogen fertilizer to help suppress weeds and keep your lawn looking great all summer.
Shortcuts: A push-powered broadcast spreader makes quick work of fertilizing your lawn. You’ll find spreaders suitable for an average suburban lawn for $35 to $100. If you have a cooking compost pile, you can substitute home-grown compost for commercial fertilizers.
Call in the pros: A lawn care company will spray on a chemical fertilizer for about $40 an application.
Repair fences and gates
Task: Cycles of cold and wet weather cause wood to move, twist, and warp. That can make garden gates fall out of alignment, and can cause fence pickets to loosen or fall off. Check for signs of loose fencing, and fix sagging gates.
Shortcuts: A cordless battery-powered nail gun ($250) makes quick work of refastening pickets and fence supports. Use only galvanized nails for outdoor work. Use a power drill fitted with a screw tip or a hex driver to remove or tighten loose screws and bolts in gates.
Call in the pros: This is a good job for a handyman. You’ll pay $30 to $60 an hour, depending on your location.
Mulch flower and vegetable beds
Task: Prevent evaporation and help keep weeds in check by insulating planting beds with 2 to 4 inches of mulch.
Shortcuts: Set aside a mulching day, and have a landscaping service deliver bulk mulch and dump it where you can get to it easily (like your driveway). Plan on 1 cubic yard of mulch to cover 100 square feet, with mulch 3 inches deep.
Call in the pros: A landscaping service will put in the mulch, but it’ll cost you—to the tune of $300 to $600 for 500 square feet, depending on your location.
Shortcuts: Have a partner clean the outside while you do the inside of the same window. That way, you can identify which side of the glass contains lingering streaks and smudges, and get rid of them on the spot. Plus, who wants to clean alone?
Call in the pros: In addition to cleaning the glass, a professional window washer will remove and clean screens and remove accumulated dirt from sliding tracks for $2 to $7 per window.
Service your grill
Task: Nobody wants a rack of ribs with last year’s grill gunk on them. Before you fire up the ol’ barbecue, make sure your grill is clean and that any gas hoses and connections are secure.
Shortcuts: No matter what kind of grill you have, invest in a grill brush or other coarse cleaning brush, remove the grates and metal plates beneath them, and soak them in hot soapy water for five to 10 minutes. Then scrub hard. To rinse, spray them with the hose.
Cover the area where the grates usually go with foil, and use a stiff grill brush to clean grime from the hood and inside walls. Use a cleaner specifically designed for your grill’s surface (e.g., stainless steel, porcelain, or cast iron), and reassemble all parts.
Call in the pros: There are professional grill cleaners who will take your barbecue from slimy to spotless, but it will cost you the equivalent of a few porterhouse steaks. This Denver cleaning service offers quotes from $185 to $279.
Check your AC
Task: Now’s your last chance to double-check your air-conditioning unit and make sure it’s in good working order before the mercury starts to rise.
Shortcuts: Hook up a garden hose and spray the outside of the condenser to remove any dust that’s settled on the unit and connections. (Yes, dust can affect your AC’s effectiveness.) Don’t use a brush, and be careful if pressure washing—you could damage or bend the fins. Make sure to change the filter, too.
Call in the pros: Having a pro service your AC system costs a few hundred dollars and includes cleaning the condenser and lubricating the fan motor.
Apr 15, 2024
In the spirit of tax day today, we’re posting this handy infographic guide to print and pin-up by your desk. This guide helps you determine what tax records to save, how long to store them, and the best ways to keep your records secure. To start 2024 off on a good foot, follow this guide to help you organize and store your tax files properly for years to come.
If you need to securely shred your outdated tax documents, we’re hosting a free paper shred event this month! See details here: Free Paper Shred Event
While it may be easy to track down smells coming from your garbage can or garbage disposal, other smells require a keener nose.
In order to help you find all of the bad smells in your home, here are some common smells and where you can find the source:
Rotten Eggs
The smell of sulfur or rotten eggs is never a good sign. You either have some old eggs sitting around from a couple Easters ago, or you have a serious gas leak or electrical problem.
The two most common sources for rotten egg smell in the home are electrical components (inside of outlets for example) or a natural gas leak.
Natural gas manufacturers are required to add a chemical, called mercaptan, to their gas in order to make it easier to detect a leak. Without this additive, you wouldn’t be able to see, smell, or taste natural gas (much like carbon monoxide).
If you smell rotten eggs in the home, call the gas company to make sure you don’t have a gas leak.
If there is no gas leak in the home, you may have a problem with your electrical system. If you smell the rotten egg smell near an outlet, that’s probably where it is coming from. When the plastic components behind your outlet plate burn, it can smell like rotten eggs. This smell indicates that there is a dangerous arcing situation happening within the interior of your outlet that could cause a home fire.
We recommend turning off power at the circuit breaker to cut off electricity to the room with the smelling outlet.
One other possible cause of a rotten egg smell in your home is when you run the hot water. You may experience a rotten egg smell when the hot water is running due to an old anode rod.
Anode rods in hot water heaters should be replaced every 5 years or so. Replacing your anode rod will reduce corrosion in your water heater and may even be able to double its lifespan.
Call your local plumber to find out which kind of anode you should replace your old one with.
Sewage Smell
If you smell raw sewage in your home, you may have a dried out P-trap. The P-trap is the little curved section of piping that helps create a seal from the sewer gas that lurks behind it. The only problem is that the curved “P” section needs to be filled with water in order to create the necessary blockage.
If you haven’t used one or more of your sinks in a while the water that normally creates a seal in the “P” section has evaporated and dried out.
In order to prevent sewer gases from rising up through your pipes and into your home, it’s important to run water in all of your drains periodically. If you have a sink in your garage or another part of the home that rarely gets use, make sure you run the water in those sinks at least once a month to refresh the water in the P-trap.
If running water in your sinks doesn’t solve the problems, you may have a more serious plumbing problem. Speak with a professional plumber to discuss your options.
Fish Smell
Something smells fishy… and it’s not fish. Well, likely not. If you smell fish with no fish in sight, you could have an overheating electrical component somewhere.
Sometimes, burning plastic, wiring, and other electrical components smell like rotten eggs or sulfur to some people. Other people notice a distinctive fishy smell. Whether you get a whiff of fish or rotten eggs, it’s important to investigate the situation. You may have a dangerous arcing situation behind one of your outlets or switches that can cause a house fire.
Again, if you can locate the electrical source of the smell and It seems to be coming from one of your outlets or switches, turn off power at the breaker box and call an electrician right away!
Stale Air
If you frequently pick up a stale smell in your home, it may be because of air leaks around the home. Recessed lights that are often connected to the attic are notoriously leaky. If you notice the stale air smell around any of your recessed lights, you will have to go into the attic to seal the air leak.
Read our Attic Insulation Guide for tips on sealing your recessed lights, flue, and other common leaky areas in your attic.
If you detect any of these odors in your home, make sure it isn’t a serious electrical or natural gas problem. Sulfur, “rotten egg” smells are a big warning sign. For help dealing with odors in your home, contact experts in plumbing, heating, cooling and/or electrical.
CA Real Estate Group works with trusted experts in all fields. Contact one of our agents for a referral anytime!
Valentine’s Day is a great day to show your appreciation for the one you love. Often, it’s through greeting cards, romantic dates, flowers, and gifts. But for some couples, the key to a loved one’s heart just might be in a few framed wedding photos around your home or a new fireplace for a cozy night. And better yet, your Valentine home improvement projects can be enjoyed for years rather than just a few moments or days. Start now on these home improvement projects to show you care for Valentine’s Day.
Add a couple rocking chairs to your porch: Whether you have space on your front porch or out back, make your outdoor areas more couple friendly with a pair of chairs you can enjoy together.
Update your lighting: Swap out harsh lighting for something softer and more flattering. Install dimmer switches to set the mood, update outdated fixtures with a new, more romantic design, and put in new bulbs with softer light.
Install a wine fridge: Love to share wine together? Enjoy an even better experience with a new wine fridge for your kitchen.
Hang an outdoor swing: Get ready for the spring and summer seasons with a cozy outdoor swing or hammock that you can enjoy together.
Frame your bathroom mirror: Update the look of your bathroom quickly — and remind your loved one of your hard work and caring in completing this projct every morning when they look in the mirror. Reveal your finished project with a love note on the mirror.
Organize kitchen cabinets: It hardly sounds romantic, but ask any harried home chef with messy cabinets, and they’ll tell you this gesture would win their hearts over. Invest in organizational tools such as divided storage, hangers, and even drawers for cabinets, and wow your loved one with kitchen storage they’ll enjoy using.
Build a piece of furniture: Nothing says love more than spending the time to create a quality handcrafted piece of furniture made with the recipient in mind. Build a bookshelf for a book lover, a jewelry hanger, or even a practical storage solution for your entryway.
Hang photos on your walls: Chances are, you have plenty of photos of you and your significant other together. But do you have them framed and hung in a place of honor? Show your loved one that you care and cherish your relationship by taking the time to print, frame, and hang photos of them or the both of you together on your walls at home. Need ideas? Look for photos from your wedding day, honeymoon, favorite vacation, or early days in your relationship to make them (and you) feel nostalgic.
Upgrade bath fixtures: Turn your master bathroom into a more romantic haven with updated fixtures. Add a new fixture for faucets and put in new fixtures in your shower and tub for a new, more inviting look. Then plan a big reveal with a bubble bath.
Plant a flower garden: Cut flowers are a nice gesture, but in the right climate, a garden of flowers that will last for weeks or months is a more enduring reminder of your love. Or, plant rose bushes for something more permanent. Plus, you can select flowers from your garden or rose bush for a home made bouquet.
Buy new bedding: Refresh your bedroom and make your bed more enticing with fresh, new sheets. Take it a step further with a new bedspread or even a new headboard.
Put in a fireplace: Nothing says cozy and romantic like a fireplace at home. But even if your home doesn’t already have one, it is possible to get one installed. Freestanding units can be purchased and enjoyed within moments, and local installers can add one to your home as well. Rather take it outside? An outdoor fire pit is romantic, too.
Carve out a ladies’ retreat or man cave: Have a space in your home that you’re not really using? Clear out the junk and make it a place for your loved one to enjoy instead. Add furniture and touches that you know they’ll enjoy, such as wall paint in their favorite color, or the perfect storage solution for their favorite collection.
Just fix it: Practically every couple has a project or two on their honey do list that gets overlooked. Think about the project that your loved one has been wanting to see done and make it happen.
Dustin Hadley @that40yearguy is floored that this common household item (not baking soda) can erase fridge stink! You need to try this!! Check out the comments at what others are sharing! 🤯 WATCH HERE
Living in a country with a tropical climate such as the Philippines is the dream vacation or even retirement plan for many people across different countries all over the globe. For one, we never have to thaw ice from snow build-ups nor wear over 3 layers of clothing. However, tropical climate comes with its share of mishaps such as low-pressure areas and typhoons that bring with them strong winds, rain, and chances of flash floods that can last for days at a time.
This can happen at any time but is more common during the rainy season, which is usually from June till October. The good news is, there are ways to possibly spare your home from the dangers of flash floods or at least make preparations sturdy enough to prevent any major damages. As the famous saying goes, it is better to be safe than sorry. It is a known fact that even the sturdiest homes can suffer from cracks and leakages despite being built with good quality materials. This regular wear and tear are inevitable and worth maintaining to avoid much bigger problems in the future. After all, our home is an extension of ourselves and should be maintained regularly.
In this article, we will tackle a few home maintenance tips, just in time for this year’s rainy season.
1. Inspect those roofs and gutters
It is a fact that our roof is the first line of defense from strong winds and heavy rains, so even if there is not much impact on the home’s overall feel, it plays a big role in keeping you and everyone else in your home safe.
The gutters also play an important part in draining the water and shielding us from great inconveniences brought about by natural disasters. If one of our gutters breaks, then the house would most likely experience flooding in some areas.
A month before the rainy season begins is the perfect time to check for any holes or cracks in the roof and gutters. Be sure to reseal everything and avoid any downpipe clogs. Make sure you do this inspection yearly to avoid any further damage caused by future typhoons.
2. Inspect your electrical systems
From the sockets to the wires, to the main switches, check all your electrical systems. This will help you create an extra layer of safety in your home, especially from unwanted water leaks which could lead to accidental fires.
If you do not know how to do it yourself, don’t fret! Not everyone does. It is best to hire an electrician to do the inspection at least twice a year. Just like your roofing and plumbing, these may not be aesthetic fixes, but instead, they are practical fixes that can save you a lot of money.
3. Be wary of pests, mosquitos, and the dangers they come with
The World Health Organization has declared over 169,000 dengue virus cases in 2015. Although those numbers are significantly lower now, the fact remains that this is due to mosquitoes that breed in murky and stagnant water in our homes, and most of the time, this happens during the rainy season whether we are aware of it or not.
It is best to keep our whole home free from stagnant waters and puddles that may form in different areas of our home during the rainy season, especially outdoors. These attract bugs and become ideal environments for mosquitoes to breed. It is best to be mindful of these and keep our family safe by cleaning the entire garden, swimming pools, aquariums or fish ponds after a few days of consistent rainfall.
4. Update your storage solutions
If possible, elevate your furniture and electrical appliances, especially if your home has a basement or lower floor, or if your house is not elevated. This is for the purpose of sudden flash floods.
If you are still in the process of designing your dream home, find heavy, sturdy, and waterproof storage solutions that will protect your most valuable belongings from getting wet or destroyed in case of rain or strong winds getting inside the house through a leak on the roof or flooding like our marbled boxes. Always choose sturdy furniture made of high-quality materials like metal, stone, wood, or marble that would more likely outlast a flood, and come out with no health risks like mold infestation unlike upholstered furniture.
We deserve to feel safe, no matter the seasons or weather conditions, and there should be no place on earth that would make you feel safer than your own home and personal sanctuary.
You probably already have a home maintenance checklist: Replace the furnace filter each season, shut off water spigots before winter, clean the gutters, etc. That’s a good start, but there are jobs that homeowners often forget about, or don’t even know about. Here are some important home maintenance items that may not be on your list-items that may cause a big headache, or worse, cost you big money if you neglect them.
FAMILY HANDYMAN
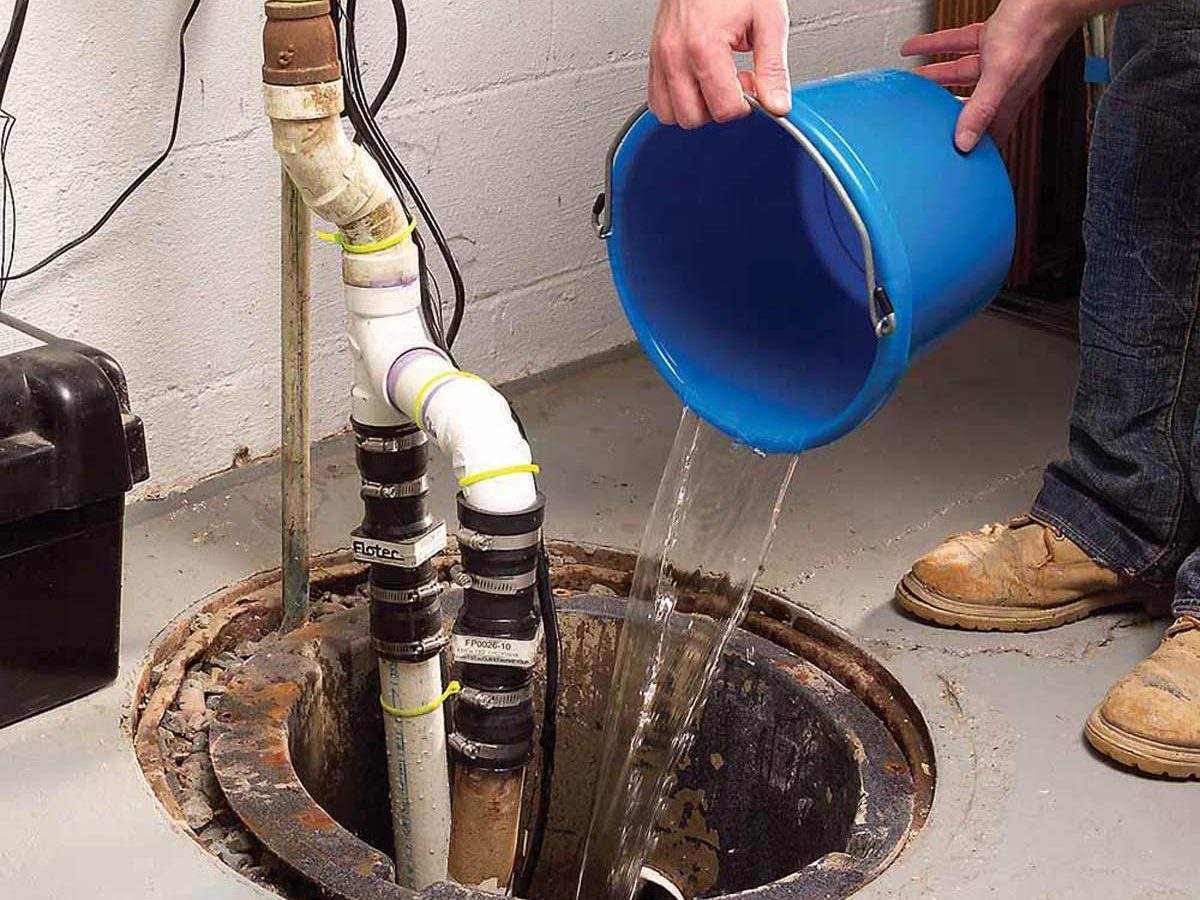
Test the Sump Pump or Risk a Flood
It’s easy to forget about your sump pump, but it’s important to make sure it’s in good working order. If you don’t, you could end up like the homeowner who returned from a weekend trip to discover his entire basement floor covered in 1/2 in. of water. After shutting down the power, he waded over to the sump pump and noticed it wasn’t working. Upon closer inspection, he realized that the cable attached to the float must have gotten tangled somehow. It took him two seconds to untangle the cable, and then he spent the next 15 hours dragging out waterlogged carpet, running the wet/dry vac and moving fans around. To avoid a similar disaster, be sure your pump has a vertical float switch. Also, check your pump at least a couple times a year by dumping water into the basin to make sure everything is working properly.
FAMILY HANDYMAN
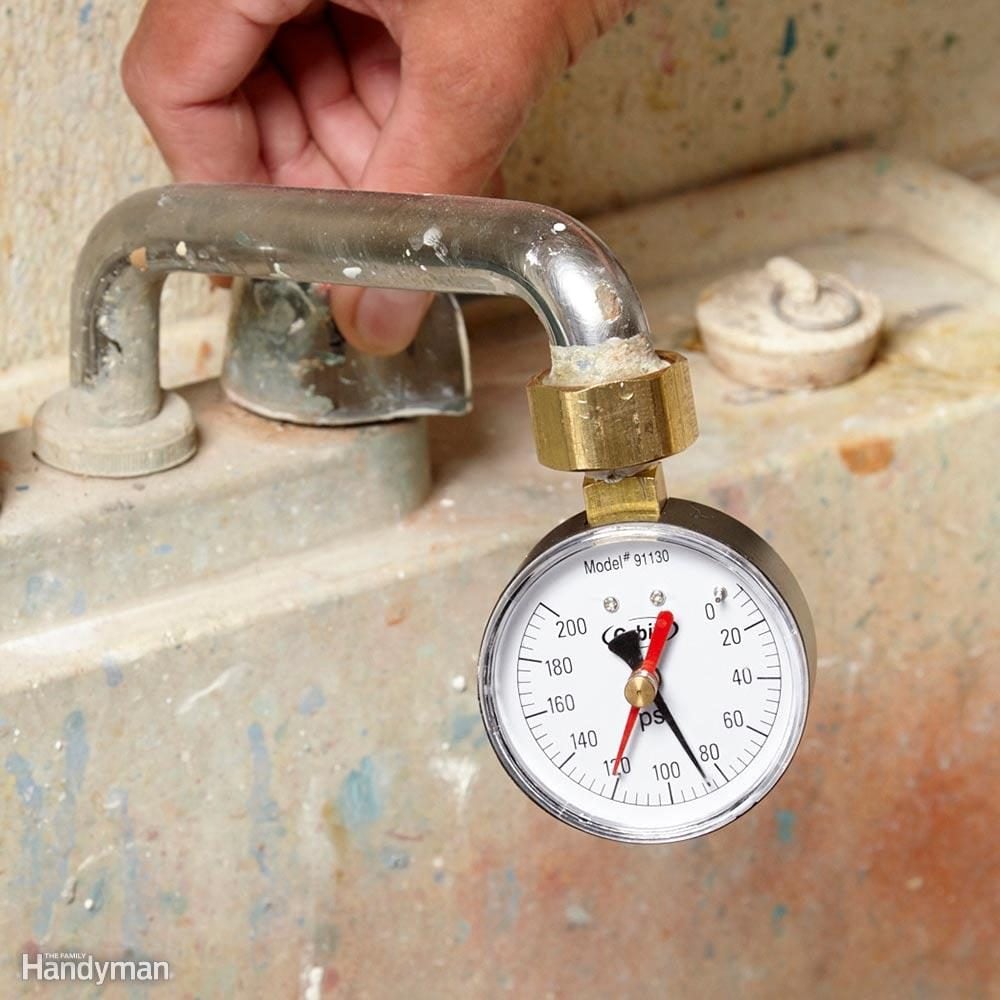
Check for High Water Pressure or Wreck Fixtures and Appliances
A technician was assisting a water softener installer who was replacing a fairly new softener because the first one had ruptured and filled the pipes with little zeolite beads.
The installer didn’t seem too worried about why the first one failed, but the assistant did a little investigating. A water pressure test gave a reading of more than 110 lbs. psi. The culprit was the 20-year-old pressure-reducing valve. After a new valve was installed, the pressure went down to about 75 lbs. Pressure-reducing valves are usually found near the main water shutoff valve, but not all homes have them. It depends on your municipality.
High water pressure can harm pipes, connections, and appliances. It also creates water hammer and waste massive amounts of water. Checking for high water pressure is an often overlooked maintenance item, and one that’s easy enough to perform. A new pressure-reducing valve and a simple pressure gauge like this one that hooks up to a spigot or laundry tub faucet are both available at home centers.
FAMILY HANDYMAN
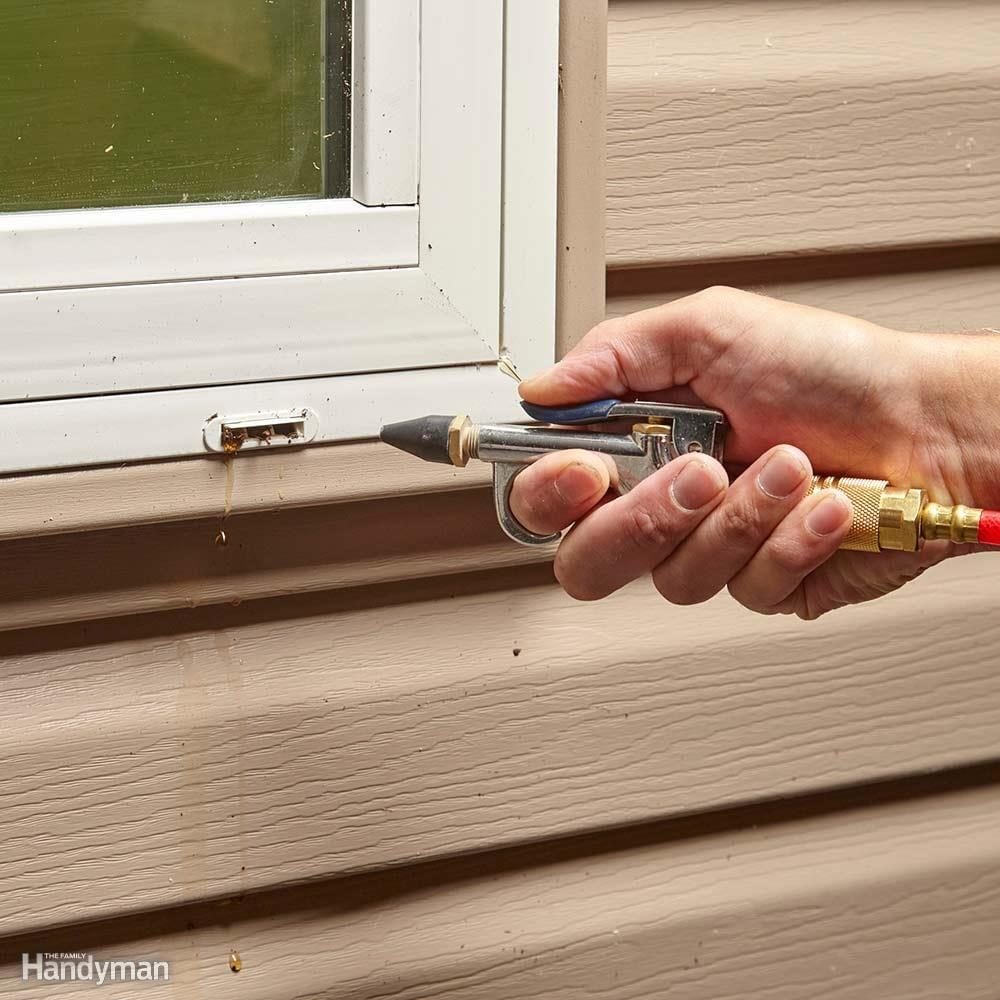
Clean Window Weep Holes or Invite Rainwater Into Your House
Many sliding windows and vinyl replacement windows have weep holes on the exterior bottom of the frame. These holes are designed to drain away rainwater that can collect in the frame’s bottom channel. Weep holes can get plugged with bugs and debris, and if that happens, water could fill up the channel and spill over into your house.
To see if your weep system is working, simply pour a glass of water into the track or spray the outside of the window with a garden hose. If you don’t see a steady stream of clean water exiting the weep hole, poke a wire hanger into the hole, or spray it out with compressed air, and wet it down again. If the little flapper (designed to keep out driving wind) is stuck shut, it can be removed with a putty knife and replaced.
Are you wondering when to replace everything in your home? Check out our list to find out how often you should replace things in your home.
FAMILY HANDYMAN
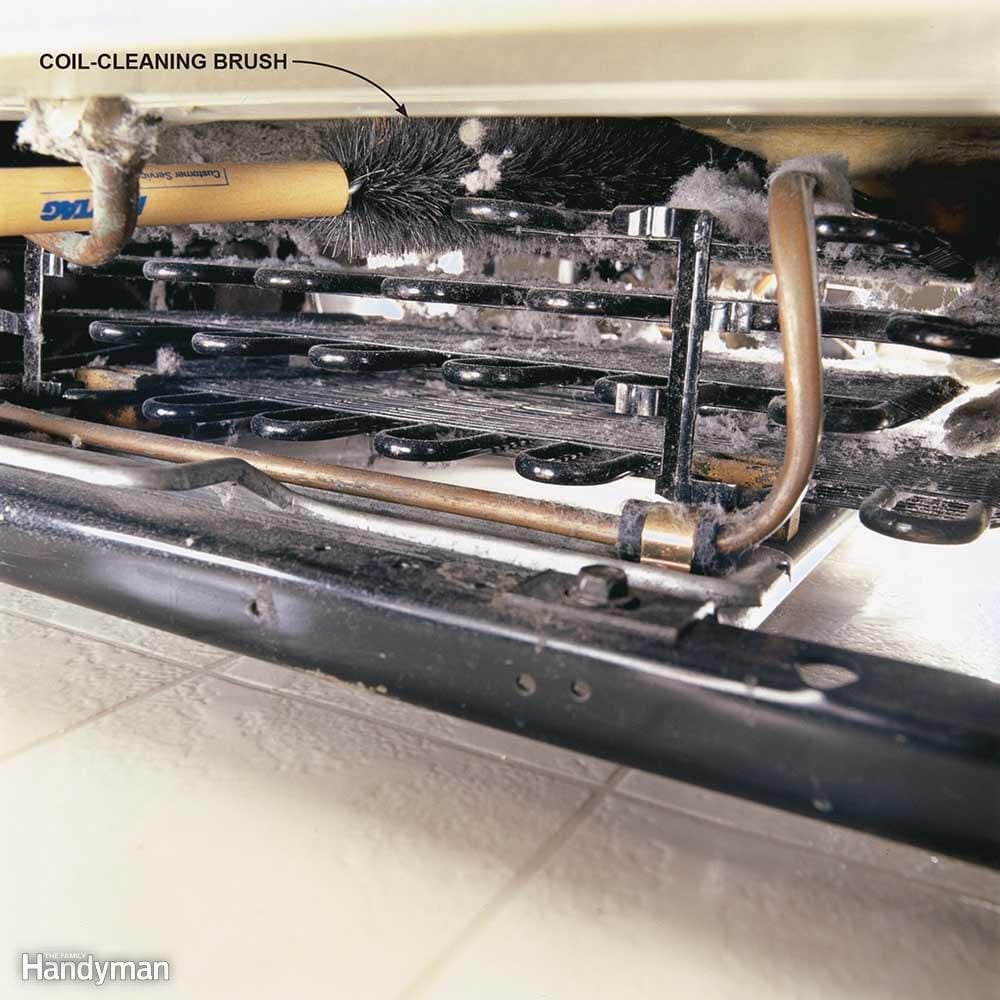
Clean Refrigerator Coils or Pay Unnecessary Repair Bills
Refrigerator condenser coils are located on the back of the fridge or across the bottom. When coils are clogged with dust, pet hair and cobwebs, they can’t efficiently release heat. The result is your compressor works harder and longer than it was designed to, using more energy and shortening the life of your fridge. Clean the coils with a coil-cleaning brush and vacuum. A coil-cleaning brush, which is bendable to fit in tight areas, does a thorough job. Look for one online or at appliance stores. For tips on repairing your refrigerator (without a service call), check out our guide.
FAMILY HANDYMAN
Keep Window Wells Clean or Risk a Broken Window and Wet Basement
If you’ve never had a problem with water in a window well, you may never think to clean it out. Here’s what happened to one homeowner who neglected his window wells. After an average rainfall, not even a heavy downpour, a clogged gutter dumped a lot of water next to his house and into his window well. The leaves in the well acted like a pool liner, preventing drainage, and the water level rose higher and higher until the pressure broke the basement windows. Gallons and gallons of water poured into the basement, ruining everything in sight. Unfortunately, he had no insurance coverage for that type of flood. Don’t let this happen to you. Keep window wells clean with a cover, available at home centers.
FAMILY HANDYMAN
Drain Sediment From Your Water Heater or Expect a Shortened Life Span
A distraught homeowner called a plumber because her water heater wasn’t heating, and furthermore, it was leaking. Right away, the plumber asked if the homeowner had been draining some of the water from it every year. The puzzled homeowner said, ‘No. Why?’ It turns out that sediment will collect at the bottom of the tank. This creates hot spots on gas-powered heaters that can damage the tank and cause premature failure. On an electric water heater, sediment buildup can cause the lower heating element to fail. So, occasionally draining a water heater will lower energy bills and extend its life. We recommend draining water heaters at least once a year.
FAMILY HANDYMAN
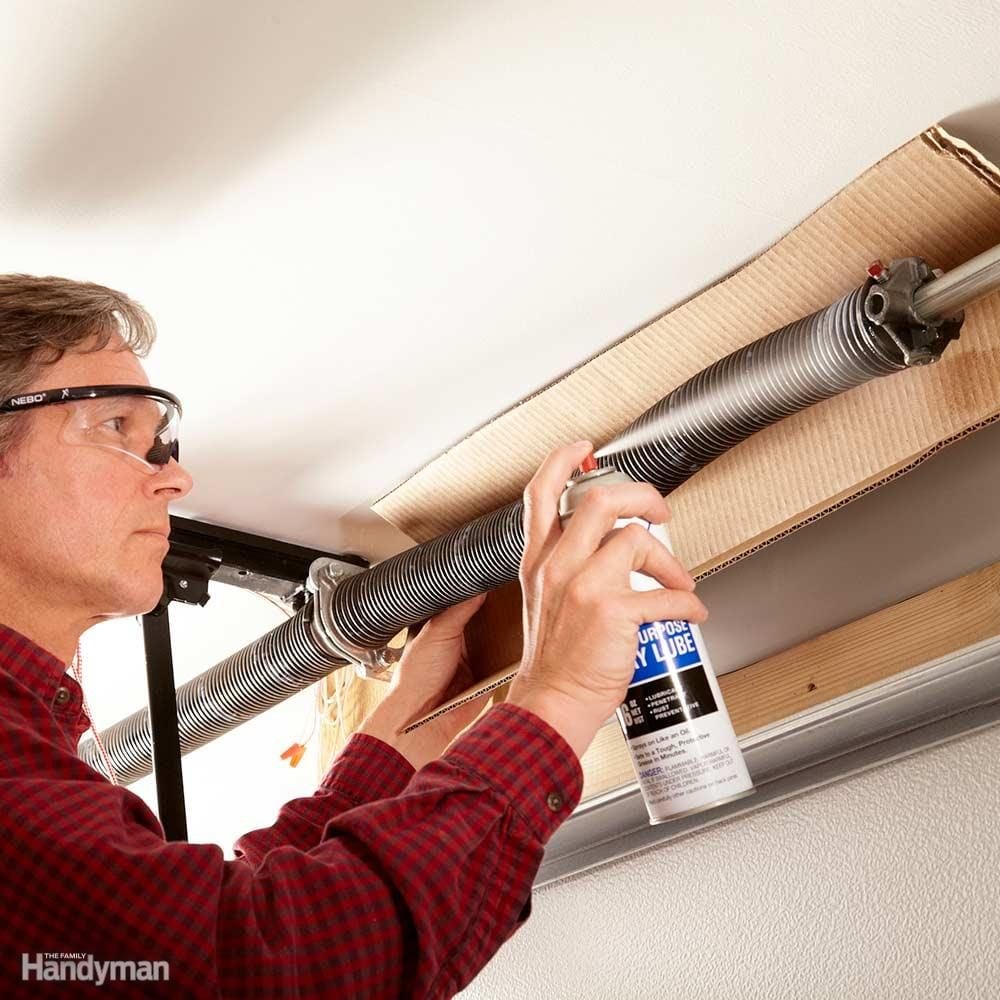
Lube Garage Door Springs or Replace Them Sooner Rather Than Later
Coat the overhead torsion springs mounted above roller tracks with a garage door lubricant. All springs will eventually break because of metal fatigue and/or corrosion, but lubing them at least once a year will make them last longer. Spraying can be messy; it’s smart to protect the wall behind the spring with a piece of cardboard. Garage door lubricant is available at home centers. Lube the rollers, hinges and track while you’re at it. Learn more garage door maintenance tips.
FAMILY HANDYMAN
Check for Mice Nests or Risk Damaged Equipment
Mice love to winter in enclosed places like engine compartments, window A/C units and lawn tractor nooks and crannies. If a vehicle or piece of equipment has been sitting unused for a while, check for mice nests before you start it up. The last thing you want to do is take out your boat and discover that you have little furry stowaways that have chewed through half the wires. Mice nests can also cause electronics to overheat and can get sucked into and clog carburetors.
FAMILY HANDYMAN
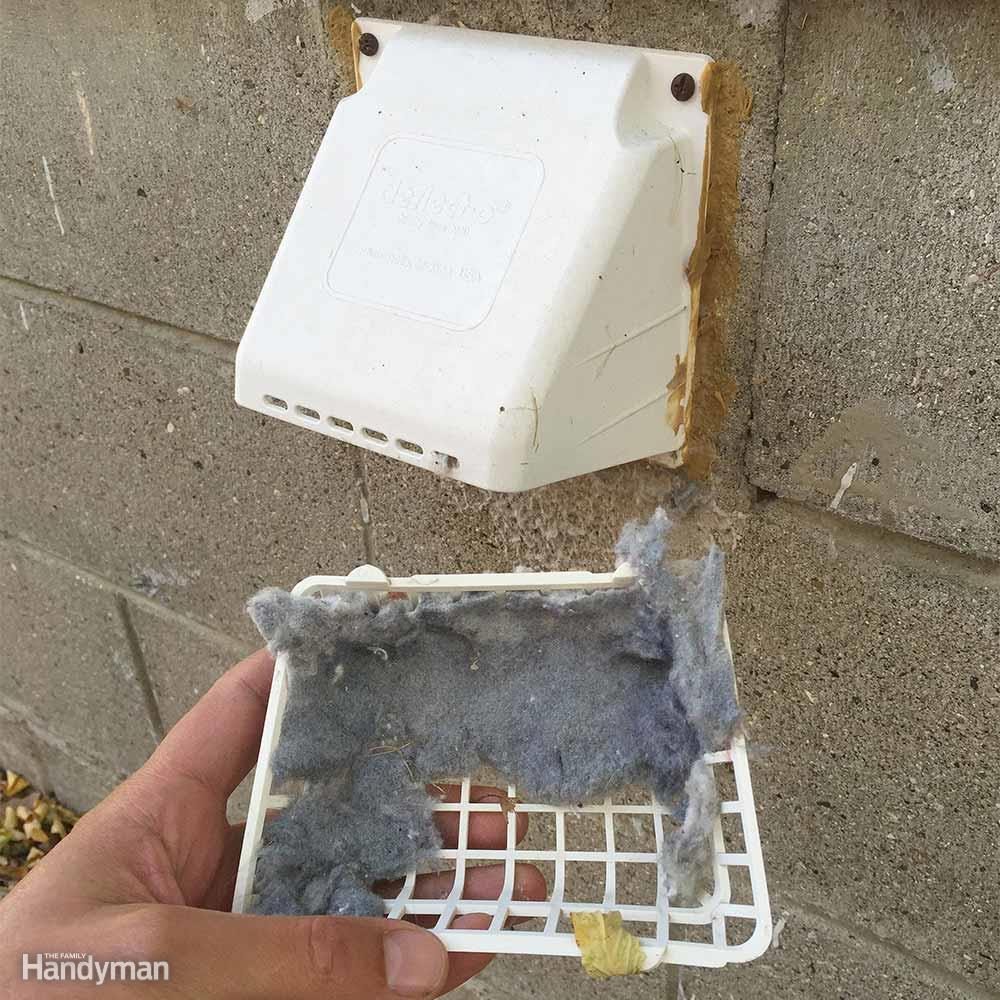
Clean Dryer Vents or Waste Energy and Risk a Fire
A plugged dryer vent will cause your dryer to run inefficiently, and that’s bad. A plugged dryer vent could also cause a house fire, and that could be deadly! Dryers that are centrally located in houses are most prone to plugging because of the longer ducts. Excess lint is only one reason ducts get clogged; nesting pests and stuck exhaust hood flappers can also cause backups. Stronger odors and longer dry times are two signs your vent is plugged. You’ll have to remove the vent from the back of the dryer to clean it. Suck debris from the ducts with a wet/dry vac, or ream them out with a cleaning kit that includes a brush on a long flexible rod that attaches to a power drill. The kits are available at home centers. If your ducts need replacing, get smooth metal ducts, which will stay cleaner longer than the rough corrugated surface of flexible ducts. Avoid plastic ducting altogether; it can be a fire hazard. Plus: Slash Heating Bills
FAMILY HANDYMAN
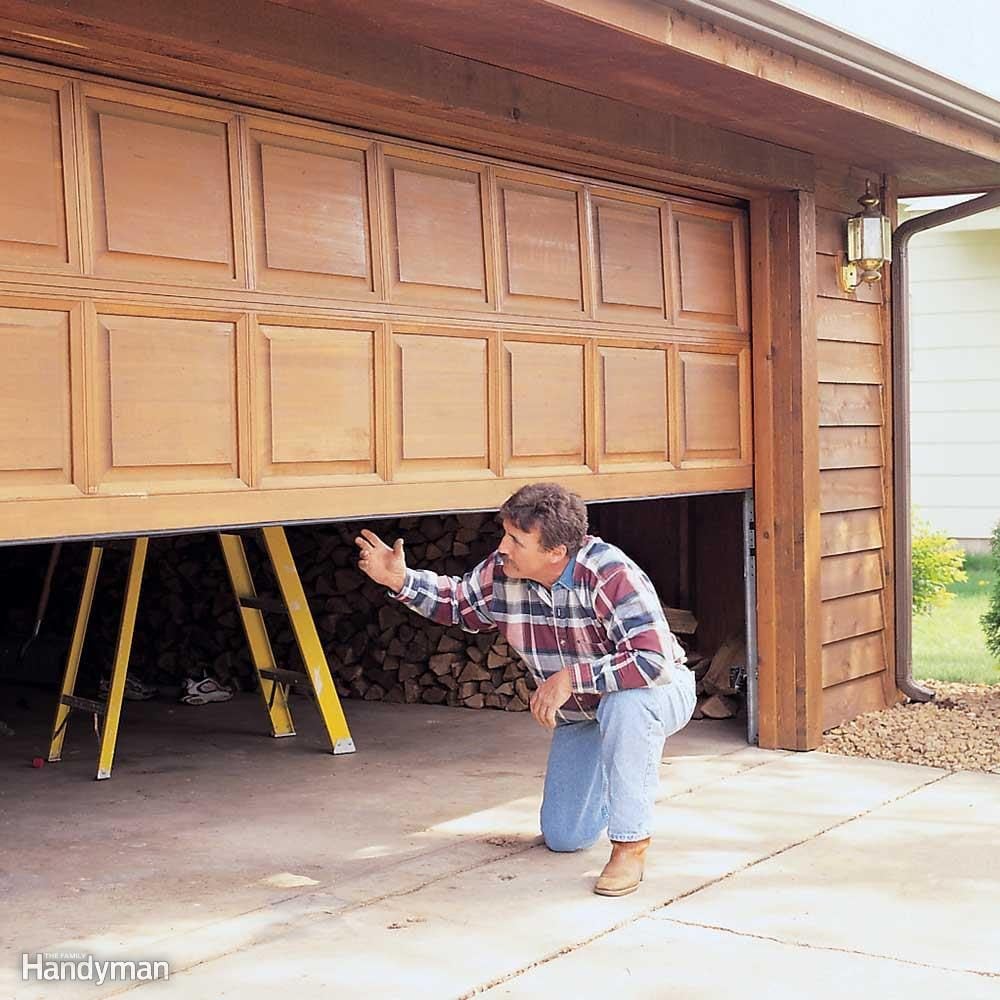
Check Garage Door Balance or Wreck Your Opener
A properly balanced door is less likely to injure someone or something and keeps the door opener from working too hard, which will shorten its life.
To check the balance on a door, close the door and then disengage the opener by pulling the opener release handle. Manually pull up the door about halfway and let go. A properly balanced door will stay in the halfway position by itself. If it falls, the tension needs to be increased. If the door rises, the door spring has too much tension, which means it’s working harder than it needs to.
Check the door a couple times a year. Adjusting the spring tension is tricky and dangerous. Call a garage door professional to perform the service, or see advanced garage door repairs.
Thanks!
Please fill out the form below and we will be contacting you shortly with information about your home.